

3.2.20. Elmeg IP290
Features

VoIP and Elmeg system telephony combined in this one device for standard workstations: Easy of use with 3 softkeys, alphanumeric display and 5 freely programmable function keys, some with dual color LEDs. Optimal readability of the display thanks to the adjustable base. Ideal for frequent phone users; a dedicated jack for using headsets is already installed.
Ringing-LED
Useful in loud environments: Each call is indicated acoustically by a particularly powerful speaker and also optically by a bright ringing LED.
System Highlights
User Interface
This is based on the familiar and proven Elmeg system telephony menu navigation. The buttons are large and easy to press, the function keys are with luminous glass fibers integrated into the key bodies for even more transparency. Dual color LEDs are assigned to two of these function keys. This is to indicate the status at both function levels.
Headsets
It is recommended to use Plantronics products with connecting cables U10P-S and GN-Netcom.
Features
A detailed table listing all of the performance features is available on the Internet for downloading at Elmeg's official web site.
Installation
Notes:
Here is a quick step by step installation of Elmeg IP290:
Initialization
When you power up the hardphone it will boot up. When performing a first-time boot, the phone will perform a series of configuration steps in order to set up the phone. The first setting that you might want to change is the language. The default language is English. You can change the setting by using the arrow keys which are located on the two sides of the OK button (just below the LED). Choose the appropriate language with the arrows and press OK to activate your selection. The available languages are:
The next step will ask you if you want to acquire your network configuration through DHCP or you want to set them static. If you choose to enable DHCP support, the phone will request its network configuration every time from your DHCP server. Otherwise it will safe the static configuration.
Setting static IP address and network mask. You should configure the phone with a valid IP address which is free in your network. For example 10.0.2.2. The put a valid network mask (such as 255.0.0.0).
Setting Gateway and DNS server. Set IP addresses of the according servers via the numpad and press OK to submit your configuration.
Setting Tone Scheme and the Timezone. When you select the appropriate configuration setting press OK to submit your configuration.
The rest of the configuration settings will be made via your web browser.
Account Configuration
Prerequisitives
Before going further reading this tutorial make sure you have asterisk server and you are familiar with adding users to asterisk. If you are not aware of this issue you can read the tutorial explaining how to add new users to asterisk.
Elmeg IP290 is working with the SIP (Session Initiation Protocol). You will have to create a SIP user. Open /etc/asterisk/sip.conf and add the user at the bottom at the file.
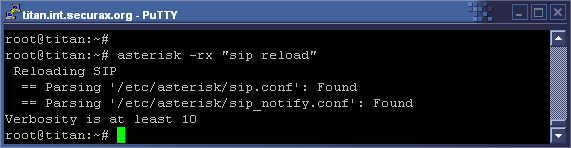
Then reload Asterisk's sip configuration by executing the command `asterisk -rx "sip reload"`.

At one point we will want to receive calls on our phone, that's why we have to create an extension for this. We will achieve this by adding extension `1001` in our default context in extensions.conf configuration file, located at /etc/asterisk
Account configuration
Start your web-browser and enter the hardphone's IP address. This will lead you to the configuration menus.
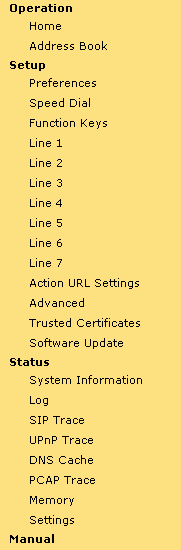
At your left you will see the navigation menu. Pick `Line 1` and the following configuration screen will be loaded in the right frame:
The most important tags that you must fill up in order to work with the hardphone are:
When you finish this stage, your phone should be ready for use. It is recommended to test it with other hardphone or softphone. We will perform a test with Idefisk softphone. We will dial 1001, and the Elmeg IP290 should ring.
If you meet some troubles with Asterisk configuration, you might want to check the configuration files used in this test:
General Settings
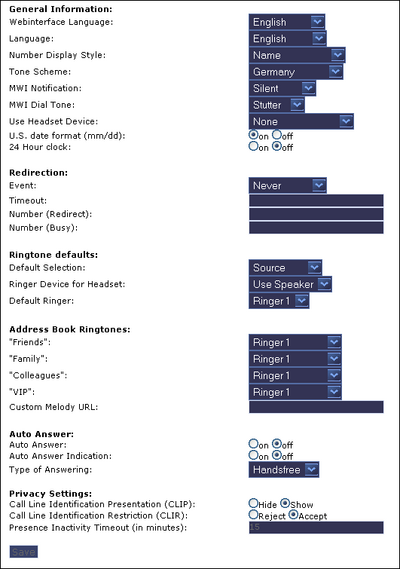
This page can be displayed by clicking on Preference in the Navigation Menu. From this configuration page you can modify several of options concerning languages (both web interface and the phone itself), tone schemes, date format, redirection options, ringtone options and auto answer settings. Here is a screenshot from the frame:
Most of the options are been set as drop down menus. When you finish with configuration remember to click on Save button in order to finalize the changes.
Speed dialing & Function Keys
The five programmable keys on Elmeg IP290 on the right beside the number block are the programmable function keys, which have the following options:
Each of these buttons has an LED indicating the status of the respective programmable key at any given time. Some features are common to all of these options:
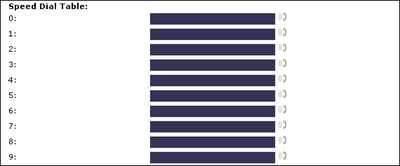
The Elmeg IP290 supports speed dial of up to 33 numbers. These are mapped onto the numbers 0-30, * and #. Dialing Speed dialing is initiated by simply typing in a number from 0-30, * or # respectively and confirming with the key. In this way, 33 speed dial numbers can be called up without having to look at the display. The speed dial numbers can be conveniently set up with the built-in web interface page of your phone:
Update
You may explicitly specify which software version you want to run on this phone. Just fill in the http URL that you want to use for the bootloader and/or the firmware. If you want to change only the firmware, leave the bootloader empty, if you want to change only the bootloader, leave the firmware empty. You should use only complete http URL (like http://snom.com/download/elmegIP290.bin). The phone will reboot after you press the load button.
Advanced Options
At this configuration page there are various of options. We will divide them into few groups for similarity.
Network Options - from this group of options you can modify the current network configuration. You can:
Web Interface Options - from this group of options you can configure the web interface of the IP290. You can:
Phone Behavior - from this group of options you can configure the phone's behavior in different situations as:
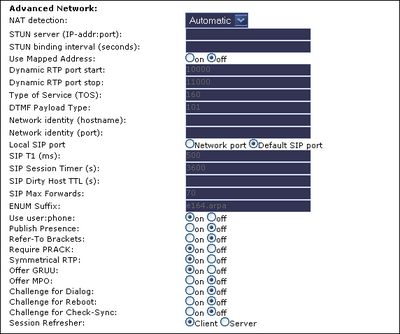
Advanced Network Options - from this group of options you can configure some VoIP related networking options as:
Update - from this group of options you can configure update preferences, such as Update Policy and Update Location (Setting URL)
Other Administrative options - from this group of options you can set some extra administrative settings as Debug settings (Syslog server) and Administrative authorization

Status and Information
You can receive status information from the web interface. It can be quite useful if you want to debug something or to trace a problem. The information has been divided into eight subsections:
System Information - from this page you can receive basic information for the phone. This includes:
Log - this page will inform you for any recent activities from the phone. Here is an example:
SIP Trace - this page is very similar to Asterisk's `sip debug` command. It will give you a detailed debug information for the SIP transmissions. Here is an example:
UPnP Trace - this page will allow you to trace any UPnP activities. Here is an example:
DNS Cache - this page will let you to monitor the DNS cache of the phone. Here is an example:
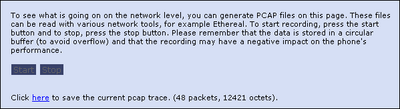
PCAP Trace - this very useful feature will enable the possibility to monitor the whole traffic that goes through the phone (or is been generated by the phone). When you are ready to start `sniffing` the traffic click on Start button. When you wish to end this operation, just click on Stop button. You can download the PCAP binary file by clicking on the here link. Here is a screenshot:
Memory - this page will give you a detailed memory statistic for the phone.
Settings - this page will show you the complete configuration (except the lines configuration) in text. You can view a sample by downloading this settings.txt.
VoIP and Elmeg system telephony combined in this one device for standard workstations: Easy of use with 3 softkeys, alphanumeric display and 5 freely programmable function keys, some with dual color LEDs. Optimal readability of the display thanks to the adjustable base. Ideal for frequent phone users; a dedicated jack for using headsets is already installed.
Ringing-LED
Useful in loud environments: Each call is indicated acoustically by a particularly powerful speaker and also optically by a bright ringing LED.
System Highlights
* System-internal alphanumeric telephone directory
* Transmission of text messages (UUS1, SMS)
* Programmable function keys
* Busy lamp panel with extension / line buttons
* Receiving announcements
* Announcement
* Voice mail button for external Voice
* Mail Systems
* Login key for team member-ship
* Headset button
* Automatic call pick-up function key (when using headset)
* Day/ night mode
* Team log-on/off
User Interface
This is based on the familiar and proven Elmeg system telephony menu navigation. The buttons are large and easy to press, the function keys are with luminous glass fibers integrated into the key bodies for even more transparency. Dual color LEDs are assigned to two of these function keys. This is to indicate the status at both function levels.
Headsets
It is recommended to use Plantronics products with connecting cables U10P-S and GN-Netcom.
Features
A detailed table listing all of the performance features is available on the Internet for downloading at Elmeg's official web site.
Installation
Notes:
a. The Elmeg IP290 should only be placed on even, horizontal surfaces that enable the rubber pads to ensure a secure grip. Do not place the Elmeg IP290 on carpets or other materials that contain fibers that could block the air vents and cause overheating.
b. Use the external power supply that is included in the package. Other power supplies may cause damage to the phone, affect the behavior or induce noise.
b. Use the external power supply that is included in the package. Other power supplies may cause damage to the phone, affect the behavior or induce noise.
Here is a quick step by step installation of Elmeg IP290:
1. Plug the one end of the handset's cable into the phone and the other into the handset itself.
2. Plug your Internet cable into the port with label 'Net'.
3. Power up the phone by plugging the power supply into the phone.
4. Plug your PC cable into the port with label 'PC'. Plug the other end into the Ethernet port of your PC. That way both the phone and your PC will be supplied with Internet without need of third device or second Internet line.
5. If you have headset plug it into the port with 'headset' image above it.
Note: Note that points 4 and 5 are optional.
Initialization
When you power up the hardphone it will boot up. When performing a first-time boot, the phone will perform a series of configuration steps in order to set up the phone. The first setting that you might want to change is the language. The default language is English. You can change the setting by using the arrow keys which are located on the two sides of the OK button (just below the LED). Choose the appropriate language with the arrows and press OK to activate your selection. The available languages are:
- English
- German
- French
- Spanish
- Italian
- Czech
- Dutch
- Polish
- Portuguese
- Slovak
- Finish
- Swedish
- Danish
- German
- French
- Spanish
- Italian
- Czech
- Dutch
- Polish
- Portuguese
- Slovak
- Finish
- Swedish
- Danish
The next step will ask you if you want to acquire your network configuration through DHCP or you want to set them static. If you choose to enable DHCP support, the phone will request its network configuration every time from your DHCP server. Otherwise it will safe the static configuration.
Setting static IP address and network mask. You should configure the phone with a valid IP address which is free in your network. For example 10.0.2.2. The put a valid network mask (such as 255.0.0.0).
Setting Gateway and DNS server. Set IP addresses of the according servers via the numpad and press OK to submit your configuration.
Setting Tone Scheme and the Timezone. When you select the appropriate configuration setting press OK to submit your configuration.
The rest of the configuration settings will be made via your web browser.
Account Configuration
Prerequisitives
Before going further reading this tutorial make sure you have asterisk server and you are familiar with adding users to asterisk. If you are not aware of this issue you can read the tutorial explaining how to add new users to asterisk.
Elmeg IP290 is working with the SIP (Session Initiation Protocol). You will have to create a SIP user. Open /etc/asterisk/sip.conf and add the user at the bottom at the file.
[mytest]
username=mytest
secret=mytest
type=friend
host=dynamic
context=default
username=mytest
secret=mytest
type=friend
host=dynamic
context=default
Then reload Asterisk's sip configuration by executing the command `asterisk -rx "sip reload"`.
At one point we will want to receive calls on our phone, that's why we have to create an extension for this. We will achieve this by adding extension `1001` in our default context in extensions.conf configuration file, located at /etc/asterisk
[default]
exten => 1001,1,Dial(SIP/mytest,20)
exten => 1001,n,HangUp()
Of course we will have to reload our asterisk extension configuration in order the changes to take effect. We can easily achieve this by typing `asterisk -rx "extensions reload"`exten => 1001,1,Dial(SIP/mytest,20)
exten => 1001,n,HangUp()
Account configuration
Start your web-browser and enter the hardphone's IP address. This will lead you to the configuration menus.
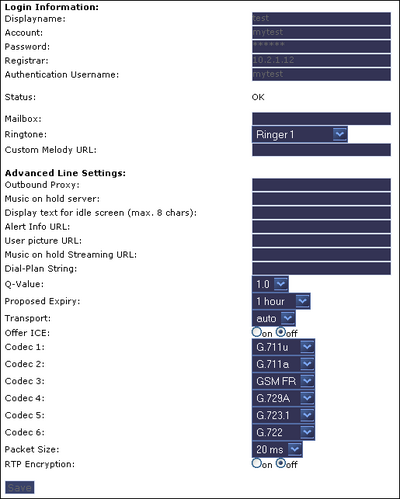
At your left you will see the navigation menu. Pick `Line 1` and the following configuration screen will be loaded in the right frame:

The most important tags that you must fill up in order to work with the hardphone are:
- Displayname - this string will be displayed as name of the phone /in our case `test`/
- Account - the name of the account /in our case `mytest`/
- Password - the secret of the SIP account /in our case `mytest`/
- Registar - the IP or domain name of the Asterisk server /in our case `10.2.1.12`/
- Authentication Username - the username that'll be used for authentication purposes /in our case `mytest`/
- Codecs - select the codecs that you to use. Elmeg IP290 supports the following codecs:
When you are ready click on Save button in order to submit the changes.- Account - the name of the account /in our case `mytest`/
- Password - the secret of the SIP account /in our case `mytest`/
- Registar - the IP or domain name of the Asterisk server /in our case `10.2.1.12`/
- Authentication Username - the username that'll be used for authentication purposes /in our case `mytest`/
- Codecs - select the codecs that you to use. Elmeg IP290 supports the following codecs:
G.711u
G.711a
GSM FR
G.729A
G.723.1
G.722
G.711a
GSM FR
G.729A
G.723.1
G.722
When you finish this stage, your phone should be ready for use. It is recommended to test it with other hardphone or softphone. We will perform a test with Idefisk softphone. We will dial 1001, and the Elmeg IP290 should ring.
If you meet some troubles with Asterisk configuration, you might want to check the configuration files used in this test:
General Settings
This page can be displayed by clicking on Preference in the Navigation Menu. From this configuration page you can modify several of options concerning languages (both web interface and the phone itself), tone schemes, date format, redirection options, ringtone options and auto answer settings. Here is a screenshot from the frame:
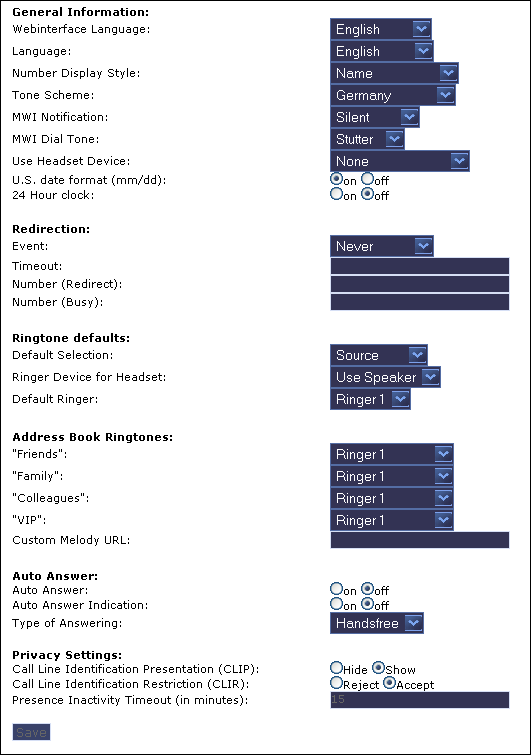
Most of the options are been set as drop down menus. When you finish with configuration remember to click on Save button in order to finalize the changes.
Speed dialing & Function Keys
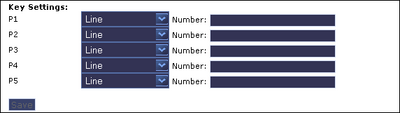
The five programmable keys on Elmeg IP290 on the right beside the number block are the programmable function keys, which have the following options:
- Line
- Destination
- Intercom
- Park Orbit
- Voice Recorder
- DTMF
- Destination
- Intercom
- Park Orbit
- Voice Recorder
- DTMF
Each of these buttons has an LED indicating the status of the respective programmable key at any given time. Some features are common to all of these options:
a. Pressing any button when its LED is blinking and the phone is ringing will receive the call.
b. Pressing the button when a call is in progress at that key, indicated by the constantly on LED, will put the call on hold.
c. Pressing any button while editing a number for dialing at that key will erase the number and the phone will go to idle state. Each of these different options will now be explained in detail.
You can edit associated functions by using the `Functions Keys` menu from the web interface. Here is a screenshot:b. Pressing the button when a call is in progress at that key, indicated by the constantly on LED, will put the call on hold.
c. Pressing any button while editing a number for dialing at that key will erase the number and the phone will go to idle state. Each of these different options will now be explained in detail.

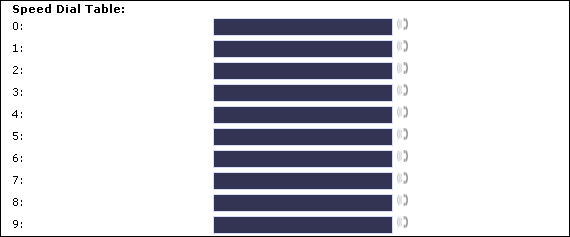
The Elmeg IP290 supports speed dial of up to 33 numbers. These are mapped onto the numbers 0-30, * and #. Dialing Speed dialing is initiated by simply typing in a number from 0-30, * or # respectively and confirming with the key. In this way, 33 speed dial numbers can be called up without having to look at the display. The speed dial numbers can be conveniently set up with the built-in web interface page of your phone:
Update
You may explicitly specify which software version you want to run on this phone. Just fill in the http URL that you want to use for the bootloader and/or the firmware. If you want to change only the firmware, leave the bootloader empty, if you want to change only the bootloader, leave the firmware empty. You should use only complete http URL (like http://snom.com/download/elmegIP290.bin). The phone will reboot after you press the load button.
Advanced Options
At this configuration page there are various of options. We will divide them into few groups for similarity.
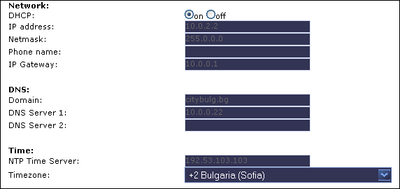
Network Options - from this group of options you can modify the current network configuration. You can:
- disable or enable DHCP support
- set the static IP address (if the DHCP is disabled)
- set the static network mask (if the DHCP is disabled)
- set the static gateway (if the DHCP is disabled)
- set static primary and/or secondary DNS server
- set NTP Time Server IP address
- set the static IP address (if the DHCP is disabled)
- set the static network mask (if the DHCP is disabled)
- set the static gateway (if the DHCP is disabled)
- set static primary and/or secondary DNS server
- set NTP Time Server IP address

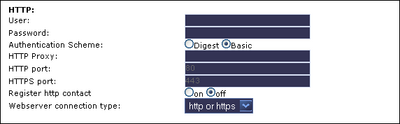
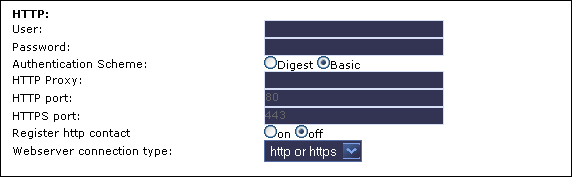
Web Interface Options - from this group of options you can configure the web interface of the IP290. You can:
- set user and password authorization for web interface
- Modify HTTP and HTTPS ports
- Select HTTP only, HTTPS only, HTTP & HTTPS web interface, or to disable it.
- Modify HTTP and HTTPS ports
- Select HTTP only, HTTPS only, HTTP & HTTPS web interface, or to disable it.
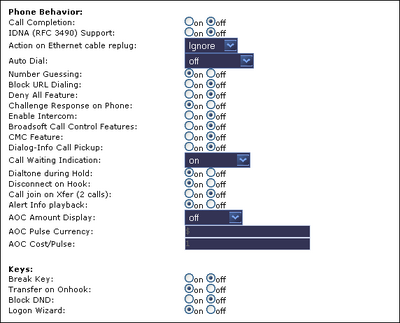
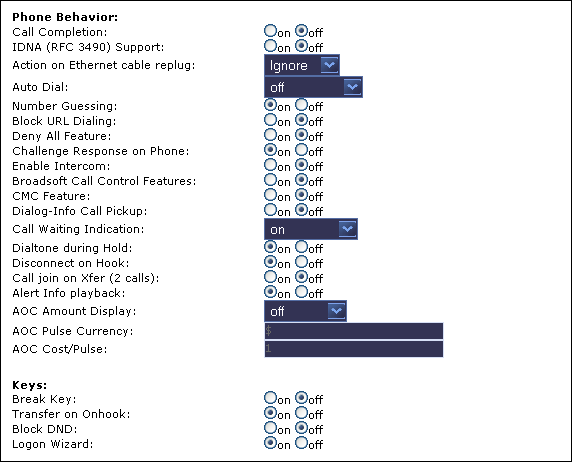
Phone Behavior - from this group of options you can configure the phone's behavior in different situations as:
- Ethernet cable replug
- Auto Dial and Number Guessing
- Different alerts
- AOC options
- Other
- Auto Dial and Number Guessing
- Different alerts
- AOC options
- Other
Advanced Network Options - from this group of options you can configure some VoIP related networking options as:
- STUN servers
- Dynamic RTP port range
- DTMF Payload
- SIP network options
- Challenges
- Dynamic RTP port range
- DTMF Payload
- SIP network options
- Challenges

Update - from this group of options you can configure update preferences, such as Update Policy and Update Location (Setting URL)
Other Administrative options - from this group of options you can set some extra administrative settings as Debug settings (Syslog server) and Administrative authorization

Status and Information
You can receive status information from the web interface. It can be quite useful if you want to debug something or to trace a problem. The information has been divided into eight subsections:
- System Information
- Log
- SIP Trace
- UPnP Trace
- DNS Cache
- PCAP Trace
- Memory
- Settings
- Log
- SIP Trace
- UPnP Trace
- DNS Cache
- PCAP Trace
- Memory
- Settings
System Information - from this page you can receive basic information for the phone. This includes:
Phone Type
MAC address
IP address
Version code
Product information
Bootloader
Firmware
MAC address
IP address
Version code
Product information
Bootloader
Firmware
Log - this page will inform you for any recent activities from the phone. Here is an example:
[2]29/01/2007 02:00:10: start_dst(986086800) end_dst(1004230800) offset_dst(3600) offset_utc(7200)
[2]29/01/2007 02:00:10: start DST: 04/01/2001 01:00:00 (986086800)
[2]29/01/2007 02:00:10: end DST: 10/28/2001 01:00:00 (1004230800)
[5]29/01/2007 02:00:10: Starting UPnP search
[5]29/01/2007 02:00:11: Match challenge for user=mytest, realm=asterisk
[2]29/01/2007 02:00:11: Registered at registrar as mytest@10.2.1.12
[3]29/01/2007 02:00:12: Invalid Date: 24.12.2001 Time: 02:00
[2]29/01/2007 02:00:15: UPnP: No answer, giving up.
[1]29/01/2007 02:00:15: UPnP: No UPnP available
[5]29/01/2007 02:00:15: Starting STUN determination
[5]29/01/2007 02:00:16: STUN: No STUN server available. Trying given address now.
[5]29/01/2007 02:30:13: Match challenge for user=mytest, realm=asterisk
[2]29/01/2007 02:30:13: Registered at registrar as mytest@10.2.1.12
[5]29/01/2007 03:00:15: Match challenge for user=mytest, realm=asterisk
[2]29/01/2007 03:00:15: Registered at registrar as mytest@10.2.1.12
[5]29/01/2007 03:30:17: Match challenge for user=mytest, realm=asterisk
[2]29/01/2007 03:30:17: Registered at registrar as mytest@10.2.1.12
[5]29/01/2007 04:00:19: Match challenge for user=mytest, realm=asterisk
[2]29/01/2007 04:00:19: Registered at registrar as mytest@10.2.1.12
[5]29/01/2007 04:30:20: Match challenge for user=mytest, realm=asterisk
[2]29/01/2007 04:30:20: Registered at registrar as mytest@10.2.1.12
SIP Trace - this page is very similar to Asterisk's `sip debug` command. It will give you a detailed debug information for the SIP transmissions. Here is an example:
Received from udp:10.2.1.12:5060 at 24/12/2001 02:00:11:340 (402 bytes):
SIP/2.0 100 Trying
Via: SIP/2.0/UDP 10.0.2.2:5060;branch=z9hG4bK-l0r6u4m3nmef;rport;received=10.0.2.2
From: "test" <sip:mytest@10.2.1.12>;tag=v3vzpci6zg
To: "test" <sip:mytest@10.2.1.12>
Call-ID: 3c26700a3f7a-0r8neefp54us@10-0-2-2
CSeq: 1 REGISTER
User-Agent: Asterisk PBX
Allow: INVITE, ACK, CANCEL, OPTIONS, BYE, REFER, SUBSCRIBE, NOTIFY
Contact: <sip:mytest@10.2.1.12>
Content-Length: 0
Received from udp:10.2.1.12:5060 at 24/12/2001 02:00:11:350 (466 bytes):
SIP/2.0 401 Unauthorized
Via: SIP/2.0/UDP
From: "test" <sip:mytest@10.2.1.12>;tag=v3vzpci6zg
To: "test" <sip:mytest@10.2.1.12>;tag=as193c1c60
Call-ID: 3c26700a3f7a-0r8neefp54us@10-0-2-2
CSeq: 1 REGISTER
User-Agent: Asterisk PBX
Allow: INVITE, ACK, CANCEL, OPTIONS, BYE, REFER, SUBSCRIBE, NOTIFY
WWW-Authenticate: Digest algorithm=MD5, realm="asterisk", nonce="5f65bbdf"
Content-Length: 0
Sent to udp:10.2.1.12:5060 at 24/12/2001 02:00:11:360 (691 bytes):
REGISTER sip:10.2.1.12 SIP/2.0
Via: SIP/2.0/UDP 10.0.2.2:5060;branch=z9hG4bK-vmreph7req2b;rport
From: "test" <sip:mytest@10.2.1.12>;tag=v3vzpci6zg
To: "test" <sip:mytest@10.2.1.12>
Call-ID: 3c26700a3f7a-0r8neefp54us@10-0-2-2
CSeq: 2 REGISTER
Max-Forwards: 70
Contact: <sip:mytest@10.0.2.2:5060;line=ga88nc7d>;q=1.0
User-Agent: elmegIP290-3.4
P-NAT-Refresh: 15
Supported: gruu
Allow-Events: dialog
X-Real-IP: 10.0.2.2
WWW-Contact: <http://10.0.2.2:80>
WWW-Contact: <https://10.0.2.2:443>
Expires: 3600
Content-Length: 0
Received from udp:10.2.1.12:5060 at 24/12/2001 02:00:11:360 (402 bytes):
SIP/2.0 100 Trying
Via: SIP/2.0/UDP;
From: "test" <sip:mytest@10.2.1.12>;tag=v3vzpci6zg
To: "test" <sip:mytest@10.2.1.12>
Call-ID: 3c26700a3f7a-0r8neefp54us@10-0-2-2
CSeq: 1 REGISTER
User-Agent: Asterisk PBX
Allow: INVITE, ACK, CANCEL, OPTIONS, BYE, REFER, SUBSCRIBE, NOTIFY
Contact: <sip:mytest@10.2.1.12>
Content-Length: 0
SIP/2.0 100 Trying
Via: SIP/2.0/UDP 10.0.2.2:5060;branch=z9hG4bK-l0r6u4m3nmef;rport;received=10.0.2.2
From: "test" <sip:mytest@10.2.1.12>;tag=v3vzpci6zg
To: "test" <sip:mytest@10.2.1.12>
Call-ID: 3c26700a3f7a-0r8neefp54us@10-0-2-2
CSeq: 1 REGISTER
User-Agent: Asterisk PBX
Allow: INVITE, ACK, CANCEL, OPTIONS, BYE, REFER, SUBSCRIBE, NOTIFY
Contact: <sip:mytest@10.2.1.12>
Content-Length: 0
Received from udp:10.2.1.12:5060 at 24/12/2001 02:00:11:350 (466 bytes):
SIP/2.0 401 Unauthorized
Via: SIP/2.0/UDP
From: "test" <sip:mytest@10.2.1.12>;tag=v3vzpci6zg
To: "test" <sip:mytest@10.2.1.12>;tag=as193c1c60
Call-ID: 3c26700a3f7a-0r8neefp54us@10-0-2-2
CSeq: 1 REGISTER
User-Agent: Asterisk PBX
Allow: INVITE, ACK, CANCEL, OPTIONS, BYE, REFER, SUBSCRIBE, NOTIFY
WWW-Authenticate: Digest algorithm=MD5, realm="asterisk", nonce="5f65bbdf"
Content-Length: 0
Sent to udp:10.2.1.12:5060 at 24/12/2001 02:00:11:360 (691 bytes):
REGISTER sip:10.2.1.12 SIP/2.0
Via: SIP/2.0/UDP 10.0.2.2:5060;branch=z9hG4bK-vmreph7req2b;rport
From: "test" <sip:mytest@10.2.1.12>;tag=v3vzpci6zg
To: "test" <sip:mytest@10.2.1.12>
Call-ID: 3c26700a3f7a-0r8neefp54us@10-0-2-2
CSeq: 2 REGISTER
Max-Forwards: 70
Contact: <sip:mytest@10.0.2.2:5060;line=ga88nc7d>;q=1.0
User-Agent: elmegIP290-3.4
P-NAT-Refresh: 15
Supported: gruu
Allow-Events: dialog
X-Real-IP: 10.0.2.2
WWW-Contact: <http://10.0.2.2:80>
WWW-Contact: <https://10.0.2.2:443>
Expires: 3600
Content-Length: 0
Received from udp:10.2.1.12:5060 at 24/12/2001 02:00:11:360 (402 bytes):
SIP/2.0 100 Trying
Via: SIP/2.0/UDP;
From: "test" <sip:mytest@10.2.1.12>;tag=v3vzpci6zg
To: "test" <sip:mytest@10.2.1.12>
Call-ID: 3c26700a3f7a-0r8neefp54us@10-0-2-2
CSeq: 1 REGISTER
User-Agent: Asterisk PBX
Allow: INVITE, ACK, CANCEL, OPTIONS, BYE, REFER, SUBSCRIBE, NOTIFY
Contact: <sip:mytest@10.2.1.12>
Content-Length: 0
UPnP Trace - this page will allow you to trace any UPnP activities. Here is an example:
Sent UDP
M-SEARCH * HTTP/1.1
HOST: 239.255.255.250:1900
ST: urn:schemas-upnp-org:device:InternetGatewayDevice:1
MAN: "ssdp:discover"
MX: 3
Sent UDP
M-SEARCH * HTTP/1.1
HOST: 239.255.255.250:1900
ST: urn:schemas-upnp-org:service:WANIPConnection:1
MAN: "ssdp:discover"
MX: 2
Sent UDP
M-SEARCH * HTTP/1.1
HOST: 239.255.255.250:1900
ST: urn:schemas-upnp-org:service:WANPPPConnection:1
MAN: "ssdp:discover"
MX: 2
Sent UDP
M-SEARCH * HTTP/1.1
HOST: 239.255.255.250:1900
ST: urn:schemas-upnp-org:device:InternetGatewayDevice:1
MAN: "ssdp:discover"
MX: 3
M-SEARCH * HTTP/1.1
HOST: 239.255.255.250:1900
ST: urn:schemas-upnp-org:device:InternetGatewayDevice:1
MAN: "ssdp:discover"
MX: 3
Sent UDP
M-SEARCH * HTTP/1.1
HOST: 239.255.255.250:1900
ST: urn:schemas-upnp-org:service:WANIPConnection:1
MAN: "ssdp:discover"
MX: 2
Sent UDP
M-SEARCH * HTTP/1.1
HOST: 239.255.255.250:1900
ST: urn:schemas-upnp-org:service:WANPPPConnection:1
MAN: "ssdp:discover"
MX: 2
Sent UDP
M-SEARCH * HTTP/1.1
HOST: 239.255.255.250:1900
ST: urn:schemas-upnp-org:device:InternetGatewayDevice:1
MAN: "ssdp:discover"
MX: 3
DNS Cache - this page will let you to monitor the DNS cache of the phone. Here is an example:
Id  	Type  	Address  	Content  	Expires
5	a	menelay.local.net		  48
4	srv	_sip._udp.menelay		48
3	srv	_sip._tcp.menelay		 48
2	naptr	menelay.local.net		 47
PCAP Trace - this very useful feature will enable the possibility to monitor the whole traffic that goes through the phone (or is been generated by the phone). When you are ready to start `sniffing` the traffic click on Start button. When you wish to end this operation, just click on Stop button. You can download the PCAP binary file by clicking on the here link. Here is a screenshot:

Memory - this page will give you a detailed memory statistic for the phone.
Settings - this page will show you the complete configuration (except the lines configuration) in text. You can view a sample by downloading this settings.txt.
| Add Comment |
Latest Headlines:
-
T.38 faxing with Zoiper 2.15 is now easier than ever
section: voip software
-
Asterisk 1.4.21 Released
section: Asterisk
-
Asterisk 1.4.20 Released
section: Asterisk
-
Asterisk 1.4.20-rc2 Released
section: Asterisk
-
Asterisk 1.4.20-rc1 Now Available
section: Asterisk
- News Archives (older news)
Latest Tutorials:
-
Sending Fax from Zoiper to Zoiper using T.38
added 08/Dec/2008 18:16
-
VMAuthenticate (dialplan application)
added 01/Mar/2008 15:57
-
Siptronic ST-530
added 06/Nov/2007 17:57
-
Siemens C455 IP hardphone
added 05/Nov/2007 10:24
-
Zoiper
added 22/Oct/2007 17:53
Latest Comments:
-
https://www.imdb.com/list/ls540404256/
...
tutorial: Request to schedule in the past?!?!
-
https://www.ttvets.org/forum/main/commen...
tutorial: General Installation
-
https://github.com/In-Broad-Daylight-chi...
tutorial: General Installation
-
https://m.facebook.com/media/set/?set=a....
tutorial: General Installation
-
白日之下 电...
tutorial: Background (dialplan application)