

3.2.29. Mv 370 Mobile VoIP - GSM Gateway
1. Package Contents, Dimension and Panel description, Accessory attachment
The package contents are:
1) Mobile VoIP main body
2) AC-DC Adaptor (110V AC - 12V DC or 220V AC - 12V DC)
3) Network cable
4) Antenna
5) User's manual
2) AC-DC Adaptor (110V AC - 12V DC or 220V AC - 12V DC)
3) Network cable
4) Antenna
5) User's manual
Be aware with the user's manual. If you lose it somehow, or something like that, and you don't know the exact model of the device, it's difficult to find it out. There aren't any inscriptions about the model. The only "helpful" inscriptions are: "VoIP GSM Gateway" and "Made in Taiwan".
Dimension:
The device's demensions are:
* length: 14.5cm
* width: 17cm
* thickness: 4.1cm
* length: 14.5cm
* width: 17cm
* thickness: 4.1cm
The dimensions look for me good enough. The device is a little bigger, than the devices which I worked on before(ATAs, VoIP GSM phones...). Maybe Portech have to think about it?
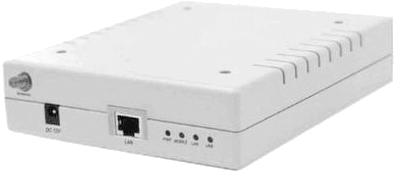
Panel description:
* Antenna connector
* DC 12V - Power socket
* LAN - Standart RJ-45 socket, connecting to Hub circuit
* Power Power indicator light, red light. Light is on when system's power supply is normal.
* Mobile - GSM indicator light, green light. Light flashes when GSM status is normal. Light turns on constantly when GSM is called.
* LAN - LAN indicator light, green light. Light flashes when LAN is called. Light turns off when GSM answers
* LINK - Link indicator light, green light. Light is on when network is connected correctly.
All ports, connectors and indicators look stable and hopeful. The device is like a white bunker.
Accessory attachment:
First of all, lets say some words before continue to the attachment and configuration process. Leave the antenna installation on the last place. For now it is absolutely not necessary. I advise also, not to plug in the SIM card yet. Firstly lets attach the needed stuff for the basic configuration and after that we will plug in the antenna and the SIM card.
1) Connect the network cable to your Hub and to your device LAN port.
2) Plug the adaptor in DC 12V socket and to the Power port on the device. The PWR light should turn red at the moment.
2) Plug the adaptor in DC 12V socket and to the Power port on the device. The PWR light should turn red at the moment.
2. Configuration
Configuration via web page
The default IP address of the GSM Gateway is http://192.168.0.100. Prepare your network for this IP address. In Linux this can be done by setting the network device(eth0, eth1, eth2...) to IP address in this network range, for example 192.168.0.101. With "ifconfig" you can do that.
ifconfig eth0 192.168.0.101
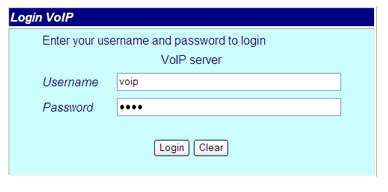
Please enter the default username and password, which are:
username: voip
password: 1234
The default IP address of the GSM Gateway is http://192.168.0.100. Prepare your network for this IP address. In Linux this can be done by setting the network device(eth0, eth1, eth2...) to IP address in this network range, for example 192.168.0.101. With "ifconfig" you can do that.
ifconfig eth0 192.168.0.101
Please enter the default username and password, which are:
username: voip
password: 1234
The first page after login is "System Information". There you can see model name, firmware version, codec version name.
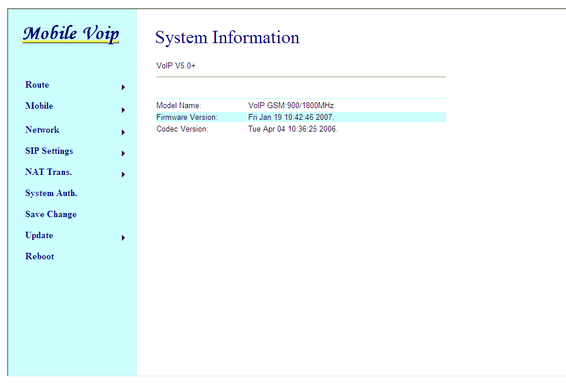
In the left side you can click on the option you would like to set.
3. Route
3.1 Mobile to LAN
In this page you can set the routing rules which will transfer the calls incoming from Mobile to LAN. The maximum sets are 50.
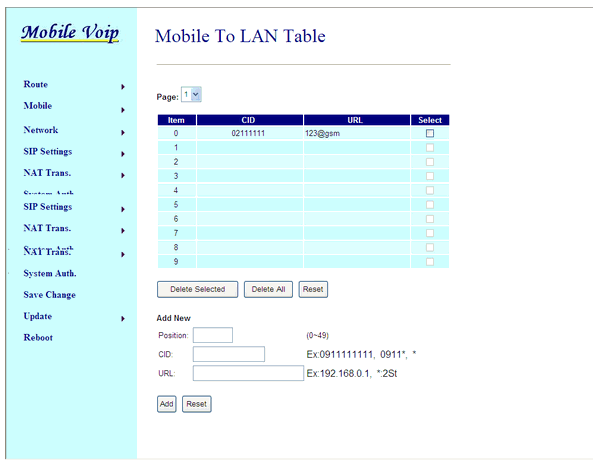
When the GSM number of the MMv 370 GSM Gateway is called, this device transfers the call to URL according to the CallerID of the incoming call.
3.1.1 CID - CallerID, the numbers of incoming call
You could set the CID as the following formats:
1) The complete number, e.g. 02111111
2) The prefix part plus *, e.g. 021*. This format means any number starting with 021 will be accepted to transfer.
3) *, this means any incoming call is accepted to transfer.
4) N, this means the incoming call without showing its CID is accepted to transfer.
The priority of routing rules is that the CID with more digits gets the first priority.
3.1.2 URL - the IP address of destination.
The available formats are:
1) The complete IP address, e.g. 192.168.0.101
2) The proxy extension numbers
3) The phone numbers
Note: If the device is registered at Asterisk, you can enter any destination phone number. Also note that in the Asterisk, you need to set the route of destination phone numer.
4) Leave it blank or "N", this mean to refuse to transfer.
5) *, this means to transfer via 2-stage-dialing. The call will be answered with a prompt dial tone for the caller to press the IP address, proxy extension, or any phone number as destination. The caller press the IP address on the phone keys: 192*168*0*101# as 192.168.0.101.
3.1.3 Example of Mobile to LAN setting
1) Mobile to LAN: 0234*, 02111234
When the GSM numbers of the device is called, if the caller's prefix number are 0234, Mobile VoIP Gateway transfers the call to 02111234, then 02111234 rings.
Note: Here you should have a route in the Asterisk of "02".
2) Mobile to LAN: *, *
Any incoming call gets a prompt dial tone, so the caller can enter any IP address, SIP extension, or phone number.
Note: SIP extension or phone number needs to register at Asterisk. Also the phone number or Asterisk needs to set the route of destination phone number.
3.2 Mobile to LAN Speed Dial Settings
The call is answered with a prompt dial tone for the caller to press the "Num", and then the device connects the "URL" as destination.
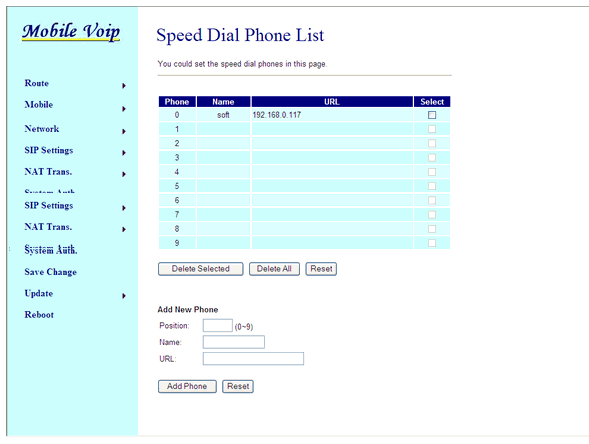
Example: After you call the GSM number of the device and hear a dial tone, you press "0", then the lan phone of IP address: 192.168.0.117 rings.
3.3 LAN to Mobile Settings
In this page you can set the routing rules to transfer the calls incoming from LAN to Mobile. The maximum sets are 50.
In this page you can set the routing rules to transfer the calls incoming from LAN to Mobile. The maximum sets are 50.
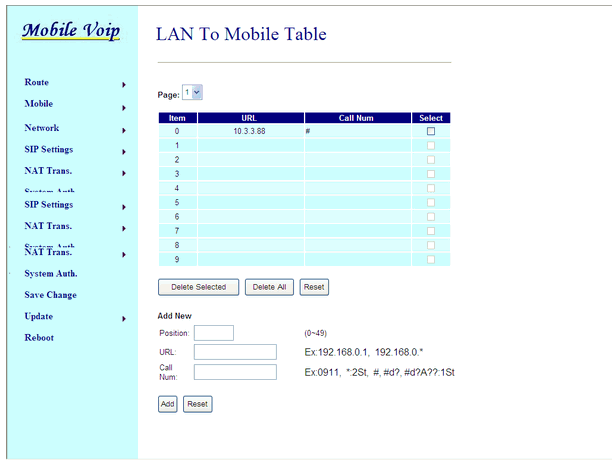
When the LAN of the Mv 370 is called, the device transfers the call to Call Num according to the URL of the incoming call.
3.3.1 URL - the IP address or extension numbers of the incoming call.
The available formats are:
1) The complete IP address, e.g. 192.168.0.101
2) The extension numbers, e.g. 101
3) Part of an IP address plus "*", e.g. 192.168.0.*. This means the IP address starting with 192.168.0 would be accepted to transfer.
4) Part of the extension numbers plus, e.g. 10*. This means the extension numbers starting with 10 would be accepted to transfer.
3.3.2 Call Num - the phone numbers of destination.
The formats can be:
1) The complete number, e.g. 02111111
2) "*", this means to transfer via 2-stage-dialing. The call will be answered with a prompt dial tone for the caller to press the destination phone numbers, e.g. 02111111.
3) "#", this allow the caller with LAN phone dial directly the destination numbers.
4) #['d'n']['a'ppp], this means to do above routing, and to modify the numbers.
1) The complete number, e.g. 02111111
2) "*", this means to transfer via 2-stage-dialing. The call will be answered with a prompt dial tone for the caller to press the destination phone numbers, e.g. 02111111.
3) "#", this allow the caller with LAN phone dial directly the destination numbers.
Note: Mobile VoIP and incoming LAN phone have to be both registered at Asterisk. Asterisk has to have the routing rules to assign prefix of numbers to be transferred from Mobile VoIP. LAN to Mobile routing sets: *, #(You can dial on your LAN phone call any destination number with prefix "02". When your LAN phone and Mobile VoIP had registered and "09" prefix is setted the routing rules at Asterisk.)
4) #['d'n']['a'ppp], this means to do above routing, and to modify the numbers.
Note: 'd'n means to delete the number of prefix, 'a'ppp means to add 'ppp' prefix.
Example: #d3a02 means to call the registered numbers via one-stage-dialing. The numbers are modified to: delete 3 digits of prefix of the original numbers, then add 02 to be new prefix of the destination numbers.
4. Mobile
4.1 Mobile Status
In this page, you can get information of your GSM network and the latest operation.
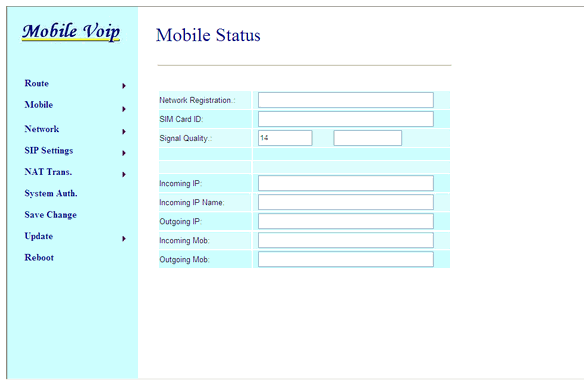
Lets explain all fields:
1) Network registration - name of telecom carrier, which the SIM card of this device registers at.
2) SIM Card ID - SIM Card ID.
3) Signal Quality - place the antenna for higher signal, above 17 is better.
4) Incoming IP - IP address of the last incoming call from LAN.
5) Incoming IP Name - extension name of incoming call from LAN.
6) Outgoing IP - The IP address of the last outgoing call from LAN.
7) Incoming Mod - The CallerID of the last incoming call from Mobile.
8) Outgoing Mod - The destination numbers of the last outgoing call from Mobile.
4.2 Mobile Setting
In this page, you can change the values. For now, don't change these values, leave the default ones.
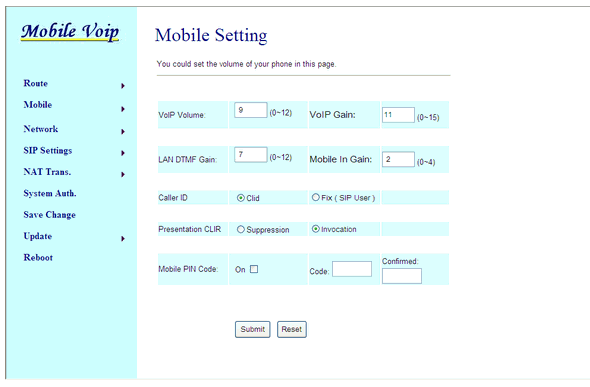
1) VoIP Volume - the sound volume that VoIP passes to Mobile.
2) VoIP Gain - the sound volume that VoIP receives from Mobile.
3) LAN DTMF Gain - the DTMF volume that LAN receives.
4) Mobile In Gain - the DTMF volume that Mobile receives.
5) CallerID - in Mobile to LAN operation, you can select "Clid" to display the incoming call numbers, or "Fix" to display fixed SIP user name on the destination phone.
6) Presentation CLIR - in LAN to Mobile operation, you select "Suppression" to hide the GSM numbers of the device, or "Invocation" to display it on the destination phone.
7) Mobile PIN Code - if you need to unlock pin code via Mobile VoIP, you can click "On" and enter pin code.
8) LAN Answer Mode - This is the LAN answer time while in LAN to Mobile routing.
Answered - when mobile side answers, then connects the call.
Alerted - when mobile side rings, then connects the call.
Income - when LAN side dials out, then connects the call soon.
9) Band Type - if your device is Quad band model, you need to choose your GSM frequency.
2) VoIP Gain - the sound volume that VoIP receives from Mobile.
3) LAN DTMF Gain - the DTMF volume that LAN receives.
4) Mobile In Gain - the DTMF volume that Mobile receives.
Note: You can change VoIP Volume and LAN DTMF Gain to fix the DTMF problem in Lan to Mobile operation. By changing the VoIP Gain and Mobile In Gain you can change the DTMF problem in Mobile to LAN operation.
5) CallerID - in Mobile to LAN operation, you can select "Clid" to display the incoming call numbers, or "Fix" to display fixed SIP user name on the destination phone.
6) Presentation CLIR - in LAN to Mobile operation, you select "Suppression" to hide the GSM numbers of the device, or "Invocation" to display it on the destination phone.
7) Mobile PIN Code - if you need to unlock pin code via Mobile VoIP, you can click "On" and enter pin code.
8) LAN Answer Mode - This is the LAN answer time while in LAN to Mobile routing.
Answered - when mobile side answers, then connects the call.
Alerted - when mobile side rings, then connects the call.
Income - when LAN side dials out, then connects the call soon.
9) Band Type - if your device is Quad band model, you need to choose your GSM frequency.
5. Network
In this section you can check the Network status, configure the WLAN Settings, LAN Settings and the SNTP Settings.
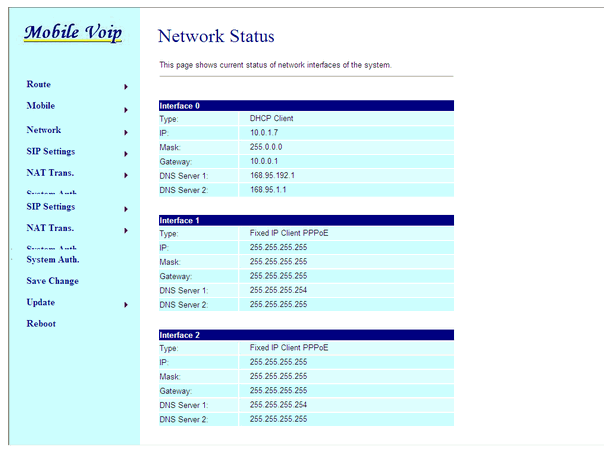
5.1 Network Status
Here you can see information of current Network.
5.2 Network Settings
You can check the current Network setting.
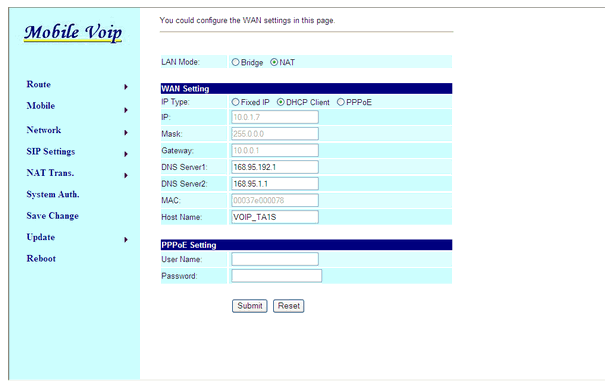
The default IP address is 192.168.0.100. You can change it to any available IP address, or select different IP type to suit your environment.
The settings are:
1) LAN Mode - select NAT
2) Fixed IP - the TCP/IP Configuration item is to setup the WAN port's network environment. You may refer to your current network environment to configure the system properly.
3) DHCP client - you can refer to your current network environment to configure the system properly.
4) PPPoE - if you have the PPPoE account from your Service Provider, please input the Username and the Password correctly.
5) After you input or modify the value, click the Submit button.
6. SIP Setting
The options here are: Service Domain, Port Settings, Codec Settings, RTP setting, RPort Setting and Other Settings. This section is to register your VoIP Mobile at SIP Proxy Server.
6.1 Service Domain
In this page, you should input the data refer to the ISP. You have 3 accounts maximum. You can dial out via first SIP account, and receive via the three SIP accounts.
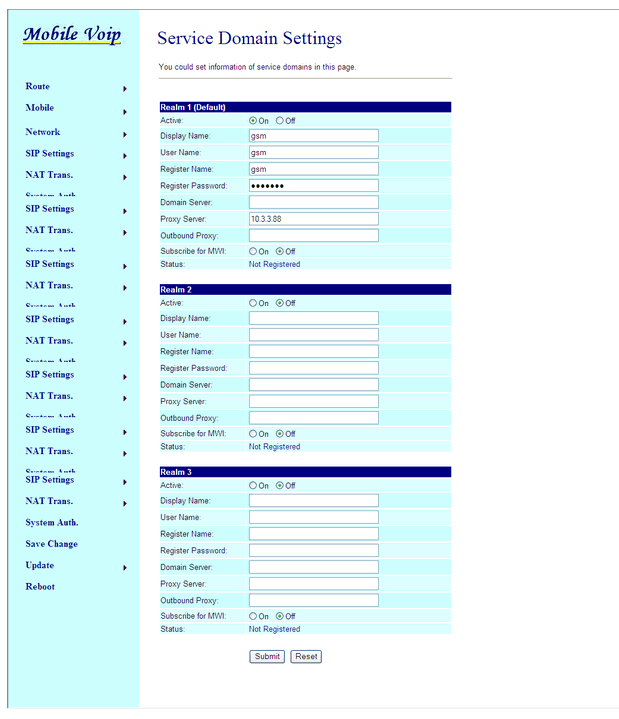
The fields are:
1) Active - click "On" to enable the function in Service Domain, then input the following items.
2) Display name - input the name you would like to display.
3) User name - input your user name in ISP.
4) Register Name - input your register name in ISP.
5) Register Password - input your password in ISP.
6) Domain Server - input the Domain Server IP address.
7) Proxy Server - input the Proxy Server IP address.
8) Outbound Proxy - input the Outbound Proxy IP address.
9) ]After setting, click the "Submit" button. Remember to click "Save Change".
10) You can see the Register Status in the Status item.
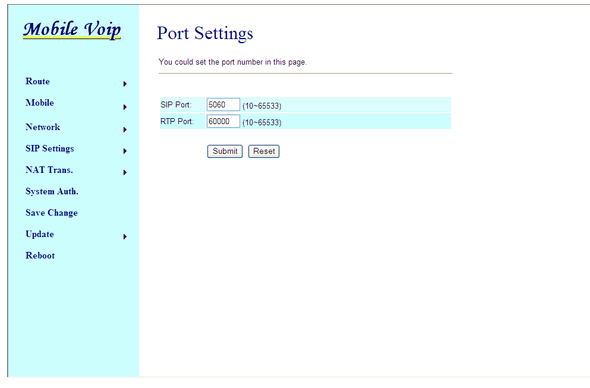
6.2 Port Settings
You can set the SIP and RTP port in this page. You have to contact to your Service Provider, to check what ports they are using.
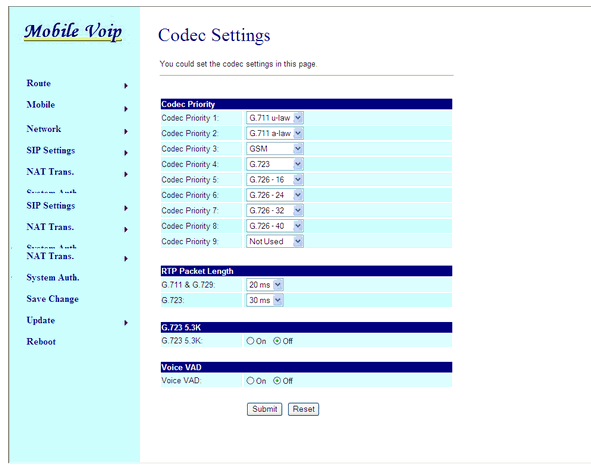
6.3 Codec Settings
You can set the codec priority, RTP packet length. Please contact again with your ISP and follow their suggestions to setup this page. Don't forget to click on the "Submit" button.
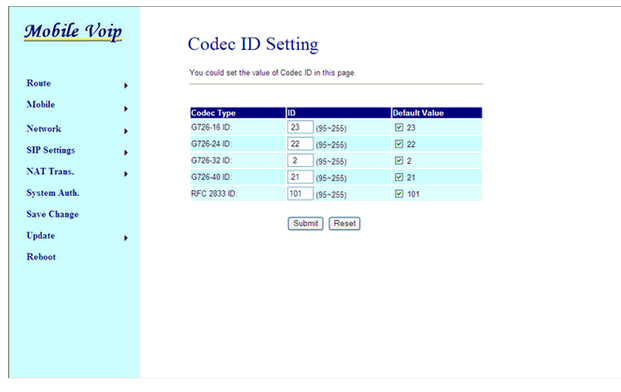
6.4 Codec ID Setting
This page is for setting the Codec ID. Leave the default settings.
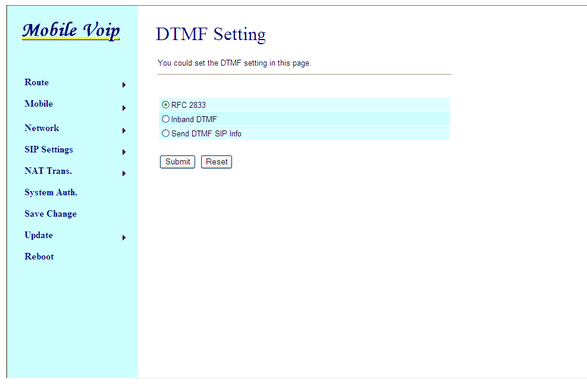
6.5 DTMF Setting
If your device has registered at Asterisk, select "2833", if not select "Inband DTMF".
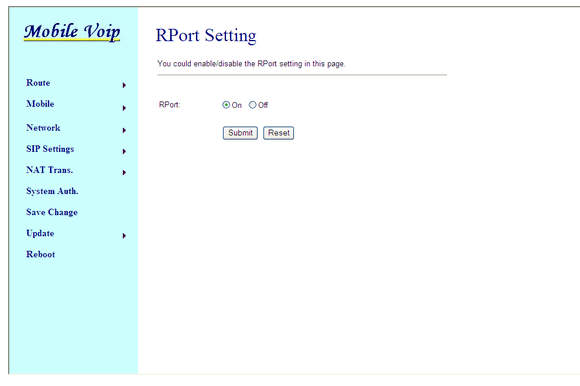
6.6 RPort Setting
According to your Service Provider, what information is told to you, you can enable or disable the RPort.
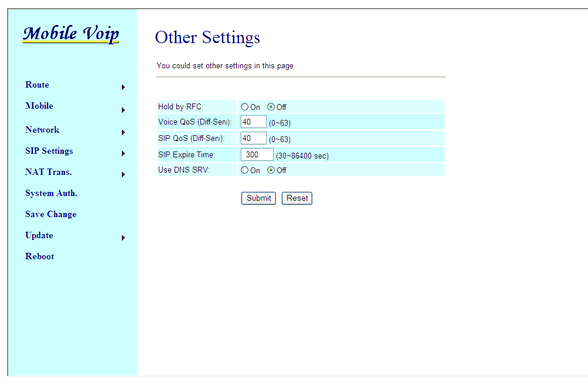
6.7 Other Settings
According to your ISP information, you can setup the RFC and QoS. The Qo
QoS is using to set the voice packets' priority. If you set a value higher than 0, then the voice packets get the higher priority to the Internet. Note that, QoS function needs to cooperate with the others Internet devices.
QoS is using to set the voice packets' priority. If you set a value higher than 0, then the voice packets get the higher priority to the Internet. Note that, QoS function needs to cooperate with the others Internet devices.
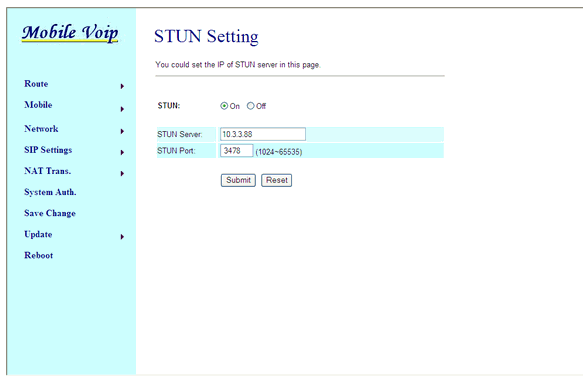
7. NAT Trans
Here you can setup the STUN server. The STUN server is useful, if you are behind NAT. Again, check if you should have a STUN server with your Service Provider.
8. System Authority
Here you can change your login username and password.
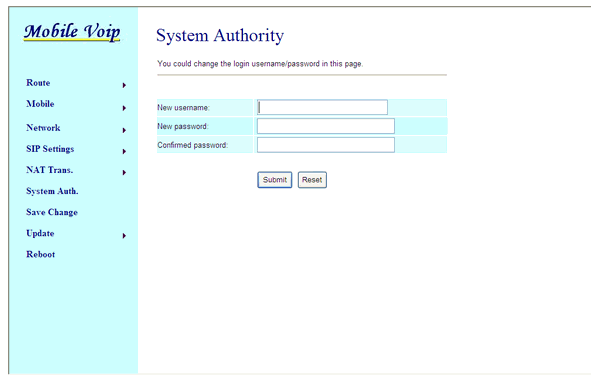
Note: the defaults are:
username: voip
password: 1234
username: voip
password: 1234
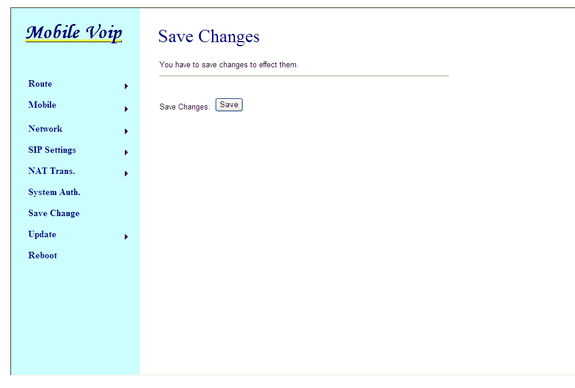
9. Save Change
Don't forget this step everytime, when you submit any setting. After clicking "Save Change" then "Save", the system will restart and make the new changes operative.
10. Update
This section is for firmware upgrade and to restore the default settings.
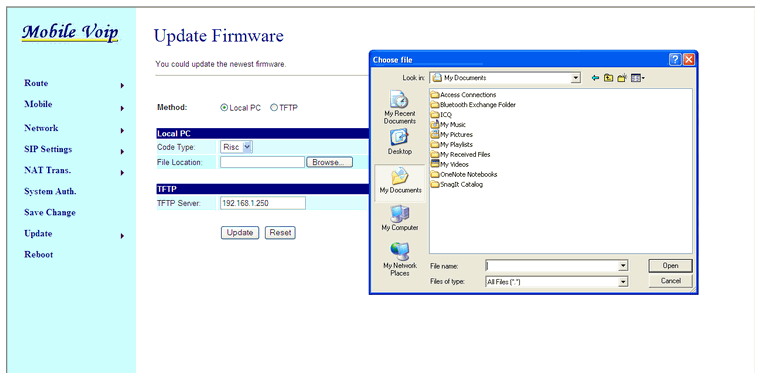
10.1 Update Firmware
1) Download the latest firmware.
2) Method - select "Local PC".
3) Code Type - select "Risc"
4) File Location - browse to your file location.
5) Click "Update", it will take few minutes to generate and load the new firmware.
2) Method - select "Local PC".
3) Code Type - select "Risc"
4) File Location - browse to your file location.
5) Click "Update", it will take few minutes to generate and load the new firmware.
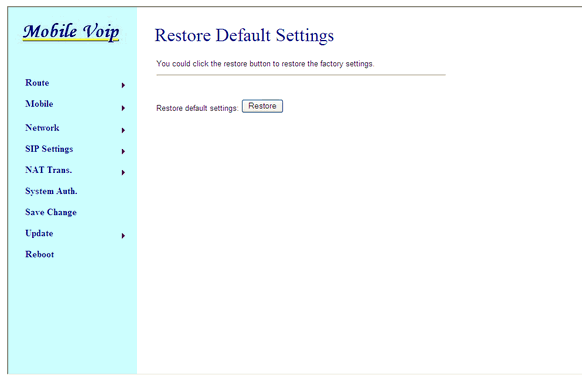
10.2 Default Settings
You can restore the factory default settings. After clicking the "Restore" button, the system will return to its default IP address: 192.168.0.100 and the device will automatically restart.
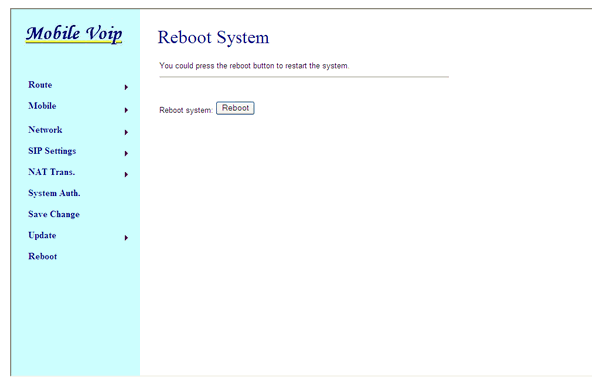
11. Reboot
Restart the system.
12. Setting via IVR
In the first 20 seconds after power-on, you can dial its mobile numbers. When you hear the dial tone, press the following codes to set the device.
1) Reboot - #195# - Reboot the device.
2) Factory Reset - #198# - Return to default settings.
3) Check IP address - #120# - IVR announces the current IP address. Default: 192.168.0.100.
4) Check IP Type - #121# - IVR announces if the DHCP is On or Off. Default value is off.
5) Check Network mask - #123# - IVR announces the current network mask. Default is 255.255.255.0.
6) Check Gateway IP address - #124# - IVR announces the current gateway IP address. Default is 192.168.0.254.
7) Check Primary DNS server - #125# - IVR announces the current setting in the Primary DNS field. Default: 192.168.0.1.
8) Check Firmware version - #128# - IVR announces the version of the firmware.
9) Set as DHCP client - #111# - The system is changed to DHCP client type.
10) Set Static IP address - #112XXX*YYY*NNN*ZZZ# - DHCP is disabled and system is changed to Static IP address type. Enter IP address using numbers on the telephone pad. Use "*" for the decimal point.
11) Set Network mask - #113XXX*YYY*NNN*ZZZ# - You should set the Static IP address first. Again use your telephone pad for entering the values.
12) Set Gateway IP address - #114XXX*YYY*NNN*ZZZ# - Again the Static IP address have to be set first.
13) Set Primary DNS server - #115XXX*YYY*NNN*ZZZ# - The Static IP address have to be set first.
13. Asterisk
Did you hear anything about Asterisk?
Asterisk is the most popular and extensible open source telephone system in the world, offering flexibility, functionality and features not available in advanced, high cost proprietary business systems. Asterisk is a complete IP telephony platform for business, and can be downloaded for free.
If you have any questions about the installation and configuration procedure of Asterisk, you can visit our forum at address: http://www.asteriskguru.com/board
Also on http://www.asteriskguru.com you can read our tutorials about the Asterisk installation, configuration, different types of hardphones, softphones, and much much more information.
You need:
Asterisk - the latest version in the 1.4 branch is 1.4.10. 1.2.24 is the latest in the 1.2 branch.
If you don't know how to install Asterisk, or you have some troubles with it, please read the following tutorial: Asterisk installation
Now lets configure the SIP account, that we will use. This one, which the Mv 370 - GSM Gateway will register itself to the Asterisk server.
sip.conf:
; GSM VOIP Gateway MV-370
[1006]
type=friend
secret=1006
qualify=yes ; keeps the NAT session open
nat=yes ; if you are behind NAT
host=dynamic
canreinvite=no ; set it to "no", just for insurance, if you are behind NAT
context=gsm ; the context in extensions.conf, which we will use for routing the calls
extensions.conf:
; GSM Gateway extensions
[gsm]
exten => _X.,1,Dial(SIP/1006/${EXTEN})
exten => _X.,n,Hangup()
exten => 100,1,Answer()
exten => 100,n,Dial(SIP/Arcopix)
exten => 100,n,Hangup()
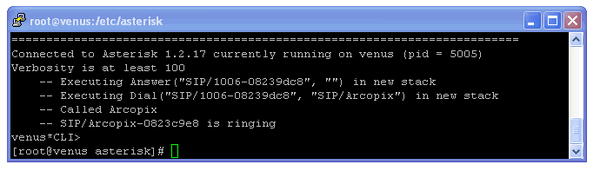
Now lets make some tests:
We will try to dial the SIM card, which is in the GSM Gateway, by my cell phone.
In the configuration menu on the device, in "Route" section, in "Mobile to LAN" we have:
CID - *
URL - 100@gsm
Configured this way, all incoming calls will be transfered to the 100 extension in the gsm context, which actually is a SIP account, named Arcopix.
(Don't forget to click on "Save Change" and then "Save" after every change you made)
The scheme is:
my cell phone -> SIM card -> GSM Gateway -> SIP/1006 -> Asterisk -> SIP/Arcopix.
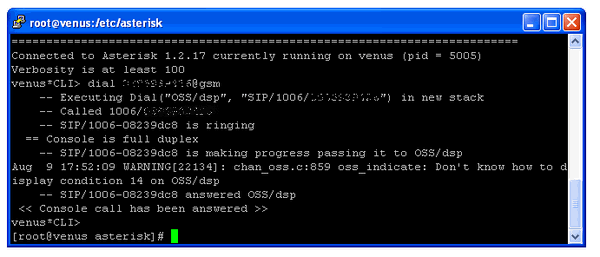
Incoming call:

Now we will make outgoing call, through our Asterisk server, by the Dial() application.
The test is simple. Via the asterisk CLI, we are dialing some telephone number, real telephone number.
In the configuration menu on the device, in "Route" section, this time in "LAN to Mobile" we have:
URL- *
Call Num - #
Configured this way means that it is allowed to the caller with LAN phone to dial directly the destination telephone numbers.
The scheme is:
Asterisk -> Dial() -> SIP/1006 -> GSM Gateway -> SIM card -> telephone number.
Outgoing call:

Asterisk is the most popular and extensible open source telephone system in the world, offering flexibility, functionality and features not available in advanced, high cost proprietary business systems. Asterisk is a complete IP telephony platform for business, and can be downloaded for free.
If you have any questions about the installation and configuration procedure of Asterisk, you can visit our forum at address: http://www.asteriskguru.com/board
Also on http://www.asteriskguru.com you can read our tutorials about the Asterisk installation, configuration, different types of hardphones, softphones, and much much more information.
You need:
Asterisk - the latest version in the 1.4 branch is 1.4.10. 1.2.24 is the latest in the 1.2 branch.
If you don't know how to install Asterisk, or you have some troubles with it, please read the following tutorial: Asterisk installation
Now lets configure the SIP account, that we will use. This one, which the Mv 370 - GSM Gateway will register itself to the Asterisk server.
sip.conf:
; GSM VOIP Gateway MV-370
[1006]
type=friend
secret=1006
qualify=yes ; keeps the NAT session open
nat=yes ; if you are behind NAT
host=dynamic
canreinvite=no ; set it to "no", just for insurance, if you are behind NAT
context=gsm ; the context in extensions.conf, which we will use for routing the calls
extensions.conf:
; GSM Gateway extensions
[gsm]
exten => _X.,1,Dial(SIP/1006/${EXTEN})
exten => _X.,n,Hangup()
exten => 100,1,Answer()
exten => 100,n,Dial(SIP/Arcopix)
exten => 100,n,Hangup()
Now lets make some tests:
We will try to dial the SIM card, which is in the GSM Gateway, by my cell phone.
In the configuration menu on the device, in "Route" section, in "Mobile to LAN" we have:
CID - *
URL - 100@gsm
Configured this way, all incoming calls will be transfered to the 100 extension in the gsm context, which actually is a SIP account, named Arcopix.
(Don't forget to click on "Save Change" and then "Save" after every change you made)
The scheme is:
my cell phone -> SIM card -> GSM Gateway -> SIP/1006 -> Asterisk -> SIP/Arcopix.
Incoming call:
Now we will make outgoing call, through our Asterisk server, by the Dial() application.
The test is simple. Via the asterisk CLI, we are dialing some telephone number, real telephone number.
In the configuration menu on the device, in "Route" section, this time in "LAN to Mobile" we have:
URL- *
Call Num - #
Configured this way means that it is allowed to the caller with LAN phone to dial directly the destination telephone numbers.
The scheme is:
Asterisk -> Dial() -> SIP/1006 -> GSM Gateway -> SIM card -> telephone number.
Outgoing call:
| Add Comment |
Latest Headlines:
-
T.38 faxing with Zoiper 2.15 is now easier than ever
section: voip software
-
Asterisk 1.4.21 Released
section: Asterisk
-
Asterisk 1.4.20 Released
section: Asterisk
-
Asterisk 1.4.20-rc2 Released
section: Asterisk
-
Asterisk 1.4.20-rc1 Now Available
section: Asterisk
- News Archives (older news)
Latest Tutorials:
-
Sending Fax from Zoiper to Zoiper using T.38
added 08/Dec/2008 18:16
-
VMAuthenticate (dialplan application)
added 01/Mar/2008 15:57
-
Siptronic ST-530
added 06/Nov/2007 17:57
-
Siemens C455 IP hardphone
added 05/Nov/2007 10:24
-
Zoiper
added 22/Oct/2007 17:53
Latest Comments:
-
<a href=\"https://ekipirovka.shop/\">...
tutorial: CALLERID(name) (dialplan function) - NEW
-
https://www.imdb.com/list/ls540404256/
...
tutorial: Request to schedule in the past?!?!
-
https://www.ttvets.org/forum/main/commen...
tutorial: General Installation
-
https://github.com/In-Broad-Daylight-chi...
tutorial: General Installation
-
https://m.facebook.com/media/set/?set=a....
tutorial: General Installation