

3.2.32. Siemens C455 IP hardphone
Overview
Gigaset C455 IP

Features
Handset
Connecting
NOTE: Please make sure that you use only the genuine batteries in your handset and they are inserted properly!
The PSTN(2.1.) and POWER (2.2.) connectors are located at the bottom of the Base module(2).
If not using PSTN please connect your IP phone following this hint:
NOTE: Please use only the mains adapter supplied!

NOTE: You can register up to six handsets that way.
Setup
Web Administration pages

Then you will access the Home screen.

Settings
Here appears a new submenu, which offers you another five choices.


Dialing Plans
Directory

Advanced Settings
Messaging
Setting up an Asterisk account
Save the changes and continue to register an extension for the user "user" ;).
In my file I added :
NOTE: Do not forget to save the changes you just made in extensions.conf .
As your new user "user" is already configured, please start your Asterisk server:
enter the Asterisk CLI console by typing:
# asterisk -r
and reload the SIP configuration for the changes to take effect by using:
# sip reload
then reload the extensions:
# extensions reload
now you can check what you've done by:
# sip show peers
To execute shell command without exiting Asterisk, type "!", then press the [ENTER] key.
Check if there are any sample sounds in your /var/lib/asterisk/sounds/:
#ls /var/lib/asterisk/sounds/
If everything is all right, you will see a long list of files.
I picked up "Hello World.gsm" for this example.

Save your extensions.conf file, and press CTRL+D to return to the Asterisk CLI console.
Reload extensions now:
# extensions reload
and exit Asterisk CLI console by typing:
# exit
Now you can dial 111 to test if you will hear the "Hello World" greeting. :)
NOTE: ALL characters after ";" are interpreted by Asterisk as a comment !
ADVICE: read our tutorial about "Configuring IP Phones for use with Asterisk"
for information how to make the configurations in the Asterisk's configuration files.
TESTS
To know that everything is all right you can test it with an echo test, or by installing a softphone.
Echo test
Now, if you dial 111 and say something you will hear your own voice.
Testing by a softphone
Congratulations ! You can start using it now !.
Setting an additional account.
Now save this file and open /etc/extensions.conf to add a new extension for that user.
Setting additional extensions.
Zoiper Setup
To use your new Zoiper softphone you need an account and you have to set it up.
This you can do following my steps:
Adding SIP account

Registering SIP accounts
As you have already set up your hardphone and your softphone, you can make a call from the first to the second one and vice versa :)

Factory Reset
Links and files
Gigaset C455 IP
This IP phone is cordless, smooth-shaped and looks like a mobile phone. It has that typical Siemens look-and-feel, easy to operate menus, etc.

Features
* Codecs - SIP VoIP, G711, G726, G729AB
* Answering machine - up to 30 minutes recording time, PIN-protected remote playback
* Dualmode - switch from internet calls to fixed-line calls by a single keypress
* Configuration with or without a PC
* Expandable - up to 6 handsets and 6 SIP accounts from different providers
* Parallel calls up to three: 2 VoIP calls and 1 fixed-line call with multiple handsets
* Gigaset.net - call worldwide to any other Gigaset net-registered VoIP phone free of charge
* Virus protection - protected operating system
* Handsfree - talking with speaker with adjustable volume, 3 earpiece volumes, Headset connection via 2.5mm jack connector
* CLIP*/CNIP *
* Display - Illuminated color display (101 x 64 pixels with 4096
colors and 4 lines) , icon-based menu
* Screensaver - big display of time in digital clock style and 5 full screen color pictures
* SMS - up to 160 characters
* Phonebook - up to 100 names and numbers
* Alarm - call and date reminder - selectable ringer melody, snooze function
* Quality of Service ToS. Diffserv (dependent on country, network and provider)
Base module
* Answering machine - up to 30 minutes recording time, PIN-protected remote playback
* Dualmode - switch from internet calls to fixed-line calls by a single keypress
* Configuration with or without a PC
* Expandable - up to 6 handsets and 6 SIP accounts from different providers
* Parallel calls up to three: 2 VoIP calls and 1 fixed-line call with multiple handsets
* Gigaset.net - call worldwide to any other Gigaset net-registered VoIP phone free of charge
* Virus protection - protected operating system
* Handsfree - talking with speaker with adjustable volume, 3 earpiece volumes, Headset connection via 2.5mm jack connector
* CLIP*/CNIP *
* Display - Illuminated color display (101 x 64 pixels with 4096
colors and 4 lines) , icon-based menu
* Screensaver - big display of time in digital clock style and 5 full screen color pictures
* SMS - up to 160 characters
* Phonebook - up to 100 names and numbers
* Alarm - call and date reminder - selectable ringer melody, snooze function
* Quality of Service ToS. Diffserv (dependent on country, network and provider)
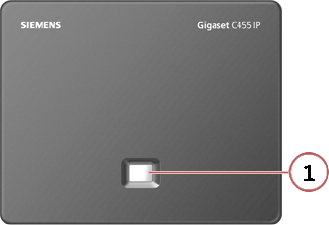
Base module
1. Paging key - The Base Module has a large button on it. When you do not know where your handset is push it, and it will start ringing!
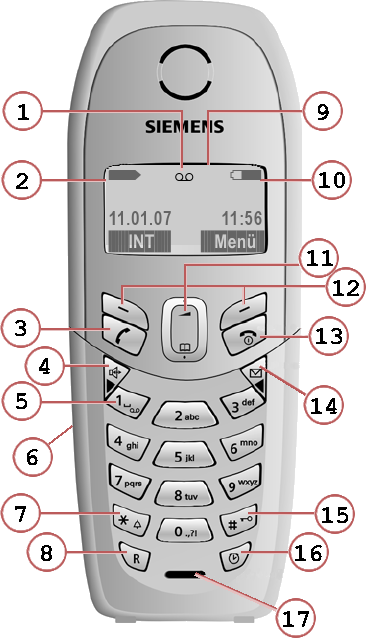
Handset
1. new message indicator
2. signal strength indicator
3. answer key
4. handsfree on/off key
5. voicemail key
6. female connector for Headset
7. bell tones in/out key
8. R-key
(not for VoIP connections)
9. graphic display
10. battery monitor
11. menu key
12. special menu keys
13. off, level back, hangup key
14. message key
15. key lock key
16. bell key
17. microphone
Connecting
NOTE: Please make sure that you use only the genuine batteries in your handset and they are inserted properly!
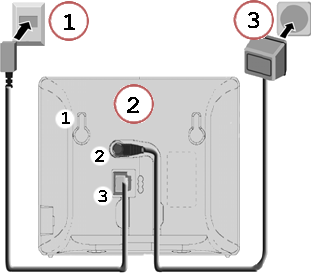
If you are intending to use PSTN, please connect your phone this way
1. Ordinary telephone wall-plug
2. Gigaset C 455 IP Base module.
2.1. Wallmount rabbets
2.2. Power jack
2.3. Phone jack
3. Electric wall-plug
2. Gigaset C 455 IP Base module.
2.1. Wallmount rabbets
2.2. Power jack
2.3. Phone jack
The PSTN(2.1.) and POWER (2.2.) connectors are located at the bottom of the Base module(2).
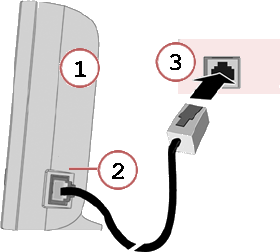
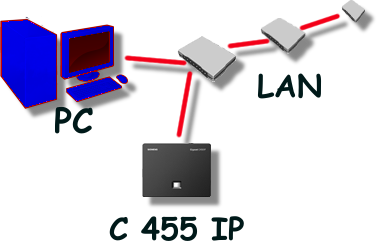
If not using PSTN please connect your IP phone following this hint:
* Connect the ethernet cable delivered in your Gigaset C 455 IP package to the network switch or the wall-plug(3) and insert its free end in the LAN jack(2) on your Gigaset C 455 IP Base module(1).
* Connect your PC to the network switch using another ethernet cable.
* Connect the Internet cable to the network switch .
* Connect the power cable to the Gigaset C 455 IP Base Module and to the appropriate wall-plug.
* Connect the Internet cable to the network switch .
* Connect the power cable to the Gigaset C 455 IP Base Module and to the appropriate wall-plug.
When all the cables are connected, it is time to pair your Handset and the Base module.
It should be registered by default.
A successfully registered handset has the INT display key on the bottom left side of its display.
It should be registered by default.
If your handset does not register automatically please follow these steps:
* enter the Menu
* choose Settings
* choose Handset
* choose Register Handset
* enter the system PIN
* within 60 seconds press and hold the Paging key on the Base Module.
* choose Settings
* choose Handset
* choose Register Handset
* enter the system PIN
* within 60 seconds press and hold the Paging key on the Base Module.
NOTE: You can register up to six handsets that way.
Now your handset is registered and you can move to the next step Setup your C 455 IP phone.
Setup
You can setup your IP phone by using the Handset or by using the Web Configuration pages.
As not everyone is used to such menus like the handset's, it is no wonder that the Web Configuring Interface is preferred.
As not everyone is used to such menus like the handset's, it is no wonder that the Web Configuring Interface is preferred.
Web Administration pages
To access the Web Administration pages you need to know the IP of your phone.
Enter it in your web browser
Enter it in your web browser
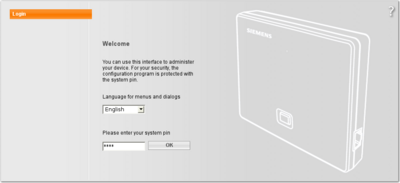
Next, you will see the login screen:

Enter your PIN to login.
NOTE: The factory PIN is 0000.Then you will access the Home screen.

Home - is the main screen. You will see two more tabs there.
Settings - access the configuration pages from here.
Status - you can check the status of your device here.
Settings - access the configuration pages from here.
Status - you can check the status of your device here.
Settings

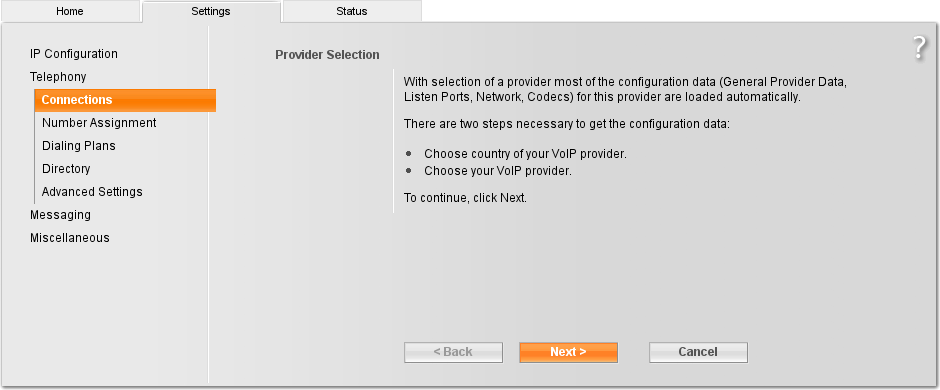
On this screen you can see a new menu on the left.
There are four choices:
Ip Configuration
Telephony
There are four choices:
Ip Configuration - you can configure your network settings from here.
Telephony - adjust telephony settings
Messaging - sending and receiving messages settings
Miscellaneous - firmware update settings
Telephony - adjust telephony settings
Messaging - sending and receiving messages settings
Miscellaneous - firmware update settings
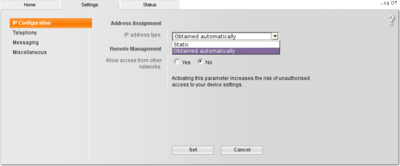
Ip Configuration
Choose if you will use DHCP server or a Static IP configuration.
Choose if your device will be accessible from other networks. It is recommended to administrate it only from your internal network.
Choose if your device will be accessible from other networks. It is recommended to administrate it only from your internal network.
Telephony

Here appears a new submenu, which offers you another five choices.
* Connections
* Number Assignment
* Dialing Plans
* Directory
* Advanced Settings
* Number Assignment
* Dialing Plans
* Directory
* Advanced Settings
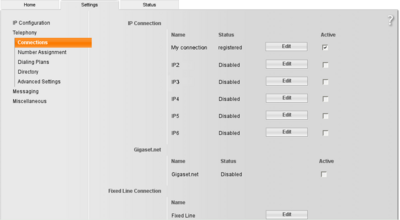
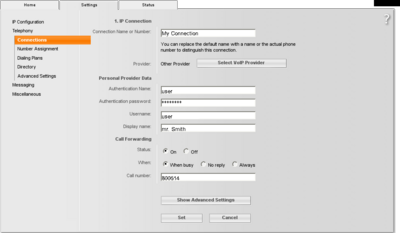
Connections
Here you can define your dialing connection.
It could be a custom IP connection
You can use a Gigaset.net account, if you have one;
You can use a fixed line too.
You can edit an IP connection to enter your own details by clicking the appropriate edit button on the page.
Here you can define your dialing connection.
It could be a custom IP connection
You can use a Gigaset.net account, if you have one;
You can use a fixed line too.
You can edit an IP connection to enter your own details by clicking the appropriate edit button on the page.
Then you will access the configuration screen

You can enter your connection's name or number here;
NOTE: If you do not use local VoIP provider account, please skip to the next paragraph!


If you will use different provider, as for example your own Asterisk server, please enter your authentication name, password, username and Display name
NOTE: the authentication name and the authentication password are the same you have in your Asterisk Configuration files! Please read below to learn how to create a SIP account on your Asterisk server.
 button.
NOTE: If you do not use local VoIP provider account, please skip to the next paragraph!
choose a VoIP provider if there is such in your country AND you have a working account by pressing
You will access the next page
click NEXT to get the list of available providers list.
If you will use different provider, as for example your own Asterisk server, please enter your authentication name, password, username and Display name
Choose if you will use Call Forwarding and in what circumstances, and number the incoming calls should be forwarded to.
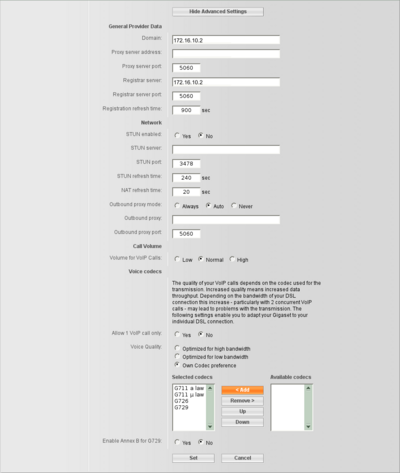
To configure the VoIP server network settings please use the
To configure the VoIP server network settings please use the
button.You will see the page extends downwards:
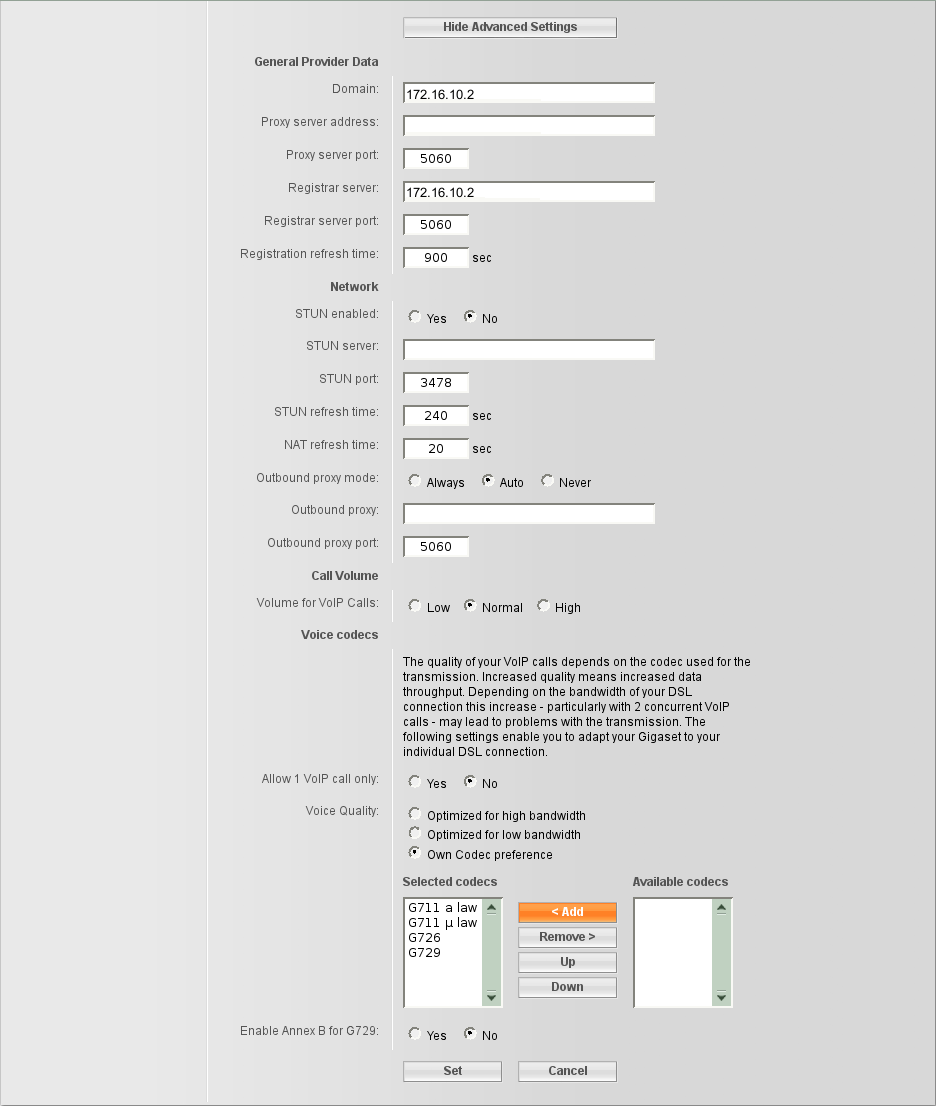
Here you can enter your Asterisk server's domain, IP address, choose if you need to use a Proxy or a STUN server if you deal with devices behind NAT, ports, Volume settings, audio codecs and etc.
Number Assignment
If you have more than one lines and more than one handset, you can bind each of the handsets to different line.
Here you can bind your Answering machine to a selected line.
Here you can bind your Answering machine to a selected line.
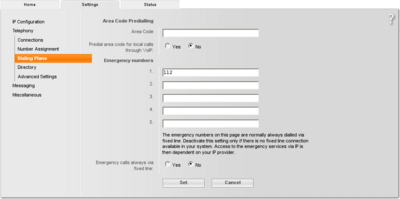
Dialing Plans
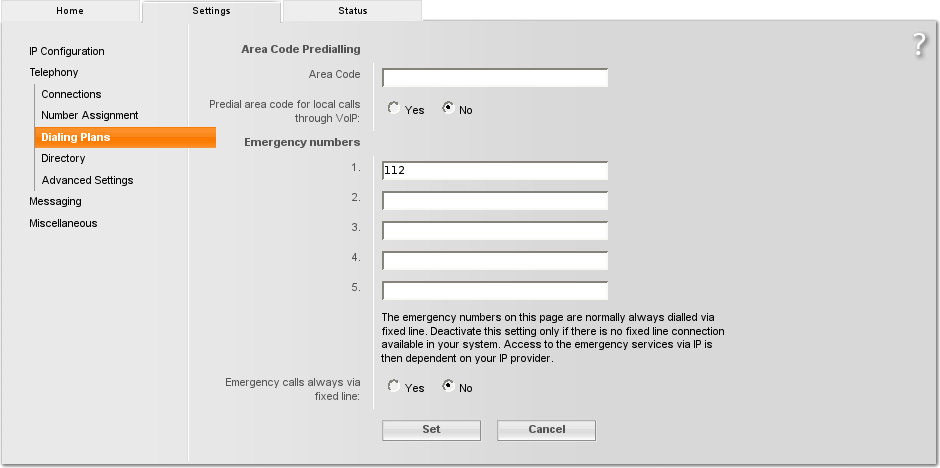
If you will make local calls through your IP phone, please enter your Area code here.
You can enter some emergency numbers here too if you use a Fixed Line.
You can enter some emergency numbers here too if you use a Fixed Line.
Directory
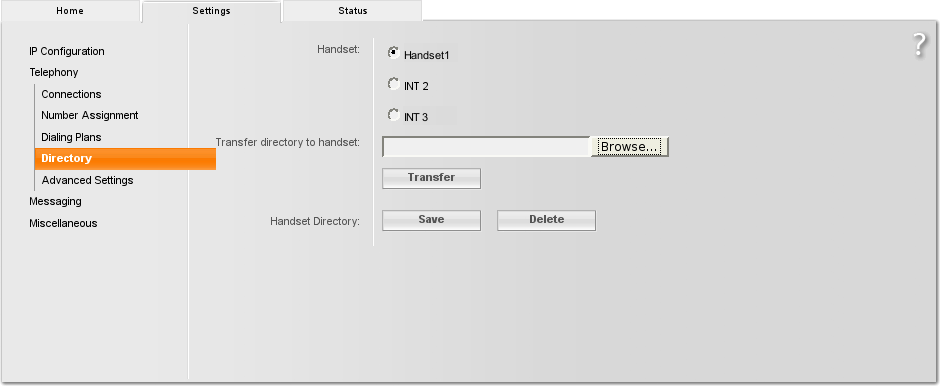
Set your handset directory here.
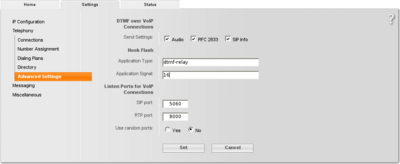
Advanced Settings
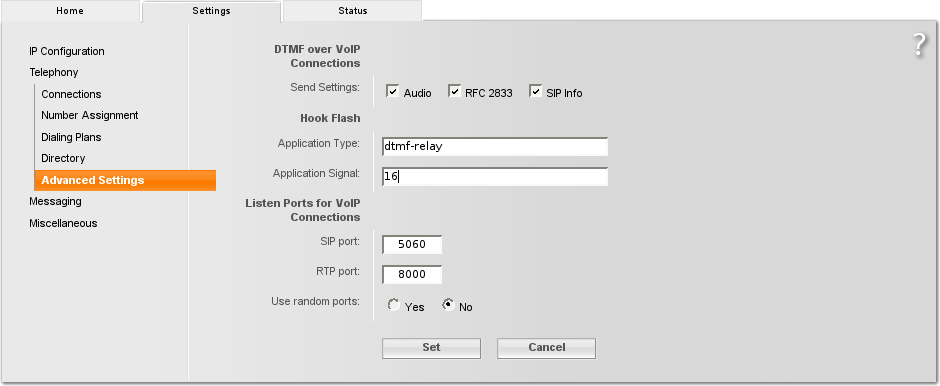
Here you can set such important things as RTP port or SIP port, DTMF settings and etc.
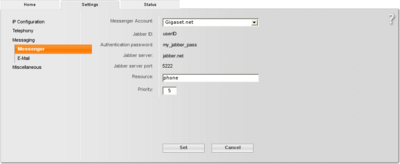
Messaging
Here you have another submenu with two choices
Status
Messenger
Email

Miscellaneous

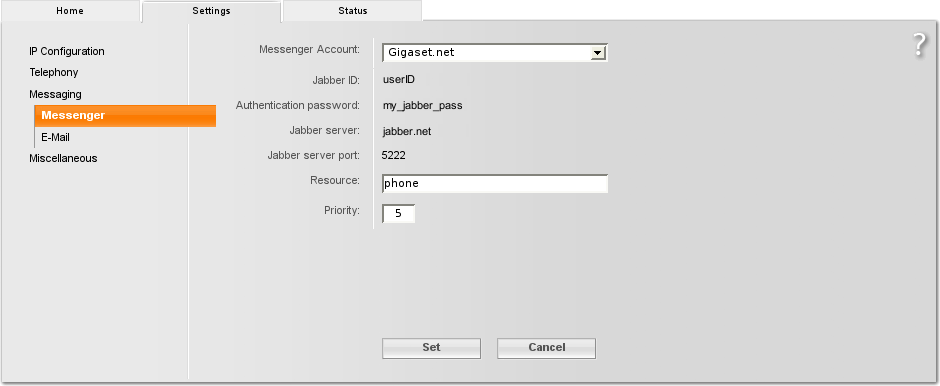
Enter here your messenger details to send and receive messages.
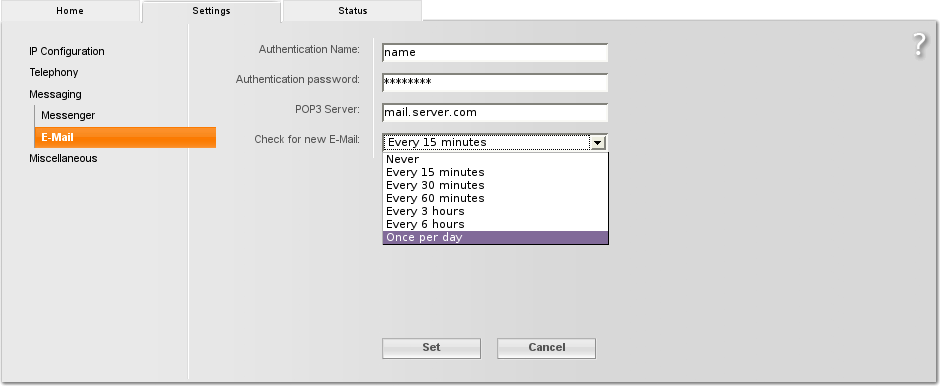
Enter your email settings here if you want to use it with your IP phone
Miscellaneous
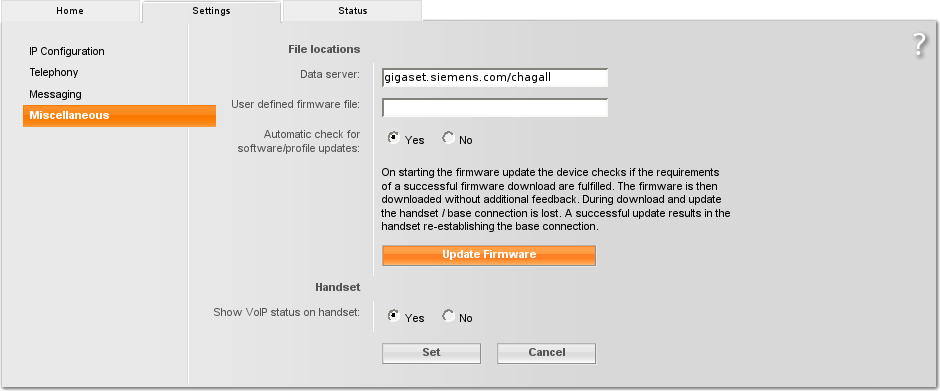
Here you can adjust the firmware update settings by using given server, or file, and update the running Firmware by clicking the Update Firmware Version button.
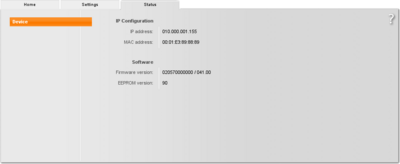
Status

Here you can see the current status of your device.
To confirm all the changes, please click the SET button and reboot your device.
To confirm all the changes, please click the SET button and reboot your device.
Setting up an Asterisk account
Setting up an Asterisk account to be used with your hardphone.
NOTE: If you are an advanced Asterisk user, please skip the following paragraph about setting up an Asterisk account to use with your phone.
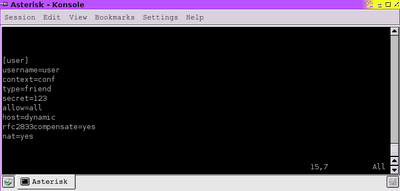
I added the following to my sip.conf :
NOTE: If you are an advanced Asterisk user, please skip the following paragraph about setting up an Asterisk account to use with your phone.
To set up a working SIP account on your Asterisk server, you have to edit some .conf files. Please, connect using your mostly preferred way to your Asterisk server and find where the sip.conf and extensions.conf files are located. They are usually located at the /etc/asterisk/ directory. Now, use your favorite text editor to make some changes. First edit the sip.conf file.
Adding a new user is a simple process, which consists of adding some lines, similar to these in our example here:
Adding a new user is a simple process, which consists of adding some lines, similar to these in our example here:
I added the following to my sip.conf :
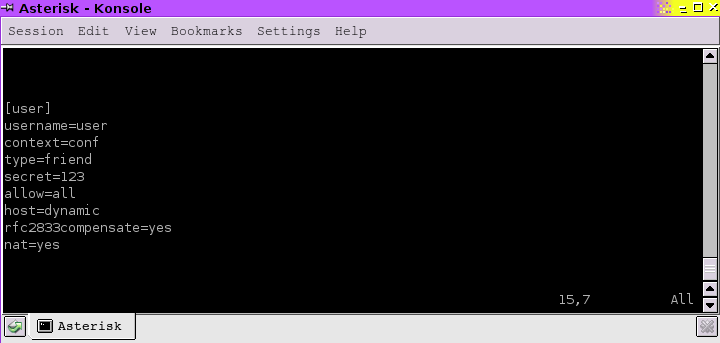
[user]: needed to indicate we are registering user "user".
username=user: to determine our user's name is "user".
context=conf: defines the dial context for the user "user". Asterisk divides outgoing numbers in groups called contexts in order to separate/define different needs for different uses. In this example the user "user" is in a context called "conf".
type=friend: Users that can place AND receive calls are described as "friend". If your new user will only receive calls, use "peer" as type. For placing calls only use "user" as type.
secret=123: this is where you set up your user's password. He will use it to login/authenticate on Asterisk. It is presented in plain text, bus as only the server's administrators (you) have access to this file, there is nothing to worry about.
allow=all: means that the line which this user will use supports all audio codecs.
host=dynamic: You can define your users IP as static or dynamic, according to the type of network.
rfc2833compensate=yes: You must have this turned on, or DTMF reception will work improperly.
nat=yes: If you are placing the phone behind a NAT you must enable that.
Save the changes and continue to register an extension for the user "user" ;).
Now please open the file extensions.conf in your favorite editor to make some changes:
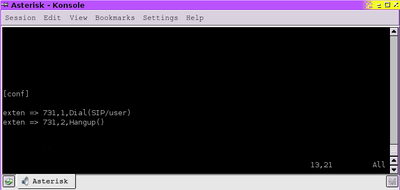
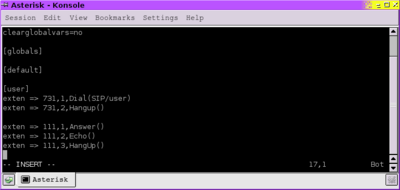
In my file I added :
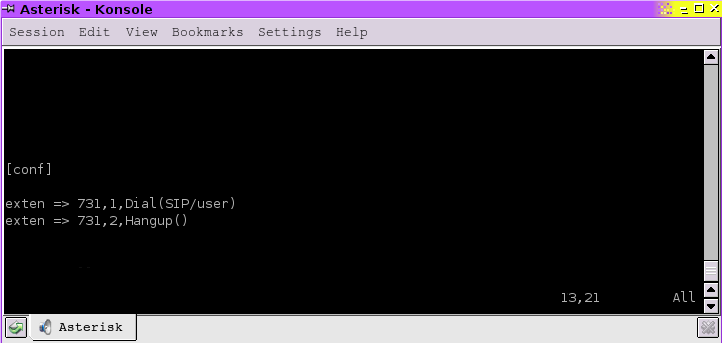
conf: it is the name of the new context.
The first line "exten => 731,1,Dial(SIP/user)" shows that if somebody dials the number 731 his call will be connected with the user "user" through SIP.
The second line "exten => 731,2,Hangup()" says that if the conversation is over then Asterisk has to hang up the line. It is needed to be sure that Asterisk will free it for the next call.
NOTE: Do not forget to save the changes you just made in extensions.conf .
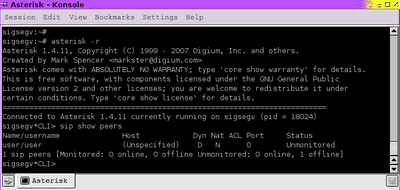
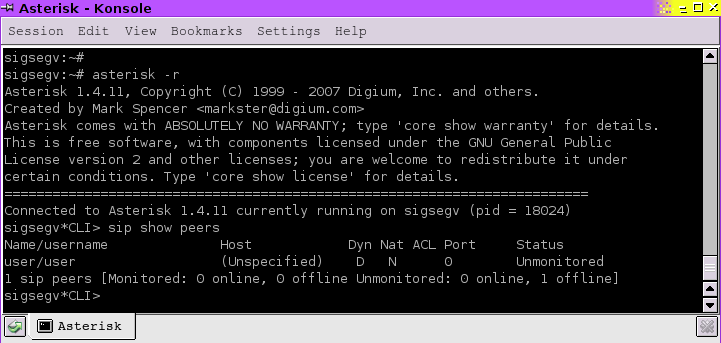
As your new user "user" is already configured, please start your Asterisk server:
# asterisk
enter the Asterisk CLI console by typing:
# asterisk -r
and reload the SIP configuration for the changes to take effect by using:
# sip reload
then reload the extensions:
# extensions reload
now you can check what you've done by:
# sip show peers
To execute shell command without exiting Asterisk, type "!", then press the [ENTER] key.
Check if there are any sample sounds in your /var/lib/asterisk/sounds/:
#ls /var/lib/asterisk/sounds/
If everything is all right, you will see a long list of files.
I picked up "Hello World.gsm" for this example.
Let us make a new extension in our context.
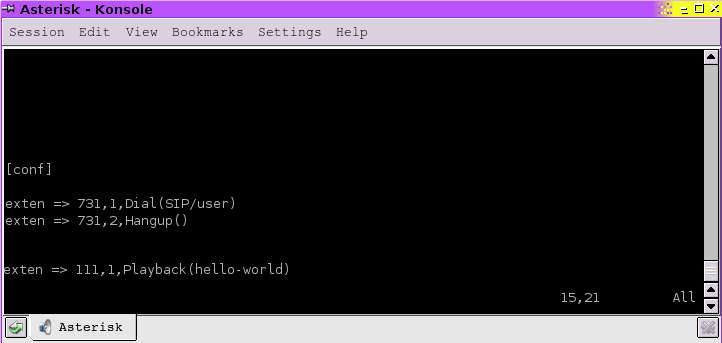
exten => 111,1,Playback(hello-world) means that if someone from the "conf" context dials 111, he will hear this file played.
Save your extensions.conf file, and press CTRL+D to return to the Asterisk CLI console.
Reload extensions now:
# extensions reload
and exit Asterisk CLI console by typing:
# exit
Now you can dial 111 to test if you will hear the "Hello World" greeting. :)
NOTE: ALL characters after ";" are interpreted by Asterisk as a comment !
ADVICE: read our tutorial about "Configuring IP Phones for use with Asterisk"
for information how to make the configurations in the Asterisk's configuration files.
TESTS
To know that everything is all right you can test it with an echo test, or by installing a softphone.
Echo test
To do an echo test you need to add few more lines in your extensions.conf file.
Open it with your favorite editor and edit it following the example:
Open it with your favorite editor and edit it following the example:

exten => 111,1,Answer(): that means that the call will be answered;
exten => 111,2,Echo(): makes possible for you to hear your own voice;
exten => 111,3,HangUp(): hangs up after you've finished the call.
exten => 111,2,Echo(): makes possible for you to hear your own voice;
exten => 111,3,HangUp(): hangs up after you've finished the call.
Now, if you dial 111 and say something you will hear your own voice.
Testing by a softphone
To make a test call with a softphone you need one.
Download Zoiper and test it for free from the download section on our website!
Download Zoiper and test it for free from the download section on our website!

Installation
Zoiper on Linux
If you are using Linux, please follow these steps which will lead you to a working Zoiper phone.
1. Download the appropriate archive from our website;
2. choose a destination directory and extract it there;
3. open that directory and click the newly extracted file Zoiper with your mouse to run it.
You can also open a terminal in the active X-session, navigate to the target directory by using cd and execute the file by
# ./zoiper
Zoiper on Windows
If you are using Windows, please follow these steps which will lead you to a working Zoiper phone.
If you are using Windows, please follow these steps which will lead you to a working Zoiper phone.
1. Download the appropriate archive from our website;
2. run the newly downloaded .exe file;
3. you will see Zoiper's installation wizard. You will be expected to read a License Agreement, and maybe - agree it.
4. If you agree it, please click on the appropriate button to proceed to the next screen, to choose a destination directory for your Zoiper. You can see some information about space required by Zoiper and the available free space on your hard drive.
5. The next screen is an opportunity to choose where do you want your Zoiper Start Menu shortcuts.
6. Once again you will deal with shortcuts this time some additional ones for your Desktop and Quick Launch. If you do not want them, just unmark the appropriate checkboxes.
7. When you click the Install button the real installation will begin. You can click the Details button to see some details, but it will finish so fast that you'd hardly have enough time.
8. The next screen is the last one. It will inform you that your Zoiper installation had finished successfully.
Congratulations ! You can start using it now !.
Setting an additional account.
Please connect/open a terminal session to your Asterisk server in order to modify your /etc/asterisk/sip.conf file and add one more user account. It will be needed to use with Zoiper.
You can copy the user account, and modify it a little.
You can copy the user account, and modify it a little.
[user]:change it to [user2] to determine that we are setting an account for user2
username=user: change it too -> username=user2to determine our user's name is now "user2".
context=conf: defines the dial context for the user "user2". You should leave it as it is, as user and "user2" can be in the same context.
type=friend: leave as it is, as you will need both of your users to place and receive calls when testing.
secret=123: you may use the same password or change it.
allow=all: you do not need to change that.
host=dynamic: you can either enter the IP address of the computer you've just installed Zoiper on or leave this as it is.
rfc2833compensate=yes: You must have this turned on, or DTMF reception will work improperly.
nat=yes: If you are placing the phone behind a NAT you must enable that.
Now save this file and open /etc/extensions.conf to add a new extension for that user.
Setting additional extensions.
You added 3 lines for your first account. Now add the new ones below:
As adding user 2 to the existing context, you do not need to specify a new one.
Just add these two lines:
As adding user 2 to the existing context, you do not need to specify a new one.
Just add these two lines:
exten => 732,1,Dial(SIP/user2) shows that if somebody dials the number 732 his call will be connected with the user "user2" through SIP.
exten => 732,2,Hangup(): it is needed to be sure that when the conversation is over then Asterisk has to hang up the line. It is needed to be sure that Asterisk will free it for the next call.
exten => 732,2,Hangup(): it is needed to be sure that when the conversation is over then Asterisk has to hang up the line. It is needed to be sure that Asterisk will free it for the next call.
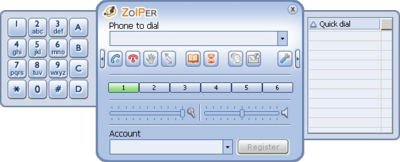
Zoiper Setup
To use your new Zoiper softphone you need an account and you have to set it up.
This you can do following my steps:
Accessing Options Form
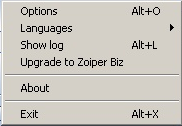

Start your Zoiper and right-click on its interface. Click on "Options" to open the configuration menu.
There is an Options button on the Zoipers interface. You can start configuration form from there too.
Use "Alt+O" if you prefer using keyboard than clicking.
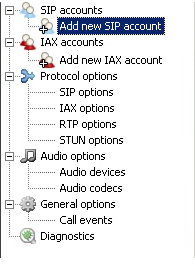
Adding SIP account
When the form starts you should click on the "Add new SIP account" label in the navigation menu to the left.
A new sub-form will appear. Enter a name the account and click on the "OK" button to create it.
The new entry will appear in the navigation menu to the left.
Click on it to continue the configuration.
On the right side of the navigation menu you can specify some options for the account.
Enter the hostname or the IP address of the Asterisk server (or other VoIP server) that you are going to use.
Enter the account name and secret that you put in the sip.conf file (user2/012). Enter a caller id and name and click on the "Apply" button to activate the changes.
There are additional options that you might want to configure. In order to view the advanced options for the current account you should enable the checkbox with label "Show advanced options" which is located on the bottom left corner.
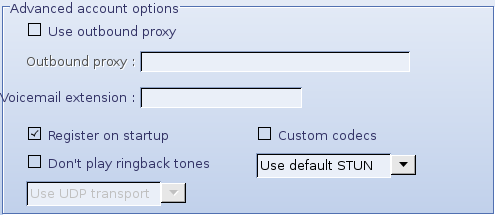
When you do this you can set an outbound proxy, if necessary, or a voicemail extension, a STUN server, if needed. You can select if Zoiper should register this account upon applications start-up.
When you are ready click on the "Apply" button.
When you are ready click on the "Apply" button.
Registering SIP accounts
You should select the proper account from the drop down menu in the bottom of Zoipers interface. When you are ready with this click on the "Register" button.
You can find our Zoiper tutorial here.
As Zoiper supports IAX accounts, you can read the Zoiper tutorial and find out how to set up and use an IAX account.
You can find our Zoiper tutorial here.
As Zoiper supports IAX accounts, you can read the Zoiper tutorial and find out how to set up and use an IAX account.
As you have already set up your hardphone and your softphone, you can make a call from the first to the second one and vice versa :)

Factory Reset
Restoring the handset default settings
When a handset setting is reset, it affects the language, display, volume, ringer and alarm clock settings. The last number redial list is cleared.
* press "Menu"
* choose "Settings"
* choose "Handset"
* choose "Reset Handset"
* confirm wiith "OK"
If you want to cancel resetting, please use the "Hangup" key.
* choose "Settings"
* choose "Handset"
* choose "Reset Handset"
* confirm wiith "OK"
If you want to cancel resetting, please use the "Hangup" key.
Resetting the Base Station
When you reset your Base all settings are reset.
The system PIN will be reset to "0000" and all handsets are deregistered.
That's it. Your Base is now reset.
The system PIN will be reset to "0000" and all handsets are deregistered.
* Remove the cable connections from the base station to the router and fixed network.
* Remove the base station mains unit from the socket.
* Press and hold the registration/paging key.
* Plug the mains unit back into the power socket.
* Press and hold the registration/paging key for at least 10 seconds.
* Release the registration/paging key.
* Remove the base station mains unit from the socket.
* Press and hold the registration/paging key.
* Plug the mains unit back into the power socket.
* Press and hold the registration/paging key for at least 10 seconds.
* Release the registration/paging key.
That's it. Your Base is now reset.
Links and files
Useful links
Files
1. Siemens Gigaset C 455 IP official page.
2. Siemens Gigaset C455 IP User Manual pages
3. Our tutorial about "Configuring IP Phones for use with Asterisk"
4. Asterisk.org
5. The official Zoiper site
6. Zoiper tutorial
2. Siemens Gigaset C455 IP User Manual pages
3. Our tutorial about "Configuring IP Phones for use with Asterisk"
4. Asterisk.org
5. The official Zoiper site
6. Zoiper tutorial
Files
| Add Comment |
Latest Headlines:
-
T.38 faxing with Zoiper 2.15 is now easier than ever
section: voip software
-
Asterisk 1.4.21 Released
section: Asterisk
-
Asterisk 1.4.20 Released
section: Asterisk
-
Asterisk 1.4.20-rc2 Released
section: Asterisk
-
Asterisk 1.4.20-rc1 Now Available
section: Asterisk
- News Archives (older news)
Latest Tutorials:
-
Sending Fax from Zoiper to Zoiper using T.38
added 08/Dec/2008 18:16
-
VMAuthenticate (dialplan application)
added 01/Mar/2008 15:57
-
Siptronic ST-530
added 06/Nov/2007 17:57
-
Siemens C455 IP hardphone
added 05/Nov/2007 10:24
-
Zoiper
added 22/Oct/2007 17:53
Latest Comments:
-
I have been suffering from Herpes for th...
tutorial: Siptronic ST-530
-
https://medium.com/@dimidev309
https://...
tutorial: Sending Fax from Zoiper to Zoiper using T.38
-
https://zyo.se/verzootropolis2
https://...
tutorial: Request to schedule in the past?!?!
-
https://keandatphimhd.linkspot.bio/
htt...
tutorial: Request to schedule in the past?!?!
-
https://keandatphimhd.linkspot.bio/
htt...
tutorial: Request to schedule in the past?!?!