

3.2.18. Grandstream GXV-3000
Introduction
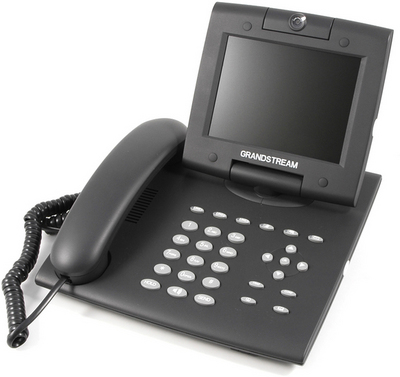
Grandstream GXV-3000 is a next generation advanced IP video phone based on SIP and H.264 standard. Built upon Grandstream's innovative technology, GXV-3000 features superb audio and video quality, rich functionality, ease of use, stylish exterior design, and highly attractive price.
Main Features:
Support advanced video features including:
The videophone also supports 2 USB (2.0) host ports, 1 audio and 1 video output jack and headset jack. The device configuration can be made via LCD, Web browser or central secure configuration file.
Hardware installation
1 Plug the one end of the handset's cable into the phone and the other into the handset itself.
2 Plug your Internet cable into the port with label 'Network'
3 Power up the phone by plugging the power supply into the phone.
4 Plug your PC cable into the port with label 'PC'. Plug the other end into the Ethernet port of your PC. That way both the phone and your PC will be supplied with Internet.
5 If you have headset plug it into the port with 'headset' image above it.
6 If you want to use the stereo output of the phone plug the audio cables into the following ports: LL OUT for the left, and RL OUT for the right.
7 If you want to transfer the video to a different screen, plug the appropriate cable into the port with label 'VIDEO OUT'
Note that your videophone is ready for usage after steps 1, 2 and 3. The rest of the steps are optional.
Software configuration
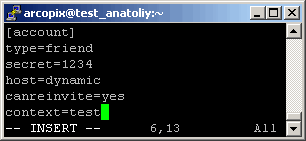
1 Create a normal SIP account in your sip.conf files. You can read our tutorial for creating new users
2 You will need to set up the IP address for your phone. There are two methods in order to accure IP address:3 Configuring SIP settings on the videophone
Setting static IP address to the phone
1. Setting static IP address
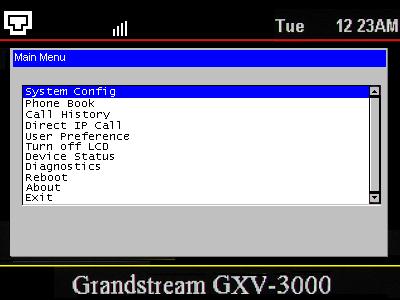
If you are setting up a new phone the only way to set a static IP address is to use the GXV-3000 graphical menus. Enter the `Main Menu` and select `System Config` sub-menu.
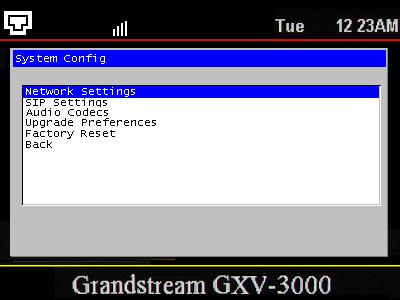
From the `System Config` sub-menu select the `Network Settings` option as is shown:
The `Network Settings` form will allow you to set your IP address, Subnetwork mask and gateway. By using the arrows and the `OK` button go to DHCP check box. If it is checked press the OK button to uncheck it. By using the arrow keys and the OK button go to IP Address text box. There you should enter you IP address. For our example we will set the IP address 192.168.10.160. Note that one-digit octets have two zeroes added in front. For example: 192.1.x.x is written as 192001.... Two digit octets have one zero added in front. For example: 192.168.10.x is written as 192168010.... Our IP address should be entered in this way: `192168010160`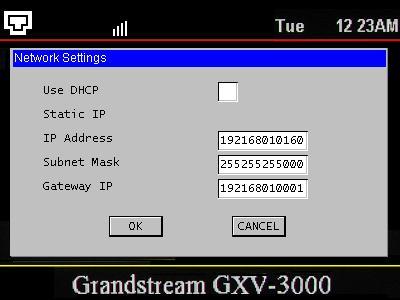
In the same way you can configure your netmask and gateway. When ready navigate to the 'OK' button of the form and press 'OK' from the keyboard to apply the changes. You can press the 'Cancel' in order to cancel all changes.
2. Editing static IP address
You can edit your IP address in two ways:


2.2 Through the videophone's configuration menu - you can edit your network setting in the way that we set them in "1. Setting static IP address". Just delete the old setting by using the `delete` button and set up the new settings.
Setting dynamic IP address
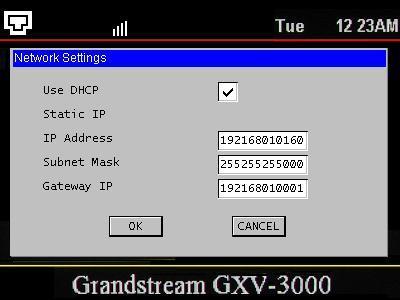
1. Setting dynamic IP address through videophone's menus - enter the `Main Menu` and select `System Config` sub-menu.
From the `System Config` sub-menu select the `Network Settings` option as shown below:
The `Network Settings` form will allow you to set your IP address, Subnework mask and gateway. Use the arrows and the `OK` button to go to DHCP check box. By `checking` the DHCP box you'll enable the acquiring of the network settings from your DHCP server.
2. Setting dynamic IP address through videophone's web interface - note that this is possible if your videophone has already configured network settings. Go to your web interface
When you authorize with your administration password go to BASIC SETTINGS
In order to enable the DHCP support, select the radio button with text `dynamically assigned via DHCP (default) or PPPoE`. You can additionally set the:
When you are ready, click on the `Update` button in order to submit the changes or on the `Cancel` button in order to cancel all changes.
Setting SIP settings
You can configure the SIP settings of the videophone in two ways:
Configuring through web interface
Go to your web interface
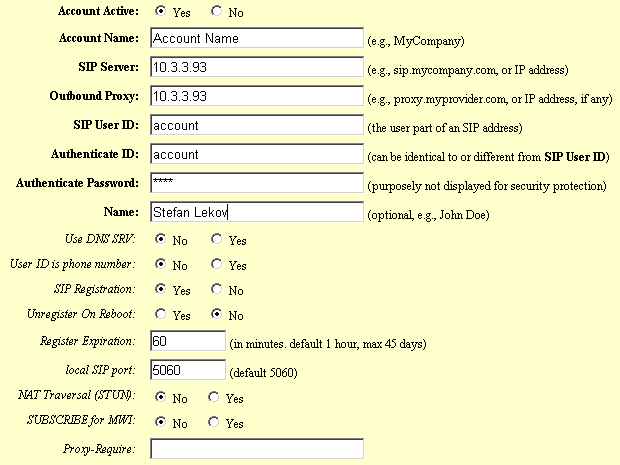
When you authorize with your administration password go to ACCOUNT 1.

Refer to the SIP account that you created on the Asterisk server:
Enter the data into the according fields:
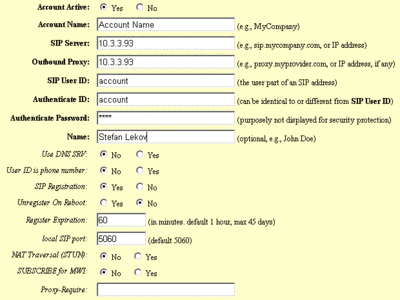
When you are ready click on the `Update` button to submit the changes or on the `Cancel` button to cancel all changes.
Configuring through videophone's menus
enter the `Main Menu` and select `System Config` sub-menu.
From the `System Config` sub-menu select the `SIP Settings` option as shown below:
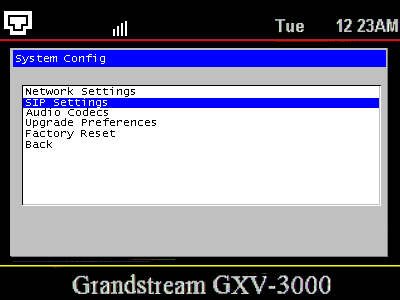
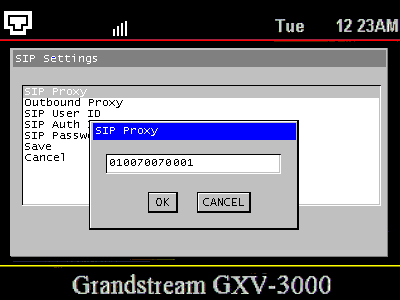
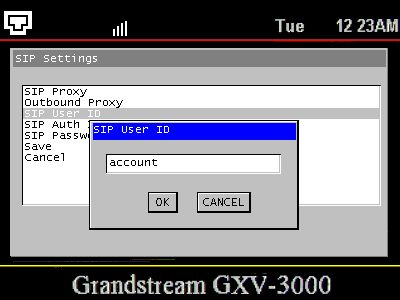
From this `SIP Settings` sub-menu you can select from different for setting up the basic SIP options for your videophone

Enter your SIP proxy's IP address (your SER's IP address, your Asterisk IP address) and press the `OK` button to confirm or the `Cancel` button to cancel all changes.
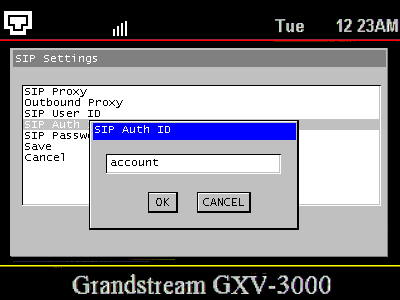
Enter your username and press the `OK` button to confirm or the `Cancel` button to cancel all changes.
Enter your account name and press the `OK` button to confirm or the `Cancel` button to cancel all changes.
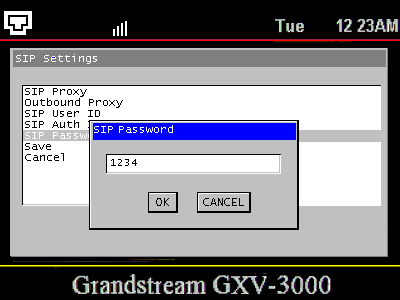
Enter your secret and press the `OK` button to confirm or the `Cancel` button to cancel all changes.
After completing all steps you should save your settings. You can achieve this by selecting `Save` option from the `SIP Settings` menu.

Grandstream GXV-3000 is a next generation advanced IP video phone based on SIP and H.264 standard. Built upon Grandstream's innovative technology, GXV-3000 features superb audio and video quality, rich functionality, ease of use, stylish exterior design, and highly attractive price.
- Supports SIP 2.0, TCP/IP/UDP, RTP/RTCP, HTTP/HTTPS, ARP/RARP, ICMP, DNS, DHCP (both client and server), PPPoE, TFTP, NTP, Telnet, TLS (pending), etc.
- Supports dual 10M/100M auto-sensing Ethernet ports configurable to operate under either switch or router mode.
- Powerful video DSP with advanced adaptive jitter control and packet loss concealment technology to ensure superb audio and video quality.
- Supports advanced H.264 base line real-time video codec (at CIF or QVGA resolution and up to 30 frames/second)
- Support popular voice features including 3 line indicators, full-duplex hands free speaker phone, 3-way conference, etc
Support advanced video features including:
- High quality 5.6-inch TFT color LCD panel 2 dimensionally
Rotatable and camera tiltable to allow virtually all viewing angles
- Advanced VGA resolution CMOS camera sensor
- Anti-flickering
- Auto focus and auto exposure
- Zoom
- PIP (Picture-in-Picture)
- Audio mute and camera block (for privacy)
- Still picture capture/store/send (VGA Resolution)
Rotatable and camera tiltable to allow virtually all viewing angles
- Advanced VGA resolution CMOS camera sensor
- Anti-flickering
- Auto focus and auto exposure
- Zoom
- PIP (Picture-in-Picture)
- Audio mute and camera block (for privacy)
- Still picture capture/store/send (VGA Resolution)
The videophone also supports 2 USB (2.0) host ports, 1 audio and 1 video output jack and headset jack. The device configuration can be made via LCD, Web browser or central secure configuration file.
Hardware installation
1 Plug the one end of the handset's cable into the phone and the other into the handset itself.
2 Plug your Internet cable into the port with label 'Network'
3 Power up the phone by plugging the power supply into the phone.
4 Plug your PC cable into the port with label 'PC'. Plug the other end into the Ethernet port of your PC. That way both the phone and your PC will be supplied with Internet.
5 If you have headset plug it into the port with 'headset' image above it.
6 If you want to use the stereo output of the phone plug the audio cables into the following ports: LL OUT for the left, and RL OUT for the right.
7 If you want to transfer the video to a different screen, plug the appropriate cable into the port with label 'VIDEO OUT'
Note that your videophone is ready for usage after steps 1, 2 and 3. The rest of the steps are optional.
Software configuration
1 Create a normal SIP account in your sip.conf files. You can read our tutorial for creating new users
2 You will need to set up the IP address for your phone. There are two methods in order to accure IP address:3 Configuring SIP settings on the videophone
Setting static IP address to the phone
1. Setting static IP address
If you are setting up a new phone the only way to set a static IP address is to use the GXV-3000 graphical menus. Enter the `Main Menu` and select `System Config` sub-menu.
From the `System Config` sub-menu select the `Network Settings` option as is shown:
The `Network Settings` form will allow you to set your IP address, Subnetwork mask and gateway. By using the arrows and the `OK` button go to DHCP check box. If it is checked press the OK button to uncheck it. By using the arrow keys and the OK button go to IP Address text box. There you should enter you IP address. For our example we will set the IP address 192.168.10.160. Note that one-digit octets have two zeroes added in front. For example: 192.1.x.x is written as 192001.... Two digit octets have one zero added in front. For example: 192.168.10.x is written as 192168010.... Our IP address should be entered in this way: `192168010160`
In the same way you can configure your netmask and gateway. When ready navigate to the 'OK' button of the form and press 'OK' from the keyboard to apply the changes. You can press the 'Cancel' in order to cancel all changes.
2. Editing static IP address
You can edit your IP address in two ways:
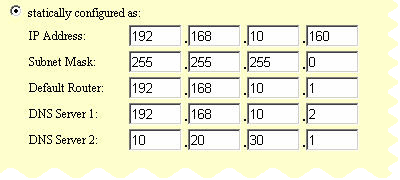
2.1 Through the web interface:
When you authorize with your admin password go to BASIC SETTINGS
From this page you will be able to change your IP address, subnetwork mask, gateway, DNS servers.
When you are ready click on the `Update` button in order to submit the changes or on the `Cancel` button in order to cancel all changes.
2.2 Through the videophone's configuration menu - you can edit your network setting in the way that we set them in "1. Setting static IP address". Just delete the old setting by using the `delete` button and set up the new settings.
Setting dynamic IP address
1. Setting dynamic IP address through videophone's menus - enter the `Main Menu` and select `System Config` sub-menu.
From the `System Config` sub-menu select the `Network Settings` option as shown below:
The `Network Settings` form will allow you to set your IP address, Subnework mask and gateway. Use the arrows and the `OK` button to go to DHCP check box. By `checking` the DHCP box you'll enable the acquiring of the network settings from your DHCP server.
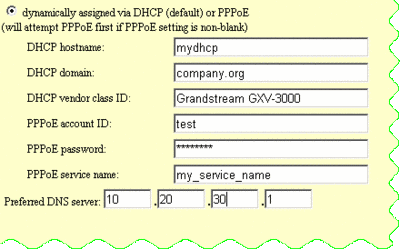
2. Setting dynamic IP address through videophone's web interface - note that this is possible if your videophone has already configured network settings. Go to your web interface
When you authorize with your administration password go to BASIC SETTINGS
In order to enable the DHCP support, select the radio button with text `dynamically assigned via DHCP (default) or PPPoE`. You can additionally set the:
* DHCP hostname
* DHCP domain
* DHCP vendor class ID
* PPPoE account ID
* PPPoE password
* PPPoE service name
* DHCP domain
* DHCP vendor class ID
* PPPoE account ID
* PPPoE password
* PPPoE service name

When you are ready, click on the `Update` button in order to submit the changes or on the `Cancel` button in order to cancel all changes.
Setting SIP settings
You can configure the SIP settings of the videophone in two ways:
Through the web-interface of the videophone
Through the videophone's menus
Through the videophone's menus
Configuring through web interface
Go to your web interface
When you authorize with your administration password go to ACCOUNT 1.
Refer to the SIP account that you created on the Asterisk server:
Enter the data into the according fields:
When you are ready click on the `Update` button to submit the changes or on the `Cancel` button to cancel all changes.
Configuring through videophone's menus
enter the `Main Menu` and select `System Config` sub-menu.
From the `System Config` sub-menu select the `SIP Settings` option as shown below:
From this `SIP Settings` sub-menu you can select from different for setting up the basic SIP options for your videophone
Enter your SIP proxy's IP address (your SER's IP address, your Asterisk IP address) and press the `OK` button to confirm or the `Cancel` button to cancel all changes.
Enter your username and press the `OK` button to confirm or the `Cancel` button to cancel all changes.
Enter your account name and press the `OK` button to confirm or the `Cancel` button to cancel all changes.
Enter your secret and press the `OK` button to confirm or the `Cancel` button to cancel all changes.
After completing all steps you should save your settings. You can achieve this by selecting `Save` option from the `SIP Settings` menu.
| Add Comment |
Latest Headlines:
-
T.38 faxing with Zoiper 2.15 is now easier than ever
section: voip software
-
Asterisk 1.4.21 Released
section: Asterisk
-
Asterisk 1.4.20 Released
section: Asterisk
-
Asterisk 1.4.20-rc2 Released
section: Asterisk
-
Asterisk 1.4.20-rc1 Now Available
section: Asterisk
- News Archives (older news)
Latest Tutorials:
-
Sending Fax from Zoiper to Zoiper using T.38
added 08/Dec/2008 18:16
-
VMAuthenticate (dialplan application)
added 01/Mar/2008 15:57
-
Siptronic ST-530
added 06/Nov/2007 17:57
-
Siemens C455 IP hardphone
added 05/Nov/2007 10:24
-
Zoiper
added 22/Oct/2007 17:53
Latest Comments:
-
https://audibg.com/forum/index.php?/topi...
tutorial: asterisk.conf
-
https://www.boxingscene.com/forums/boxin...
tutorial: asterisk.conf
-
https://ia600803.us.archive.org/21/items...
tutorial: Asterisk Installation
-
https://www.finance.gov.fj/wp-content/up...
tutorial: RemoveQueueMember (dialplan application)
-
https://www.finance.gov.fj/wp-content/up...
tutorial: RemoveQueueMember (dialplan application)