

3.2.15. Jensen Scandinavia VoIP Gateway
1. Introduction
2. Prerequisites
3. Asterisk PBX configuration
4. Configurations on the Jensen Scandinavia VoIP Gateway
5. Uploaded Files
6. Reference
This is a product of Jensen Scandinavia - VoIP Gateway, which works with the Session Initiation Protocol (SIP).
Features
- Support configuration through Web Interface;
- Two levels of access;
- Downloading through TFTP and HTTP;
- AutoUpdate;
- Localization;
- Gain Control on the Input and Output audio;
- Support SNMP;
- Different types of service access;
- Different Codecs - G711 u-law, G711 a-law, G723, G726, G729;
- Packetization;
- Adaptive and Fixed Jitter Buffer;
- Support Session Initiation Protocol (SIP);
- Support Simple dial plan;
- Support different signaling types like: In-Band, Out-Of-Band, In-Band & Out-Of-Band, INFO(RFC2976)
- VLAN Tagging
- DHCP
- Static address assignments
- Dynamic and Static Routing
- Port forwarding
- Operating modes as Router or Bridge
- PPPoE Configurations
- IPSec Configurations
- MAC Spoofing
In this tutorial we will show you how to make the configuration of your phone, in order to work with Asterisk PBX.
2. Prerequisites
1) You need a working Asterisk PBX with registered users and made extensions.
2) On the back of the phone there are two RJ-45 ports.
Put the Ethernet cable from your network in the port labeled WAN
Use another Ethernet cable to connect your computer with the phone. Put this cable in the RJ-45 jack labeled LAN.
3) A normal phone device with a RJ-11. Connect this telephone with the VoIP Gateway by using the port labeled Phone.
4) Plug the power cord in the phone.
3. Asterisk PBX configuration
1) sip.conf
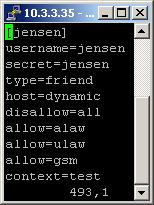
We need to create one user in the sip.conf file. This is because the Jensen Scandinavia VoIP Gateway is using the SIP protocol, for a connection with the Asterisk PBX.
So, we have created the user jensen. This user will be used with the VoIP Gateway.
Type=friend means that the user could make and receive calls. Host=dynamic means that the IP is not static but dynamic through a DHCP server. Disallow=all - means that the line will not support any codecs. However, below this option we have allow=ulaw, allow=alaw and allow=gsm. This means that the line will support these three codecs - ulaw, alaw and gsm. It is important to write the options exactly in this order. First you write the disallow=all option and then the allow options. Otherwise, if you write the disallow option after the allow options, no codecs will be supported by the line. Context=test - this shows that the user is working with the extensions in this context of the configuration file extensions.conf.
Type=friend means that the user could make and receive calls. Host=dynamic means that the IP is not static but dynamic through a DHCP server. Disallow=all - means that the line will not support any codecs. However, below this option we have allow=ulaw, allow=alaw and allow=gsm. This means that the line will support these three codecs - ulaw, alaw and gsm. It is important to write the options exactly in this order. First you write the disallow=all option and then the allow options. Otherwise, if you write the disallow option after the allow options, no codecs will be supported by the line. Context=test - this shows that the user is working with the extensions in this context of the configuration file extensions.conf.
2) extensions.conf

Now, lets take a look at the extensions.conf file.
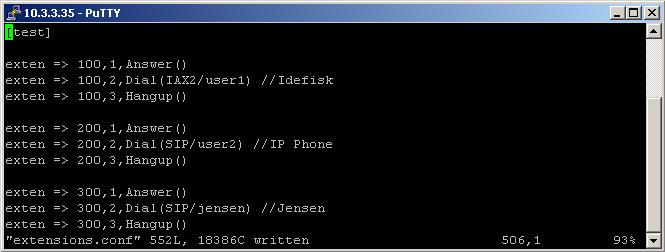
On the picture above you can see our extensions.conf file.
We will create our extensions in the [test] context of the extensions.conf file.
We have three phone numbers - 100, 200 and 300. For each of them we have by three extensions. We are working in the [test] context.
When somebody dials number 100, the call will be answered by the Answer application. The next application, which will be executed is the Dial one. Thanks to it, the call will be connected to the user user1 through the IAX2 channel. user1 is a user, which we are using with our softphone Idefisk. The last extension is using the Hangup application. Its purpose is to hang up the line, when the conversation is over. It is a good idea, always to use this application in your dialplans.
When somebody dials number 200, the call will be answered by the Answer application. The next application, which will be executed is the Dial one. Thanks to it, the call will be connected to the user user2 through the SIP channel. We are using the user2 user, with one of our IP Phones - ST-302 IP Phone. The last extension is using the Hangup application. Its purpose is to hang up the line, when the conversation is over. It is a good idea, always to use this application in your dialplans.
When somebody dials number 300, the call will be answered by the Answer application. The next application, which will be executed is the Dial one. Thanks to it, the call will be connected to the user jensen through the SIP channel. Jensen is actually the user, which we are going to use for the Jensen Scandinavia VoIP Gateway. The last extension is using the Hangup application. Its purpose is to hang up the line, when the conversation is over. It is a good idea, always to use this application in your dialplans.
So when somebody dials the number 100 from the phone device, attached to the VoIP Gateway, he/she will call the user user1, which actually will cause the Idefisk to start ringing.
When somebody dials the number 200 from the phone device, attached to the VoIP Gateway, he/she will call the user user2, which actually will cause the ST-302 IP Phone to start ringing.
And finally when somebody dials the number 300, from the ST-302 IP Phone or from the Idefisk, the phone device attached to the VoIP Gateway will start ringing.
For more information about how to make the configurations in the Asterisk's configuration files please read our tutorial about the Configuring IP Phones for use with Asterisk
4. Configurations on the Jensen Scandinavia VoIP Gateway
The configuration of the device could be done through Web Interface.
First you have to find out the IP address of the Jensen Scandinavia VoIP Gateway. The default IP address of the device is 192.168.1.1 If this one does not work, then you could reset the phone to the Factory Settings.
How to restore to the Factory Settings
Making configuration through the Web interface
First you have to find out the IP address of the Jensen Scandinavia VoIP Gateway. The default IP address of the device is 192.168.1.1 If this one does not work, then you could reset the phone to the Factory Settings.
How to restore to the Factory Settings
In order to restore the factory settings of the phone, please do the following:
All of the phone system settings will be restored
1. Press the Reset button placed at the back of device
2. Unplug the Power Cord
3. While you still pressing the Reset button - plug in the Power Cord
4. Wait for 5 seconds
2. Unplug the Power Cord
3. While you still pressing the Reset button - plug in the Power Cord
4. Wait for 5 seconds
All of the phone system settings will be restored
Making configuration through the Web interface
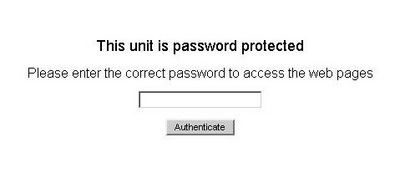
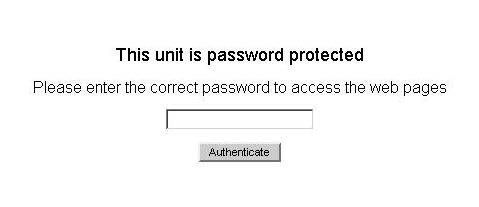
Open your Web Browser and type the IP address of the device (default 192.168.1.1). New page will be opened and you will see a prompt to enter the password.
Important: There are two access levels. The first one is root and the second one is user. If you log in with as root, then you will have access to all the settings of the device.
If you log in as a user, then you will have access only to the following settings:
The default password for the root access is: root.
The default password for the user access is: user.
Once you are logged in as root, you could change these password to whatever you want.
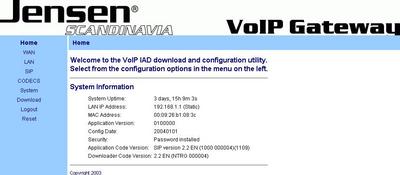
When you enter the correct password a new page will be opened.
If you log in as a user, then you will have access only to the following settings:
- All LAN settings
- The CODECS settings
- The AutoUpgrade settings in the System section
- The Reset section
- The CODECS settings
- The AutoUpgrade settings in the System section
- The Reset section
The default password for the root access is: root.
The default password for the user access is: user.
Once you are logged in as root, you could change these password to whatever you want.
When you enter the correct password a new page will be opened.

On the left side you could see the eight possible sections:
1) The WAN Section
2) LAN Settings

3) SIP


4) CODECS
5) System


6) Download

7) Logout

8) Reset
- WAN
- LAN
- SIP
- CODECS
- System
- Download
- Logout
- Reset
- LAN
- SIP
- CODECS
- System
- Download
- Logout
- Reset
1) The WAN Section

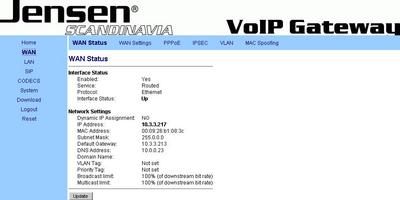
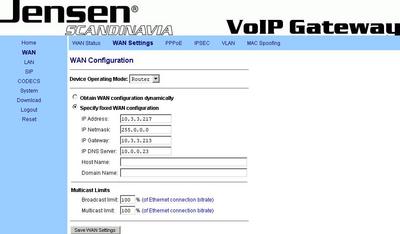
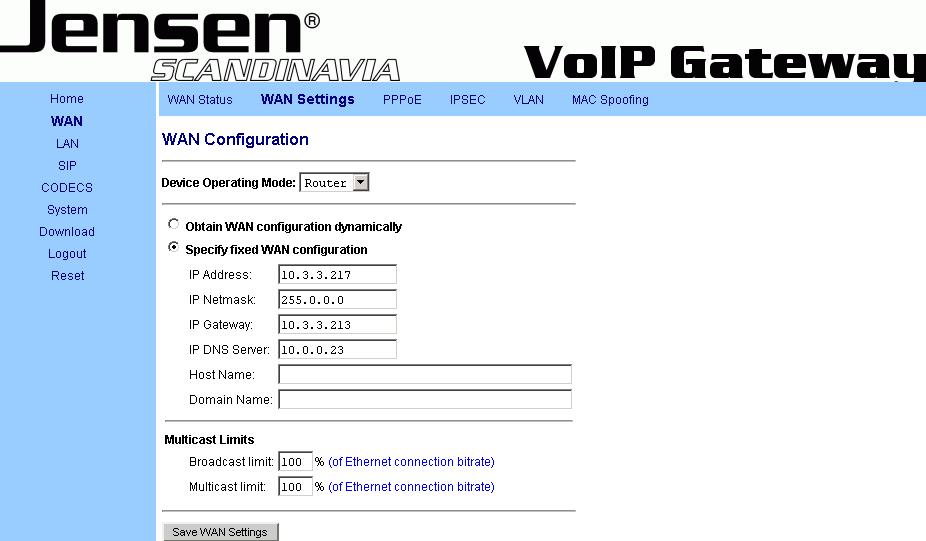
a) WAN Settings - This is the section where you could choose the Device operating mode. There are two modes - Router and Bridge.
The WAN Settings section allows you to change the IP address of the WAN Interface of the device. It could be obtained dynamically (through DHCP) or you could set it manually.
If you choose the manual way, you have to enter the IP address for the Interface, the IP Netmask, the IP Gateway and the IP DNS Server Address. Also you could give the device Host Name and Domain Name
In our case we have for the IP Address - 10.3.3.217, for the IP Netmask - 255.0.0.0, for the IP Gateway - 10.3.3.213 and for the IP DNS Server - 10.0.0.23. We do not have Host Name and Domain Name. In your case this options could be different
Other possibility is the Multicast Limits, where you could limit the Ethernet connection bitrate, in percentages, for the Broadcast and Multicast.
Once you are ready with the configuration, do not forget to press the Save WAN Settings button.
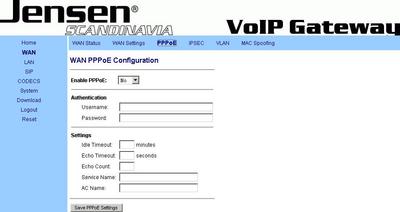
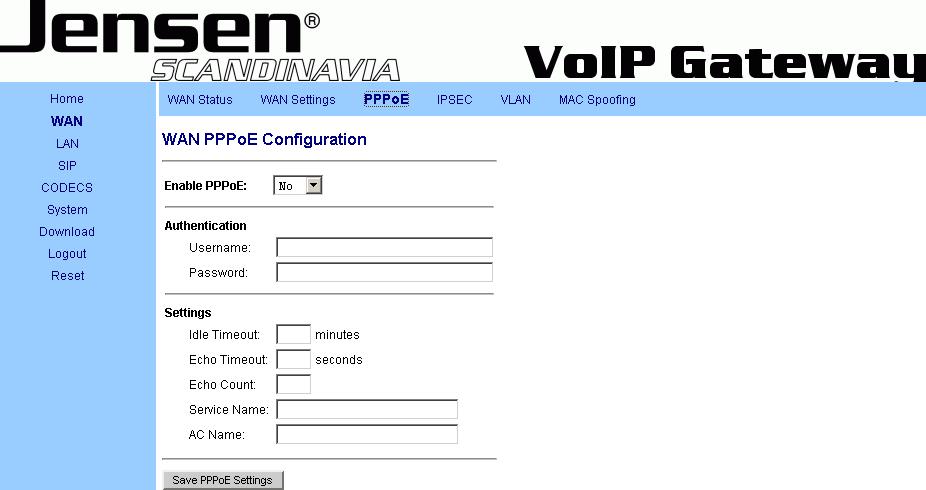
b) PPPoE - If you are using PPPoE connection, you could set the username and password of your PPPoE account.
We do not use such connection so we won't make changes in this section
We do not use such connection so we won't make changes in this section
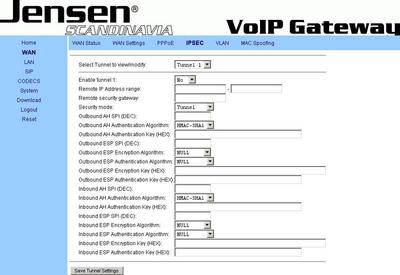
c) IPSec - Possibility for IPSec configuration.

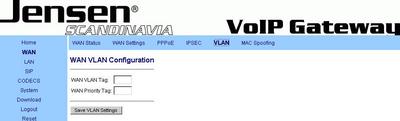
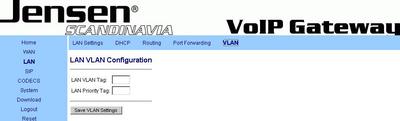
d) VLAN - Possibility for VLAN Tagging:

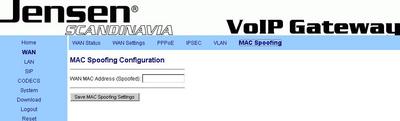
e) MAC Spoofing

2) LAN Settings
Here, you could change the IP address for the LAN Interface of the device.
This is the section where you could set the IP Address manually.
You have to enter the IP address, and the Subnet Mask
In our case we have for the IP Address - 192.168.1.1, for the Subnet Mask - 255.255.255.0. In your case they could be different
Other possibility is the Multicast Limits, where you could limit the Ethernet connection bitrate, in percentages, for the Broadcast and Multicast.
Once you are ready with the configuration, do not forget to press the Save LAN Settings button.

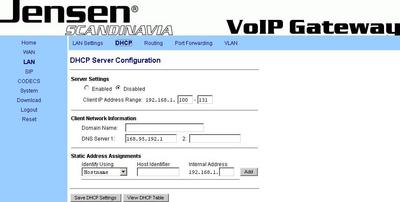
a) DHCP - If you want to obtain the IP Address of the LAN Interface dynamically (through DHCP), this is the section where you could set it.
You could even define a Client IP Range. Also one of the other possible options is the Static Address Assignments, where you have two variants - Identify Using the Hostname and Identify Using the MAC Address
If you make changes, do not forget to press the Save DHCP Settings button, otherwise the changes will be discarded.

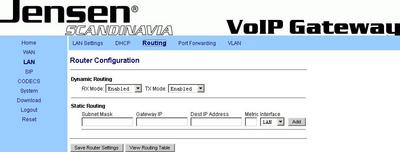
b) Routing - you have two possibilities - Dynamic and Static Routing. You could check the Routing table by pressing the View Routing Table button.
If you make changes, do not forget to press the Save Router Settings button, otherwise the changes will be discarded.
If you make changes, do not forget to press the Save Router Settings button, otherwise the changes will be discarded.

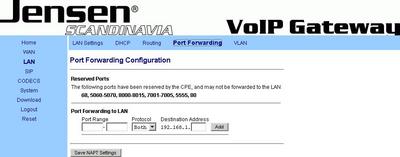
c) Port Forwarding - you could see a list of ports which are reserved and you could not use for forwarding.
To make a port forwarding, you have to define the port range, then you have to decide for which protocols in will be valid (TCP, UDP or Both). Then set the destination Address. When you are ready press the Add button.
In order to save the made changes, do not forget to press the Save NAPT Settings button.

d) VLAN - Possibility for VLAN Tagging:

3) SIP
This is the place, where you have to configure the settings for the SIP server. In other word, this is the place, where we have to define the IP address of our Asterisk PBX. The device will use an account (user) to register to our Asterisk Server. So the device needs to know the account username and password, which it has to use in order to register. The SIP Section is the place for this configuration.
The required fields are Server Address and Port. If you leave them blank, then the system will try to obtain the information via DHCP or DNS
In the Server Address you have to enter the IP address of your Asterisk Server. In our case this is 10.3.3.35. In your case could be different
In the Port field, write the port through which the device to connect with the Asterisk. The default port is 5060, which is the default port for the SIP protocol.
The other thing which is good to set is the Send Registration Request with Expire Time. In our case it is set to 15360, which means that every four and a half hours the system will send registration request. The Outbound Server and The Stun Server are not required, but if you are using such ones, write their IP addresses. In our case we have written the same IP address as the one of our Asterisk server, but in your case it could be different.
The last step is to write the account's username and password. The device will use them in order to be registered on the Asterisk Server.
Actually this are the username and secret (password), defined in the sip.conf file. In our case the username is jensen and the secret is jensen too. So we have written jensen in the username and password boxes. It is necessary to write jensen in the Phone Number box, otherwise you could have problems with the registration.
Finally do not forget to press the Save SIP settings button, which will actually cause the system to remember the made changes.

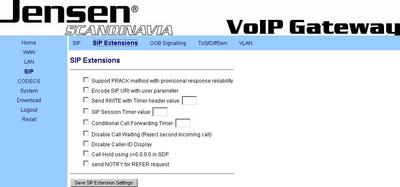
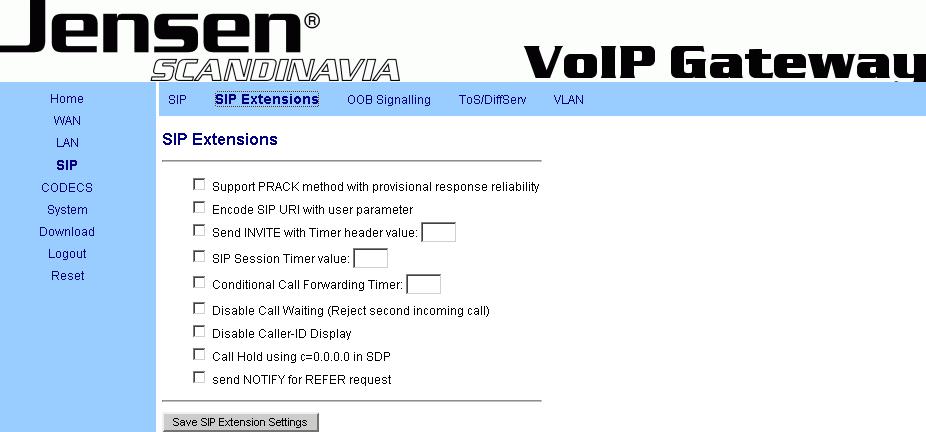
a) SIP Extensions - here you could allow, disallow or set different settings such as SIP Sessions Timer value, Conditional Call Forwarding Timer, Send INVITE with Timer header value and others
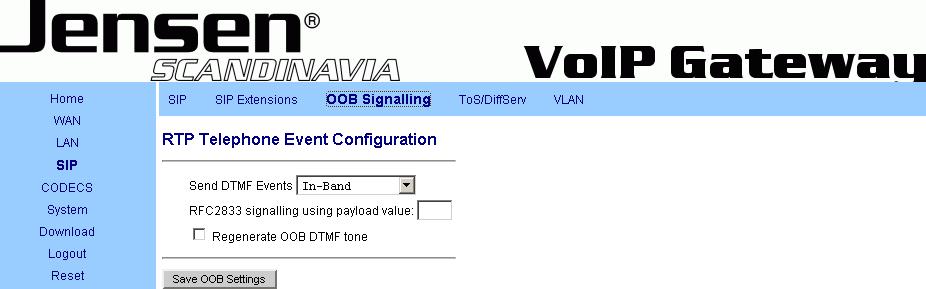
b) OOB Signalling - there are different types of signalling. The Jensen Scandinavia VoIP Gateway supports: In-Band, Out-of-Band, both In-band and Out-of-Band simultaneously, and INFO (RFC2976). In our case the system works fine with In-band. In your case it could be different.
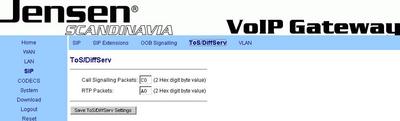
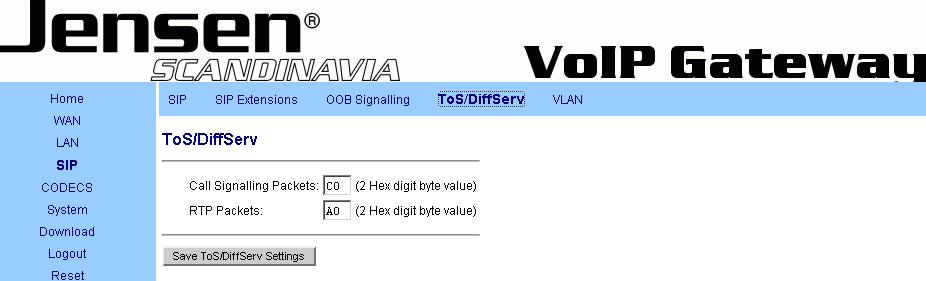
c) ToS/DiffServ - define the Call Signalling Packets hex digit byte value or the RTP Packets hex digit byte value
d) VLAN - Possibility for VLAN Tagging:

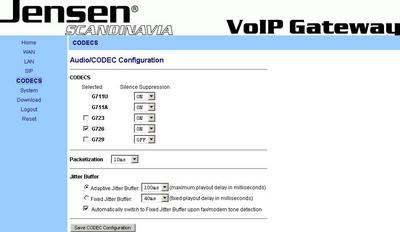
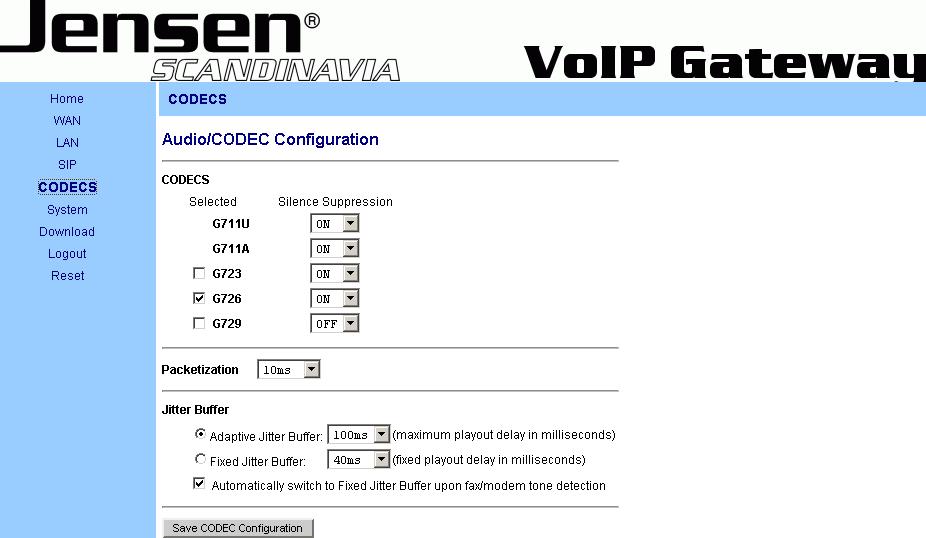
4) CODECS
The device supports six Codecs: G7111ulaw, G711alaw, G723, G726 and G729. You could turn on all the six. In our case we use G711uals, G711alaw or G726.
The other options are Packetization and Adaptive or Fixed Jitter Buffer
The other options are Packetization and Adaptive or Fixed Jitter Buffer
5) System
The System section is where the options considering the device are placed. The sections are:
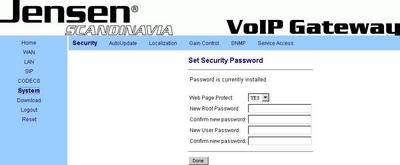
a) Security - this is the place, where you could determine the Root and the User passwords or you could simply turn off the Web Page Protection.
Do not forget to press the Done button, which will actually cause the system to remember the made changes.
- Security
- AutoUpdate
- Localization
- Gain Control
- SNMP
- Service Access
- AutoUpdate
- Localization
- Gain Control
- SNMP
- Service Access
a) Security - this is the place, where you could determine the Root and the User passwords or you could simply turn off the Web Page Protection.
Do not forget to press the Done button, which will actually cause the system to remember the made changes.

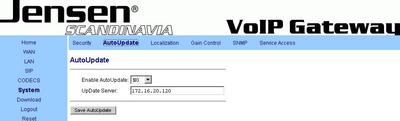
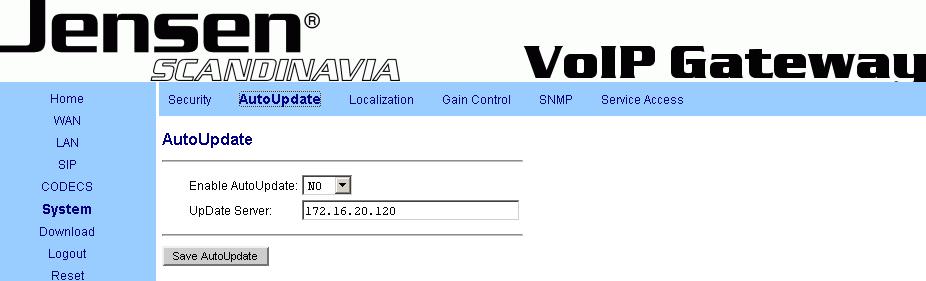
b) AutoUpdate - If you want to update the device automatically, set the IP address of the Update Server. By default it is set to 172.16.20.120.
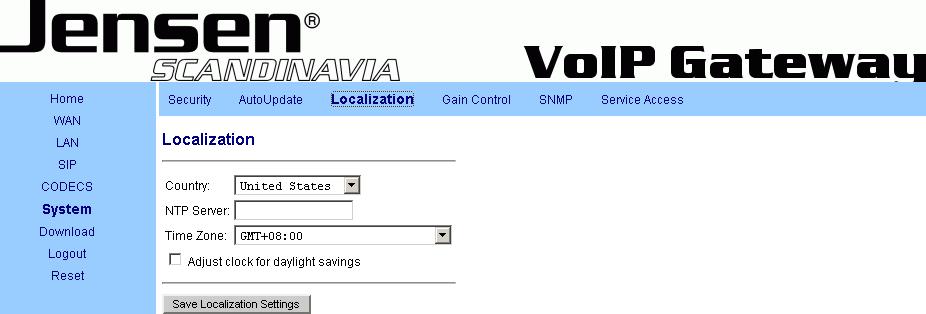
c) Localization - Define your country and TimeZone. If you have a NTP Server, you could set its IP Address in the field named NTP Server
In order to save the made changes press the Save Localization Settings button.
In order to save the made changes press the Save Localization Settings button.
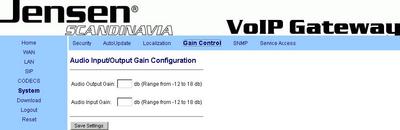
d) Gain Control - Define the Output and Input Audio Gain, in db. The range is between -12 and 18

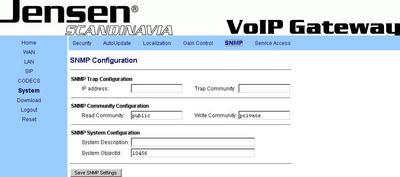
e) SNMP - If you are using the SNMP this is the place, where you have to do the SNMP Configurations for the device.

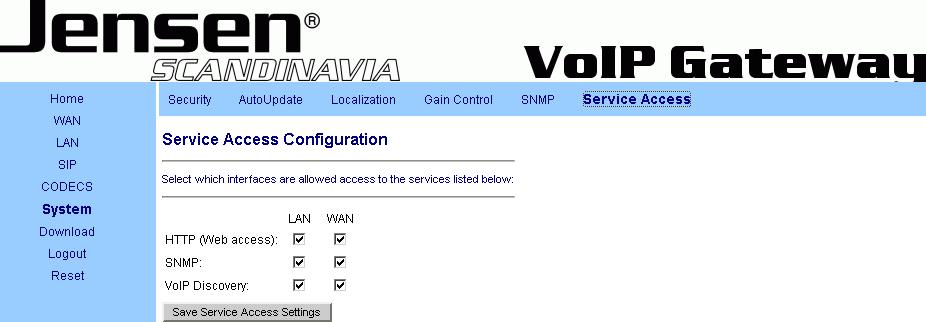
f) Service Access - choose which device services could be reached through the Lan Interface and which ones through the WAN Interface. You could choose between: HTTP(Web Access), SNMP and VoIP Discovery
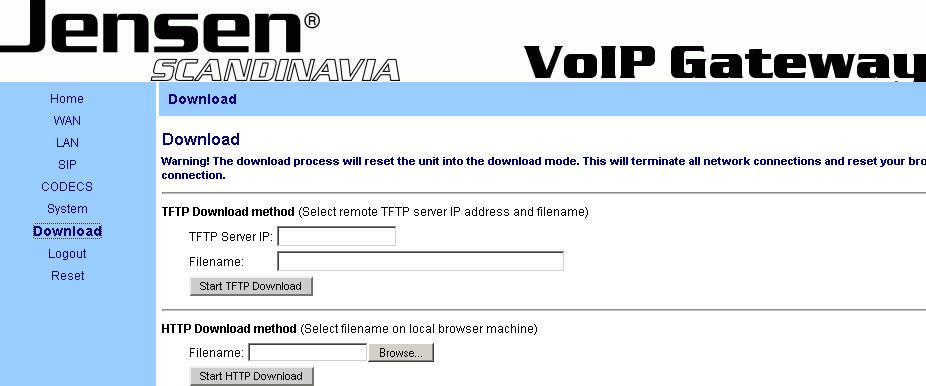
6) Download
Use this section, when you want to upgrade the device manually. You have two choices: Upgrade through TFTP or through HTTP. In the first case you have to write the IP address of the server and the name of the file. In the second case you have just to choose the upgrade file.
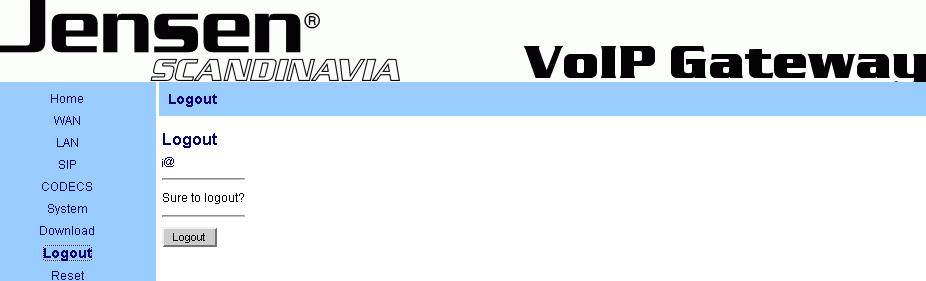
7) Logout
The purpose of this section is clear - to allow you to log out from the Interface
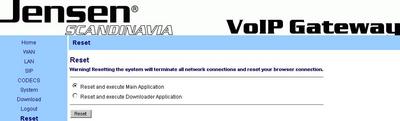
8) Reset
This section allows you to reset the device. You have two options:
- To reset and execute the Main application
- To reset and execute the Downloader Application
- To reset and execute the Main application
- To reset and execute the Downloader Application

5. Uploaded Files
6. Reference
| Add Comment |
Latest Headlines:
-
T.38 faxing with Zoiper 2.15 is now easier than ever
section: voip software
-
Asterisk 1.4.21 Released
section: Asterisk
-
Asterisk 1.4.20 Released
section: Asterisk
-
Asterisk 1.4.20-rc2 Released
section: Asterisk
-
Asterisk 1.4.20-rc1 Now Available
section: Asterisk
- News Archives (older news)
Latest Tutorials:
-
Sending Fax from Zoiper to Zoiper using T.38
added 08/Dec/2008 18:16
-
VMAuthenticate (dialplan application)
added 01/Mar/2008 15:57
-
Siptronic ST-530
added 06/Nov/2007 17:57
-
Siemens C455 IP hardphone
added 05/Nov/2007 10:24
-
Zoiper
added 22/Oct/2007 17:53
Latest Comments:
-
https://audibg.com/forum/index.php?/topi...
tutorial: asterisk.conf
-
https://www.boxingscene.com/forums/boxin...
tutorial: asterisk.conf
-
https://ia600803.us.archive.org/21/items...
tutorial: Asterisk Installation
-
https://www.finance.gov.fj/wp-content/up...
tutorial: RemoveQueueMember (dialplan application)
-
https://www.finance.gov.fj/wp-content/up...
tutorial: RemoveQueueMember (dialplan application)