

3.2.27. Sipura SPA-2100
1. Introduction
2. Differences between Sipura SPA-2100 and Sipura SPA-2002
Sipura SPA-2100 also connects analog telephone adapters or fax machines with IP based data networks. The difference between Sipura SPA-2100 and Sipura SPA-2002 is that Sipura SPA-2100 has two RJ11 ports for connecting to existing telephone analog adapters, fax or PBX systems and two RJ45 Ethernet ports, whereas Sipura SPA-2002 has one RJ45 Ethernet port. Each one of the RJ11 ports can be configured independently from each other. One Ethernet port is for a router and the other port is for connection to a computer or another device in a local network. Sipura SPA-2100 guarantees precise and high-quality voice communications in different network conditions. The perfect quality of the voice is due to the new modern algorithms for decoding the voice.
The Sipura SPA-2100 eliminates the NAT problem by being both a router and a SIP adapter, which allows it to use your public IP address in SIP messages. The most common NAT problem is one-way audio (the other person can hear you, but you can't hear him). If your Sipura SPA-2100 is plugged directly into your DSL/cable modem and you have one public IP address (typical situation), then your Sipura SPA-2100 will use the public IP address (rather than a private IP address that would be assigned if a typical home router was in between the DSL/cable modem and the SIP adapter), which eliminates NAT problems.
The Sipura SPA-2100 also has a couple more relatively minor benefits: T.38 (QoS for faxes), and G.729 works simultaneously on both lines (which means that if you have a typical 128 kbps uplink, you can make two phone calls and browse the Internet all at the same time).
3. Product Features
4. Prerequisites
5. Asterisk PBX configuration
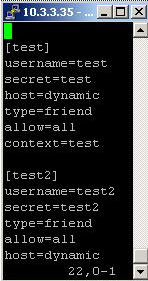
First, you need to register a user in the sip.conf file. In our case we are registering the user test, to use for line1 and user test2 for line2. You have to also set the password(secret) - in our case test for line1 and test2 for the second line.
Type=friend means that this user can make and receive calls. Secret=test and Secret=test2 - password test for line1 and test2 for line2. Host=dynamic means that the IP is not static but dynamic through a DHCP server. Allow=all means that the line which this user will use supports all audio codecs. Context=test - this shows that this user is working with the extensions in this context of the configuration file extensions.conf.
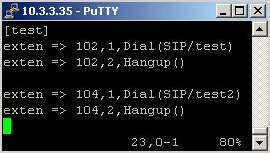
The first line in the context [test] shows that if somebody dials the number 102 his call will be connected with the user test through SIP. In our case this user is set for line 1. The next line says that if the conversation is over then Asterisk has to hang up the line.
Do the same if you want to use line 2. In our example we do this with the number 104. If somebody dials 104, his call will be connected with the user test2 through SIP. Again, its good to add an extension for a hanging up in order to be sure that when the conversation is over the Asterisk PBX will hang up the line. You can see a screenshot of extensions.conf below.
6. Configuration
IVR Interface:
From the WAN port:
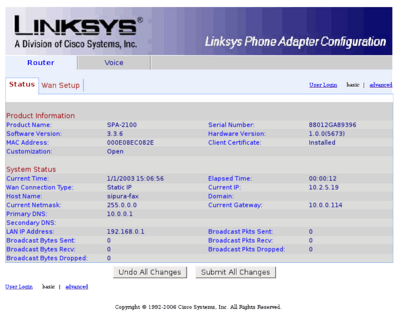
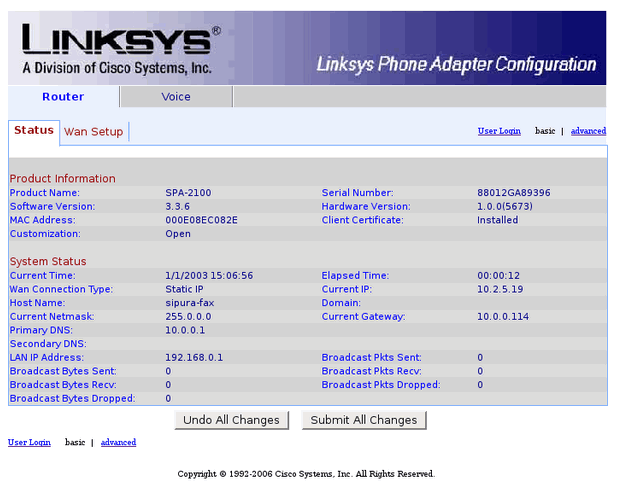
The welcome screen and the first option is "Status". On this screen you can see the Product Name and Serial Number of the device, the MAC address, also the current LAN and WAN IP address, Gateway, Domain name, Netmask and the Primary and Secondary DNS, etc.:
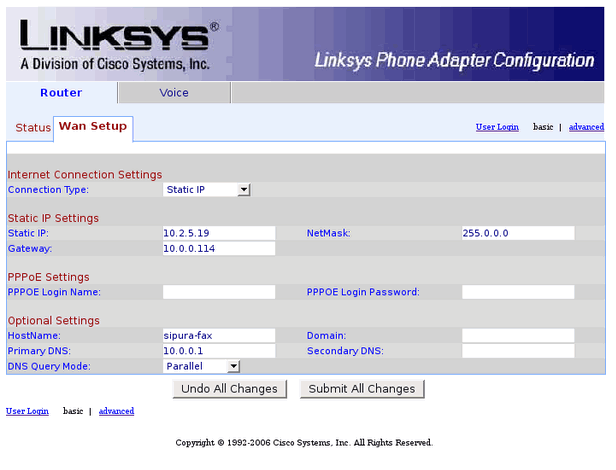
The second option is "Wan Setup". Here you can change the Connection Type(DHCP, Static IP, PPPoE, PPPoE with DHCP, or DHCP with PPPoE, you can change the Static IP Address, the Gateway and the Netmask address. PPPoE Settings also can be changed here(Login Name and Login Password prompt, Optional Settings are for setting up the Hostname, Domain Name, Primary and Secondary DNS and the Mode of DNS Query(Parallel or Sequential):
There is "Advanced" option in the right most part of the screen, which allows you to make some advanced settings - "Lan Setup' and 'Application".
The "Lan Setup" section includes the following options: changing the LAN IP Address, LAN Netmask, Enabling or Disabling the DHCP Server, changing the DHCP Lease Time, choosing the starting IP Address if DHCP Server is Enable, etc. You can see these options on the screenshot below:
Details of the options of that section are as follows:
1) LAN IP Address is the IP Address used by the LAN(PC) port, the default IP Address is 192.168.0.1.
2) LAN IP Mask is the Network Mask used by the LAN Port, the default Network Mask is 255.255.255.0.
3) Enable DHCP Server is option that allows you to Enable or Disable the DHCP Server, the default value is set to Enabled.
4) DHCP Lease Time is the the time used by the DHCP Server to distribute IP Address to the clients. The default value is "24h"
5) DHCP Client Starting IP Address is the initial IP Address which will be given to the clients. The default value is 192.168.0.2.
6) Number of Client IP Address is the maximum number of IP Addresses that can be distributed to clients. The default value is "50"
1) Enable - Enable or Disable, by default it is "No"(disabled).
2) Host MAC Address is for entering the MAC Address of the specified device. This field is empty by default.
3) Host IP Address is where you must enter the IP Address, which you want to assign to the specified device.
One note here: The Host IP Address should be an IP Address which is not in the range used for the distribution Addresses.
The "Application" section is for Port Forwarding, DMZ(Demilitarized Zone, it is used to secure an internal network from external access), System Reserved Ports Range.
The entries which you can use for Port Forwarding are twenty. The options are:
1) Enable - Yes or No, by default it is "No"
2) Service Name is optional. It is used to identify this entry with a name.
3) Starting Port is the initial Port of the Forwarded Port range.
4) Ending Port is the ending Port of the Forwarded Port range.
5) Protocol - you can choose between TCP, UDP or Both protocols for use. The default value is "TCP".
6) Server IP Address is the target Host that the traffic is forwarded. The default value is "0".
1) Enable DMZ - Enable or Disable, by default it is "No"(disabled)
2) DMZ Host IP Address - the DMZ Server IP Address. The default value is "0"
Note: The "Starting Port" has a fixed value of 10000. For example, by default the value is set to 50000, thus the system reserved ports range will be [60000,60256].
1) Starting Port - the starting port of the system reserved port range. The default value is "50000"
2) Number of Ports reserved - total ports reserved by the system, by default it is "256".
Voice Section
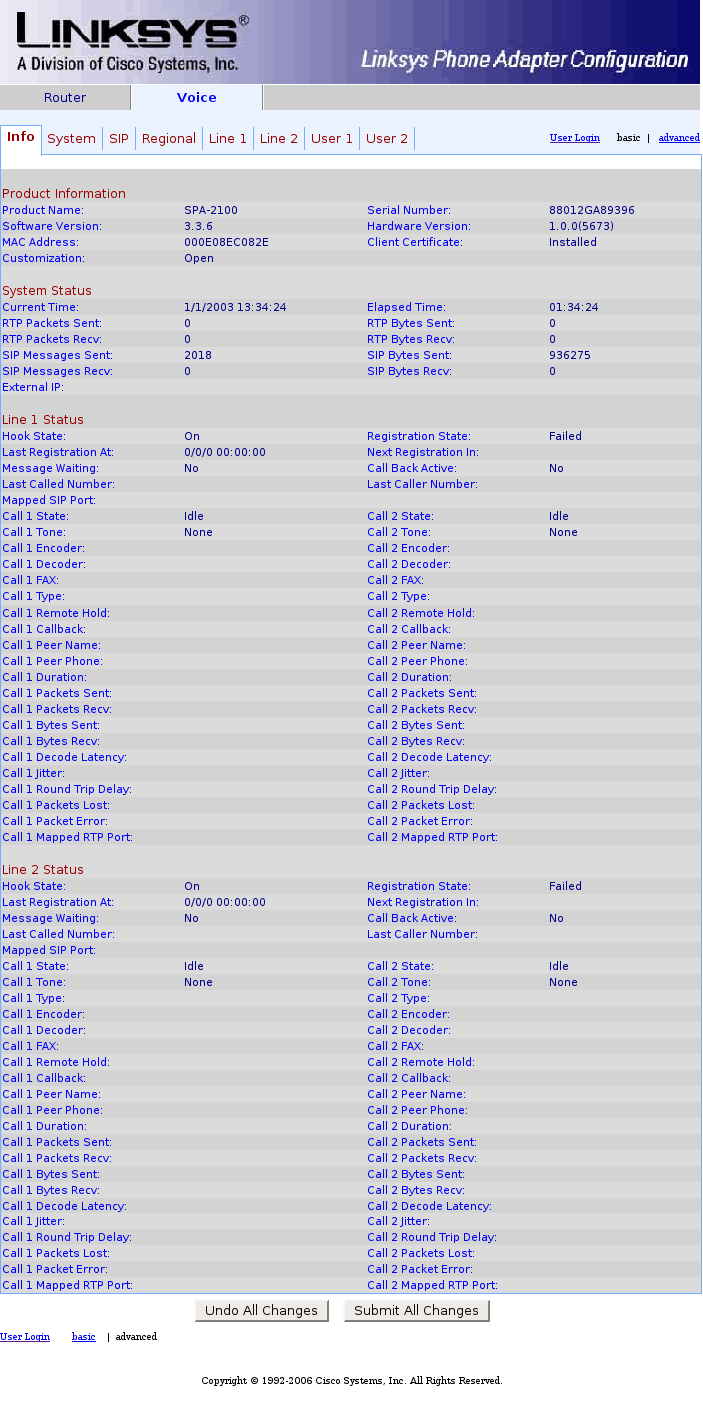
The second general option is "Voice". On this screen you can see the Product Information, System current Status, Line 1 Status, Line 2 Status. You also can change the User Password, Syslog Server, RTP ports range, the Time Zone, Local Date, change the SIP settings for Line 1 and Line 2 and configure the settings for User 1 and User 2.
The next few screenshots shows in short these settings in the "Voice" section.
On this screenshot you can see the Product Name, MAC Address, Current Time, Line 1 Status information and Line 2 Status information.
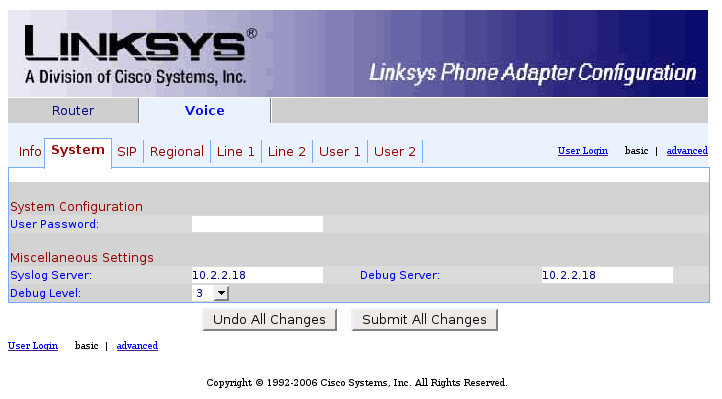
You can change the User Password, Syslog Server, the Debug Server and also the Debug Level.
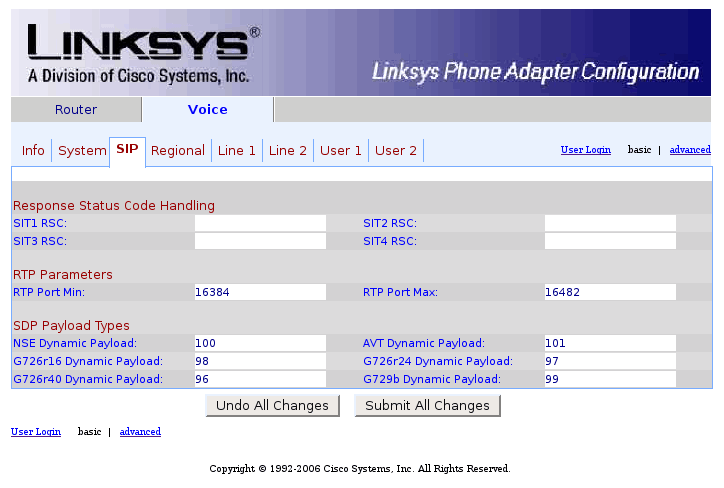
You can change the RTP Ports range and also the Response Status Code.
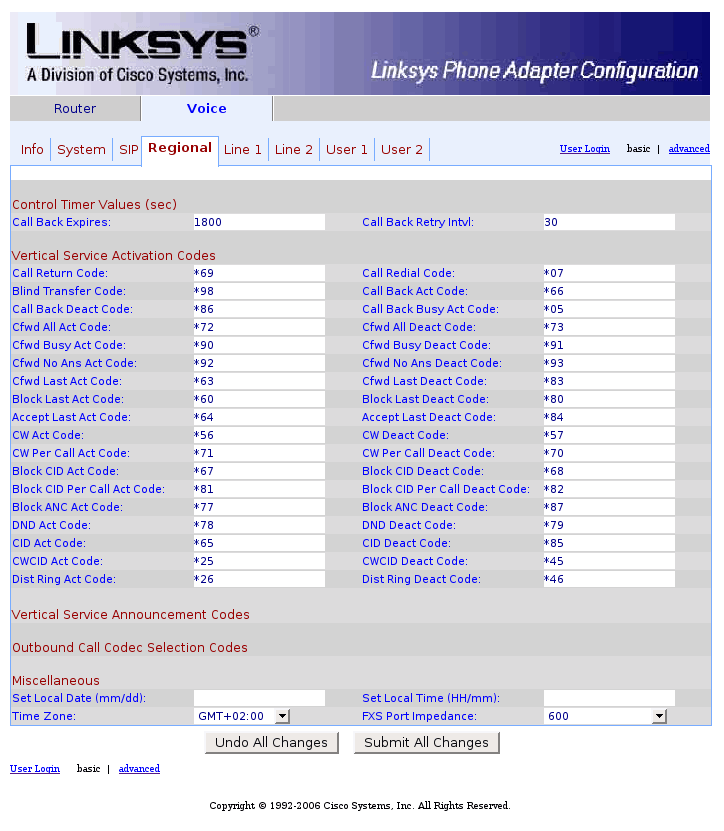
Here you can change the Act Codes, Current Time Zone, Local Time.
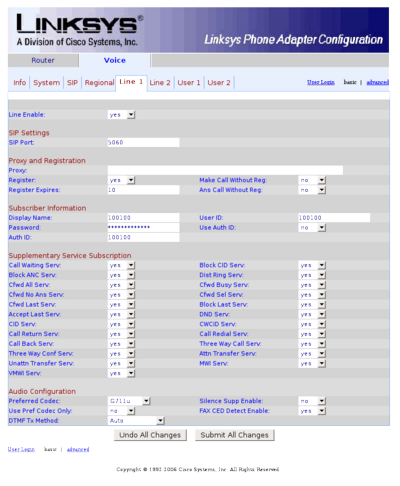
You can make changes for the Line 1 with the follow options: SIP Port, to set up a Proxy Server, Registration needed or not, the time of expires the registrations. Also the preferred audio codec, etc.
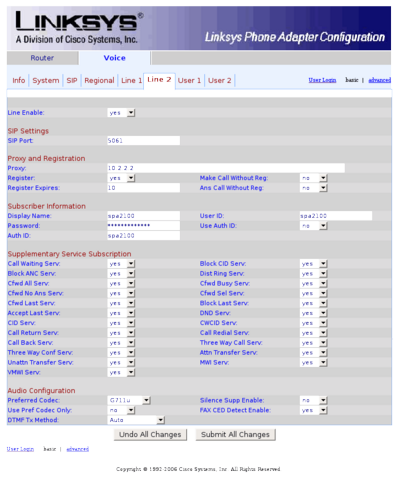
The same options as the aboves, but for Line 2.
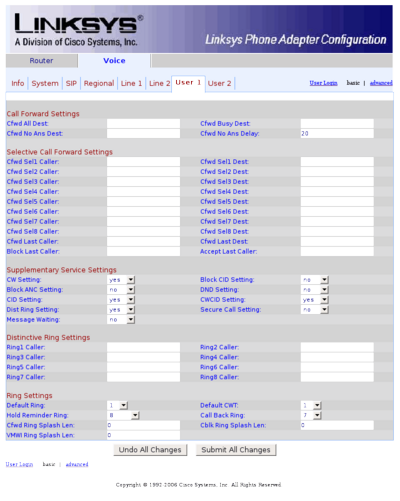
Here you can change Forward settings, the Distinctive settings, and the Ring settings for User 1.
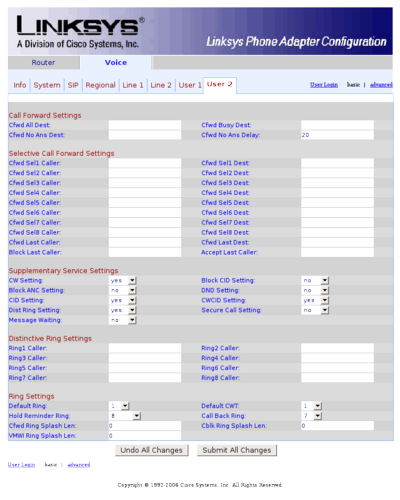
The same options as above, but for User 2.
7. Firmware upgrade
It is good to have your devices always updated to the latest available firmware.
Follow the steps below for upgrading:
1) Go to the Official Sipura web page.
2) Download the latest firmware.
2) After you download the package, unzip it and choose between .exe and .bin file to use according to your Operating System. If you use Windows use upg-spa2100-x-x-x.exe file. If you use UNIX-like Operating System, you have to use the .bin file - spa2100-x-x-x.bin.
3) There are two ways for upgrading your firmware. The first one is via TFT, the second is via HTTP.
Release Notes for Firmware 3.3.6:
*** Since firmware 3.2.9(b) ***
* T38 Redundancy made configurable via per-line parameter FAX_T38_Redundancy.
* Support NOTIFY "check-sync" event as NOTIFY "resync" event.
* Support <Mark All AVT Packets> option:
If set to "yes", all AVT tone packets (encoded for redundancy) will have the marker bit set. If set to "no", only the 1st packet will have the marker bit set for each dtmf event. Default is "yes" (compatible with old behavior).
* Changed default ring and call-waiting tone cadence to bellcore standard r1-r5 and cwt 1-4.
* Changed default ring to: 85V, 20 Hz (US std), and trapezoid waveform.
* CBQ QDisc is removed from the QoS settings because of the performance.
NOTE: TBF will be used on all units with CBQ configured once the unit is upgraded.
*** Since firmware 3.2.9(b) ***
* If first record in a record-route header has an maddr
parameter that is specified as a hostname instead of an IP address, the SPA will not try to resolve it and use it to send the next request (within a dialog); it still uses the host portion of the record istead.
* Restric Source IP feature didn't work when both SRV and "Auto SRV Prefix" were enabled.
* nonce-count (nc) parameter not incremented when reINVITE to hold/resume inside a dialog.
* DMZ router feature didn't work.
* Unit may reboot randomly under heavy traffic when DMZ is enabled
* Unit may reboot randomly during heavy traffic in NAT mode.
* Dialing could fail to terminate under certain conditions involving rejection of patterns ending in repetition
* Unit should cold reboot on resync if Primary or Seconday DNS params changed.
Official Sipura SPA-2100 page
Sipura SPA-2100 is a multi-port, all-in-one Analog telephone and fax machine adapter. It has two FXS ports(Analog Telephone Adapter), two Ethernet ports(LAN and WAN) and one power-supply jack. Sipura SPA-2100 supports various protocols including SIP 2.0, TCP/UDP/IP, RTP/RTCP, HTTP, ICMP, ARP/RARP, DNS, DHCP(both client and server), NTP, TFTP, PPPoE, STUN.. It also supports different codecs: G.711, G.723.1, G.729A/B, G.728, G.726, iLBC, T.38.
2. Differences between Sipura SPA-2100 and Sipura SPA-2002
Sipura SPA-2100 also connects analog telephone adapters or fax machines with IP based data networks. The difference between Sipura SPA-2100 and Sipura SPA-2002 is that Sipura SPA-2100 has two RJ11 ports for connecting to existing telephone analog adapters, fax or PBX systems and two RJ45 Ethernet ports, whereas Sipura SPA-2002 has one RJ45 Ethernet port. Each one of the RJ11 ports can be configured independently from each other. One Ethernet port is for a router and the other port is for connection to a computer or another device in a local network. Sipura SPA-2100 guarantees precise and high-quality voice communications in different network conditions. The perfect quality of the voice is due to the new modern algorithms for decoding the voice.
The Sipura SPA-2100 eliminates the NAT problem by being both a router and a SIP adapter, which allows it to use your public IP address in SIP messages. The most common NAT problem is one-way audio (the other person can hear you, but you can't hear him). If your Sipura SPA-2100 is plugged directly into your DSL/cable modem and you have one public IP address (typical situation), then your Sipura SPA-2100 will use the public IP address (rather than a private IP address that would be assigned if a typical home router was in between the DSL/cable modem and the SIP adapter), which eliminates NAT problems.
The Sipura SPA-2100 also has a couple more relatively minor benefits: T.38 (QoS for faxes), and G.729 works simultaneously on both lines (which means that if you have a typical 128 kbps uplink, you can make two phone calls and browse the Internet all at the same time).
3. Product Features
* Terminating Impedance Agnostic - 8 Settings
* Call Waiting, Cancel Call Waiting
* Caller ID with Name / Number
* Caller ID Blocking
* Call Waiting Caller ID with Name / Number
* Call Forwarding: No Answer / Busy / All
* Do Not Disturb
* Call Transfer (Blind and Consultative)
* Three-Way Conference Calling with Local Mixing
* Message Waiting Indication - Visual and Tone Based
* Call Return
* Call Back on Busy
* Call Blocking with Toll Restriction
* Delayed Disconnect
* Distinctive Ringing - Calling and Called Numbers
* Off-Hook Warning Tone
* Selective / Anonymous Call Rejection
* Hot Line and Warm Line Calling
* Speed Dialing of 8 Numbers
* Music on Hold
* Fax - G.711 Pass-Through or Real Time Fax over IP via T.38 (Pending)
4. Prerequisites
The steps to install a Sipura SPA-2100 are as follows:
1. Connect a standard touch-tone analog telephone to the PHONE 1 or 2 port.
2. Plug a standard RJ11 telephone cable into the LINE port and connect the other end of the telephone cable to a wall jack.
3. Plug the Ethernet cable into the Ethernet port of Sipura SPA-2100 and connect the other end of the Ethernet cable to an uplink port (a router or a modem, etc.)
4. Connect a PC to the Internet port of Sipura SPA-2100 if it is used as a router.
5. Plug 5V power adapter into the Sipura SPA-2100 and connect it to a wall outlet.
5. Asterisk PBX configuration
5.1 sip.conf
First, you need to register a user in the sip.conf file. In our case we are registering the user test, to use for line1 and user test2 for line2. You have to also set the password(secret) - in our case test for line1 and test2 for the second line.
Type=friend means that this user can make and receive calls. Secret=test and Secret=test2 - password test for line1 and test2 for line2. Host=dynamic means that the IP is not static but dynamic through a DHCP server. Allow=all means that the line which this user will use supports all audio codecs. Context=test - this shows that this user is working with the extensions in this context of the configuration file extensions.conf.
5.2 extensions.conf
The first line in the context [test] shows that if somebody dials the number 102 his call will be connected with the user test through SIP. In our case this user is set for line 1. The next line says that if the conversation is over then Asterisk has to hang up the line.
Do the same if you want to use line 2. In our example we do this with the number 104. If somebody dials 104, his call will be connected with the user test2 through SIP. Again, its good to add an extension for a hanging up in order to be sure that when the conversation is over the Asterisk PBX will hang up the line. You can see a screenshot of extensions.conf below.
6. Configuration
6.1 Configuration through phone
IVR Interface:
Dial Prompt Description
**** "Active IVR Menu"
You will hear "Sipura configuration menu". Enter option followed by the pound key.
110 "Check WAN IP Address"
It will announce the IP address of the WAN port.
120 "Check WAN Network Mask"
It will announce the Network mask of the WAN port.
130 "Check WAN Gateway"
It will announce the gateway of the WAN port.
140 "Check MAC Address"
It will announce the MAC address of the Sipura SPA-2100.
150 "Check Firmware Version"
It will announce the firmware version running on Sipura SPA-2100.
160 "Check Primary DNS Server IP Address"
It will announce the Primary DNS Server IP address
170 "Check WAN Port Web Server Port"
It will announce the WAN port web server port.
210 "Check LAN IP Address"
It will announce the IP address of the LAN port.
100 "Check WAN internet Connection Type"
It will announce the WAN Internet Connection Type.
101 "Set WAN Internet Connection Type"
Enter "0" to use DHCP, "1" to use Static IP, or "3" to use PPPoE.
111 "Set WAN Network Mask"
Enter IP address using numbers on the telephone keypad. Use the * (asterisk) key when entering a decimal point. Note that the WAN Internet Connection Type must be set to "Static IP", otherwise you will hear "Invalid option".
121 "Set WAN Gateway"
Enter network mask using numbers on the telephone keypad. Use the * (asterisk) key when entering a decimal point. Note that the WAN Internet Connection Type must be set to "Static IP", otherwise you will hear "Invalid option".
131 "Set WAN Gateway"
Enter IP address using numbers on the telephone keypad. Use the * (asterisk) key when entering a decimal point. Note that the WAN Internet Connection Type must be set to "Static IP", otherwise you will hear "Invalid option".
161 "Set Primary DNS Server IP Address"
Enter IP address using numbers on the telephone keypad. Use the * (asterisk) key when entering a decimal point.
7932 "Enable/Disable Wan Port Web Server"
Enter "1" to enable, or "0" to disable
732668 "Reboot the Sipura SPA-2100"
The Sipura SPA-2100 will reboot after you hang-up the phone.
73738 "Factory Reset"
Enter "1" to confirm, or "* (asterisk)" to cancel. Sipura SPA-2100 will inform you that the "Option Successful"
877778 "User Factory Reset"
6.2 Access the Web Configuration Menu
From the WAN port:
Open a web browser and enter http://192.168.0.1/. This is the default IP address of Sipura SPA-2100.
Note:
By default there are not any passwords to access the device. It's freely accessible locally.
The welcome screen and the first option is "Status". On this screen you can see the Product Name and Serial Number of the device, the MAC address, also the current LAN and WAN IP address, Gateway, Domain name, Netmask and the Primary and Secondary DNS, etc.:
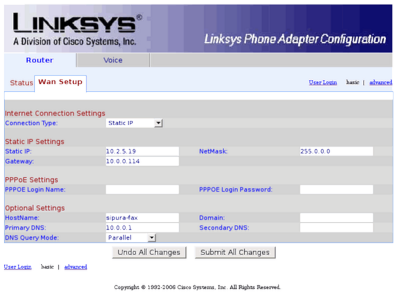
The second option is "Wan Setup". Here you can change the Connection Type(DHCP, Static IP, PPPoE, PPPoE with DHCP, or DHCP with PPPoE, you can change the Static IP Address, the Gateway and the Netmask address. PPPoE Settings also can be changed here(Login Name and Login Password prompt, Optional Settings are for setting up the Hostname, Domain Name, Primary and Secondary DNS and the Mode of DNS Query(Parallel or Sequential):
There is "Advanced" option in the right most part of the screen, which allows you to make some advanced settings - "Lan Setup' and 'Application".
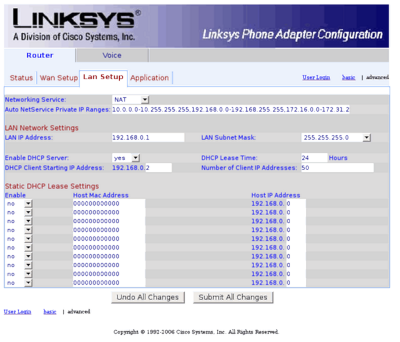
The "Lan Setup" section includes the following options: changing the LAN IP Address, LAN Netmask, Enabling or Disabling the DHCP Server, changing the DHCP Lease Time, choosing the starting IP Address if DHCP Server is Enable, etc. You can see these options on the screenshot below:
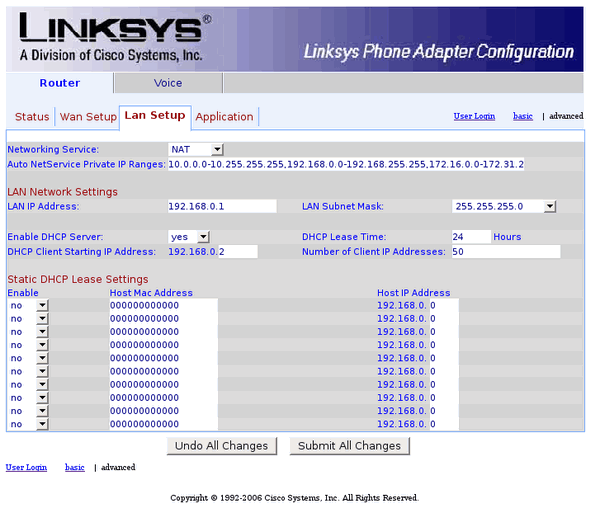
Details of the options of that section are as follows:
LAN Network settings:
1) LAN IP Address is the IP Address used by the LAN(PC) port, the default IP Address is 192.168.0.1.
2) LAN IP Mask is the Network Mask used by the LAN Port, the default Network Mask is 255.255.255.0.
3) Enable DHCP Server is option that allows you to Enable or Disable the DHCP Server, the default value is set to Enabled.
4) DHCP Lease Time is the the time used by the DHCP Server to distribute IP Address to the clients. The default value is "24h"
5) DHCP Client Starting IP Address is the initial IP Address which will be given to the clients. The default value is 192.168.0.2.
6) Number of Client IP Address is the maximum number of IP Addresses that can be distributed to clients. The default value is "50"
Static DHCP Lease settings:
1) Enable - Enable or Disable, by default it is "No"(disabled).
2) Host MAC Address is for entering the MAC Address of the specified device. This field is empty by default.
3) Host IP Address is where you must enter the IP Address, which you want to assign to the specified device.
One note here: The Host IP Address should be an IP Address which is not in the range used for the distribution Addresses.
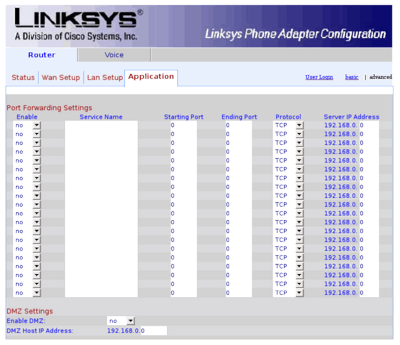
The "Application" section is for Port Forwarding, DMZ(Demilitarized Zone, it is used to secure an internal network from external access), System Reserved Ports Range.

Port forwarding Settings:
The entries which you can use for Port Forwarding are twenty. The options are:
1) Enable - Yes or No, by default it is "No"
2) Service Name is optional. It is used to identify this entry with a name.
3) Starting Port is the initial Port of the Forwarded Port range.
4) Ending Port is the ending Port of the Forwarded Port range.
5) Protocol - you can choose between TCP, UDP or Both protocols for use. The default value is "TCP".
6) Server IP Address is the target Host that the traffic is forwarded. The default value is "0".
DMZ Settings:
1) Enable DMZ - Enable or Disable, by default it is "No"(disabled)
2) DMZ Host IP Address - the DMZ Server IP Address. The default value is "0"
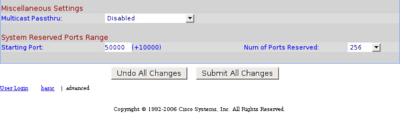
System Reserved Ports Range:
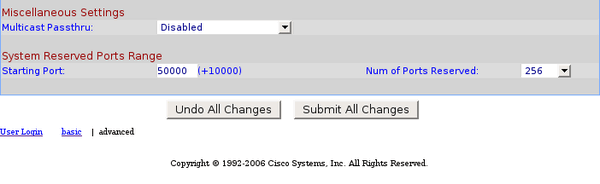
Note: The "Starting Port" has a fixed value of 10000. For example, by default the value is set to 50000, thus the system reserved ports range will be [60000,60256].
"System Reserved Ports Range" defines the random TCP/UDP Ports used by an application running on the SPA-2100. These ports and other system reserved ports cannot be used by Port Forwarding or DMZ service.
1) Starting Port - the starting port of the system reserved port range. The default value is "50000"
2) Number of Ports reserved - total ports reserved by the system, by default it is "256".
Voice Section
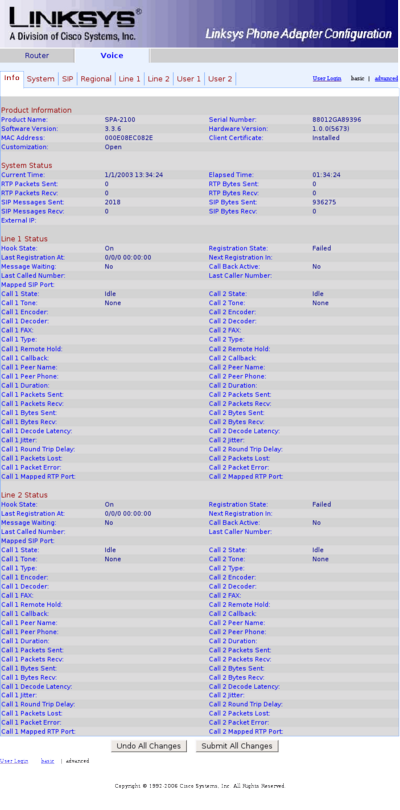
The second general option is "Voice". On this screen you can see the Product Information, System current Status, Line 1 Status, Line 2 Status. You also can change the User Password, Syslog Server, RTP ports range, the Time Zone, Local Date, change the SIP settings for Line 1 and Line 2 and configure the settings for User 1 and User 2.
The next few screenshots shows in short these settings in the "Voice" section.
On this screenshot you can see the Product Name, MAC Address, Current Time, Line 1 Status information and Line 2 Status information.
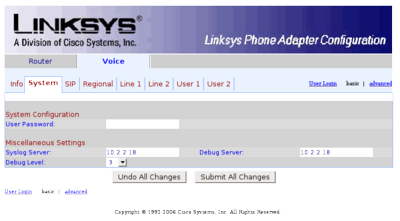
You can change the User Password, Syslog Server, the Debug Server and also the Debug Level.
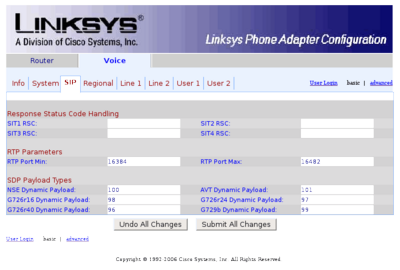
You can change the RTP Ports range and also the Response Status Code.
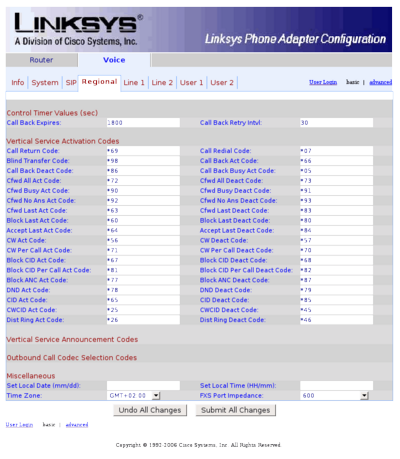
Here you can change the Act Codes, Current Time Zone, Local Time.
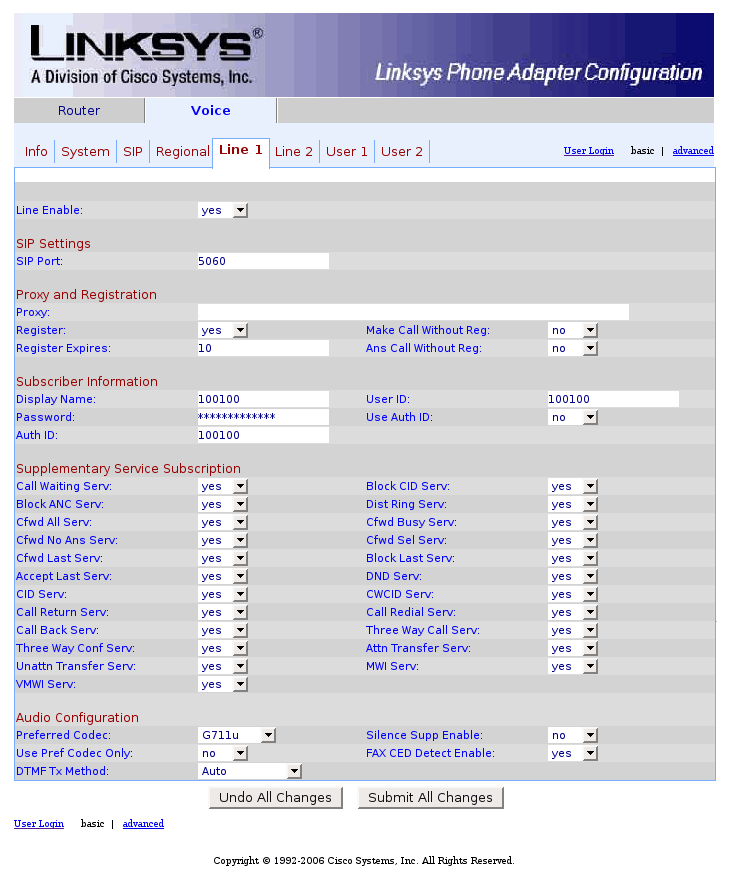
You can make changes for the Line 1 with the follow options: SIP Port, to set up a Proxy Server, Registration needed or not, the time of expires the registrations. Also the preferred audio codec, etc.
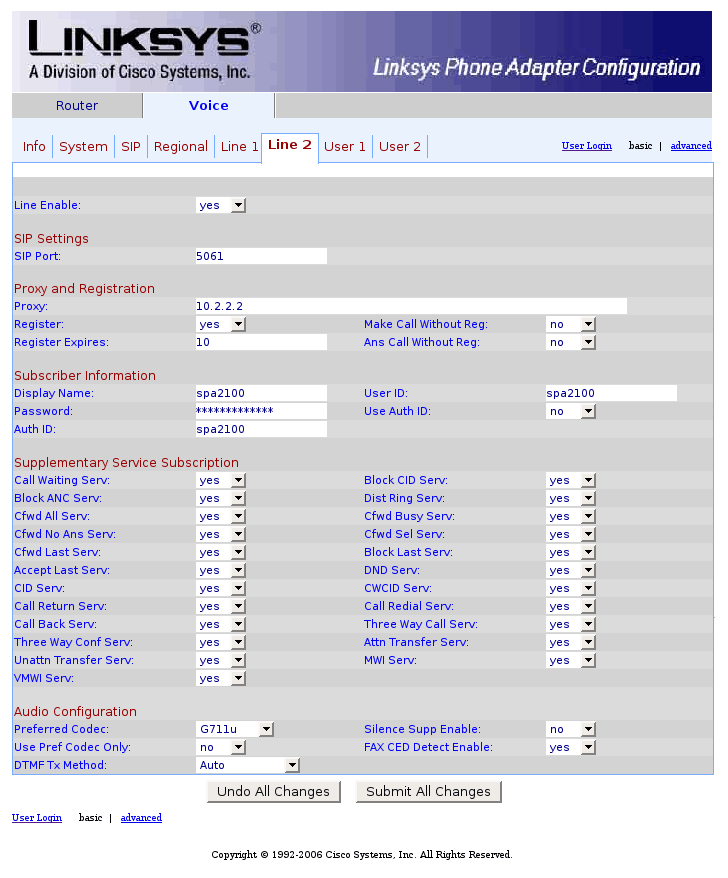
The same options as the aboves, but for Line 2.
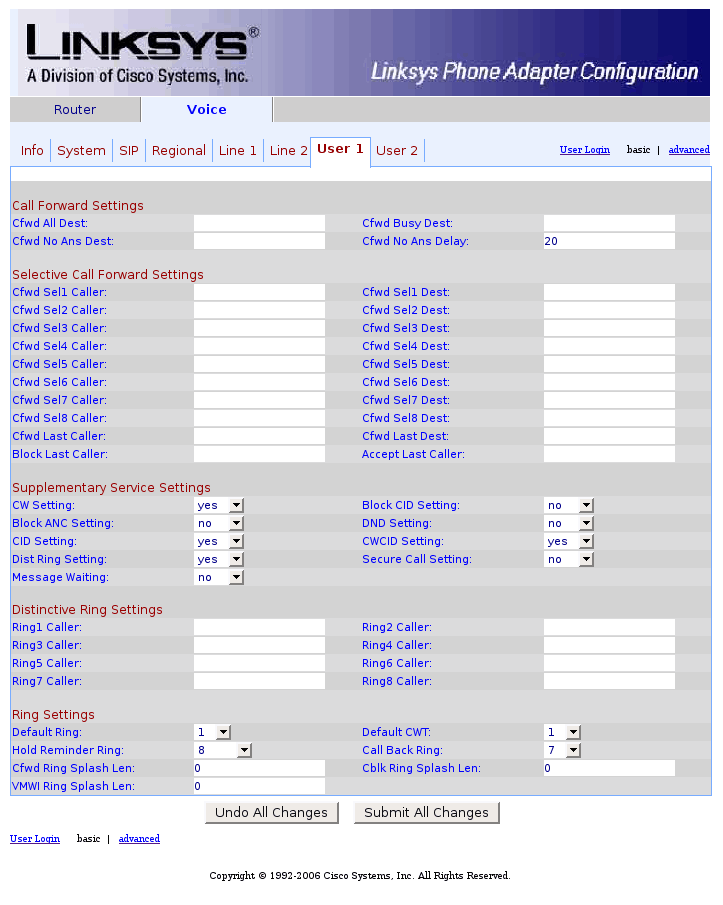
Here you can change Forward settings, the Distinctive settings, and the Ring settings for User 1.
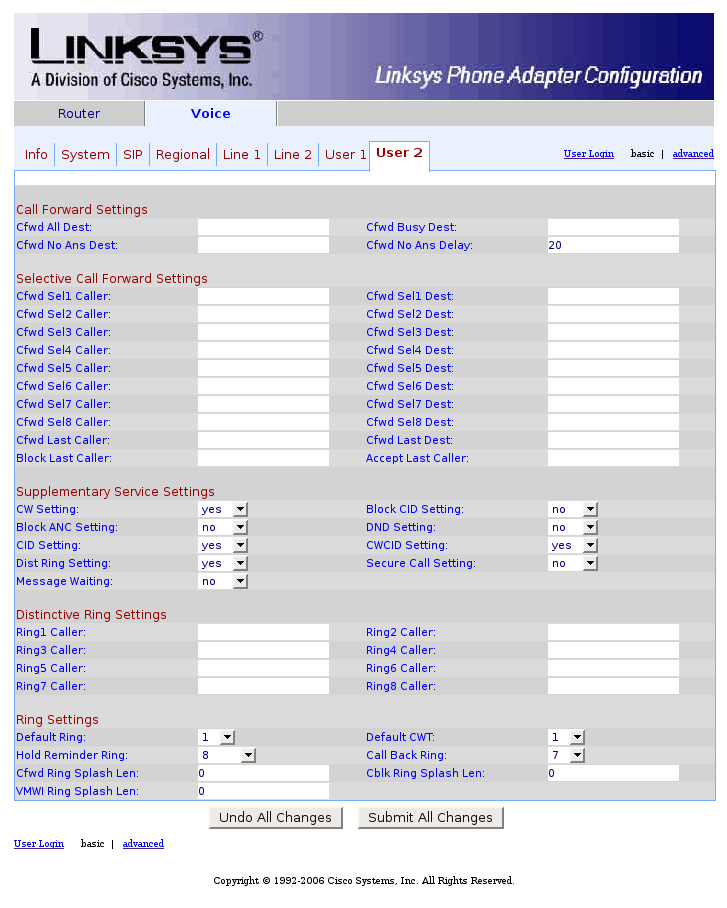
The same options as above, but for User 2.
7. Firmware upgrade
It is good to have your devices always updated to the latest available firmware.
Follow the steps below for upgrading:
1) Go to the Official Sipura web page.
2) Download the latest firmware.
2) After you download the package, unzip it and choose between .exe and .bin file to use according to your Operating System. If you use Windows use upg-spa2100-x-x-x.exe file. If you use UNIX-like Operating System, you have to use the .bin file - spa2100-x-x-x.bin.
3) There are two ways for upgrading your firmware. The first one is via TFT, the second is via HTTP.
Via TFT:
1. Install a TFTP server on a computer on the same network as the SPA device. Most Linux distributions include a tftp server.
2. Place the firmware upgrade "spa2100-x-x-x.bin" file in the tftp root directory - by default it is /tftpboot.
3. Determine the IP address of the powered-up SPA-2100 (IVR menu ****#110#).
4. Request the upgrade from a web browser. If the TFTP server is running on the same computer: assuming a.b.c.d is the SPA-2100 IP address, http://a.b.c.d/upgrade?/spa2100-x-x-x.bin. If the tftp server is on a different computer (a.b.c.d is the SPA-2100 address, x.y.z.w is the tftp server address), use the following URL: http://a.b.c.d/upgrade?tftp://x.y.z.w/spa2100-x-x-x.bin.
5. The SPA-2100 should then get the new firmware from the TFTP server and reboot.
Via HTTP:
1. Upload this file to a directory on your webserver. (Example http://10.2.2.68/spa2100-x-x-x.bin )
2. Request the upgrade from a web browser. Assuming a.b.c.d is the SPA-2100 IP address then type http://a.b.c.d/upgrade?http://10.2.2.68/spa2100-x-x-x.bin into your browser.
3. Now you should be redirected to a wait screen and your sipura phone should be flashing while it upgrades its firmware.
2. Request the upgrade from a web browser. Assuming a.b.c.d is the SPA-2100 IP address then type http://a.b.c.d/upgrade?http://10.2.2.68/spa2100-x-x-x.bin into your browser.
3. Now you should be redirected to a wait screen and your sipura phone should be flashing while it upgrades its firmware.
The current latest firmware for Sipura SPA-2100 is: 3.3.6
Release Notes for Firmware 3.3.6:
Feature Enhancements:
*** Since firmware 3.2.9(b) ***
* T38 Redundancy made configurable via per-line parameter FAX_T38_Redundancy.
* Support NOTIFY "check-sync" event as NOTIFY "resync" event.
* Support <Mark All AVT Packets> option:
If set to "yes", all AVT tone packets (encoded for redundancy) will have the marker bit set. If set to "no", only the 1st packet will have the marker bit set for each dtmf event. Default is "yes" (compatible with old behavior).
* Changed default ring and call-waiting tone cadence to bellcore standard r1-r5 and cwt 1-4.
* Changed default ring to: 85V, 20 Hz (US std), and trapezoid waveform.
* CBQ QDisc is removed from the QoS settings because of the performance.
NOTE: TBF will be used on all units with CBQ configured once the unit is upgraded.
Bug fixes:
*** Since firmware 3.2.9(b) ***
* If first record in a record-route header has an maddr
parameter that is specified as a hostname instead of an IP address, the SPA will not try to resolve it and use it to send the next request (within a dialog); it still uses the host portion of the record istead.
* Restric Source IP feature didn't work when both SRV and "Auto SRV Prefix" were enabled.
* nonce-count (nc) parameter not incremented when reINVITE to hold/resume inside a dialog.
* DMZ router feature didn't work.
* Unit may reboot randomly under heavy traffic when DMZ is enabled
* Unit may reboot randomly during heavy traffic in NAT mode.
* Dialing could fail to terminate under certain conditions involving rejection of patterns ending in repetition
* Unit should cold reboot on resync if Primary or Seconday DNS params changed.
Official Sipura SPA-2100 page
| Add Comment |
Latest Headlines:
-
T.38 faxing with Zoiper 2.15 is now easier than ever
section: voip software
-
Asterisk 1.4.21 Released
section: Asterisk
-
Asterisk 1.4.20 Released
section: Asterisk
-
Asterisk 1.4.20-rc2 Released
section: Asterisk
-
Asterisk 1.4.20-rc1 Now Available
section: Asterisk
- News Archives (older news)
Latest Tutorials:
-
Sending Fax from Zoiper to Zoiper using T.38
added 08/Dec/2008 18:16
-
VMAuthenticate (dialplan application)
added 01/Mar/2008 15:57
-
Siptronic ST-530
added 06/Nov/2007 17:57
-
Siemens C455 IP hardphone
added 05/Nov/2007 10:24
-
Zoiper
added 22/Oct/2007 17:53
Latest Comments:
-
https://audibg.com/forum/index.php?/topi...
tutorial: asterisk.conf
-
https://www.boxingscene.com/forums/boxin...
tutorial: asterisk.conf
-
https://ia600803.us.archive.org/21/items...
tutorial: Asterisk Installation
-
https://www.finance.gov.fj/wp-content/up...
tutorial: RemoveQueueMember (dialplan application)
-
https://www.finance.gov.fj/wp-content/up...
tutorial: RemoveQueueMember (dialplan application)