

3.2.2. SNOM200 SIP hardphone
CONNECTING
To connect the phone plug one end of an Ethernet cable to the PC input and the other end to your PC LAN card. Plug the free end of your Internet cable to the phones Net input. The other end must be plugged where your Internet is coming from. Plug the adapter in its jack and connect it to the electricity network.
ADJUSTING
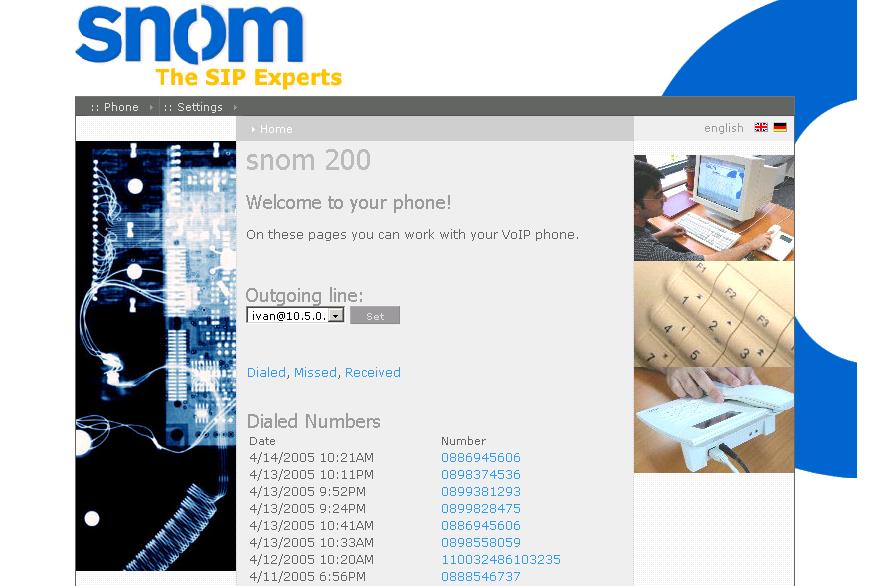
When started for first time it will prompt for an IP address. When you choose some non-existing one from your network you can administrate the telephone from the local site (the site is the IP of the phone). For the different model the site will look in a different way but anyway every single setting you can make to the phone can be made also from the site. Here is how the keypad is looking.

If you do not remember your phone IP you can find it in the Main Menu scrolling it with the left right arrows. Let us now look in more details the settings you can do remotely from the phones site.
My phone IP address is 10.10.0.22 so I type it in my browser (remember that this is valid only within your company or local network). We will have a look at some important issues not all of them.

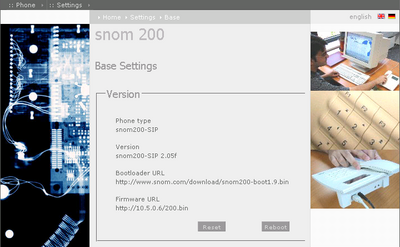
Settings -> Base
All Settings/Base you can adjust the basic settings you want. In Version you can see the Phone type, Phone version, the URLs for Boot loader and Firmware.
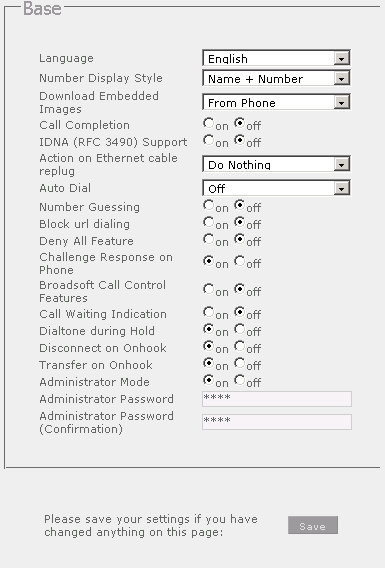
Below in Base are all the basic settings you want to change.
Language:
Number Display Style:
Download Embedded Images:
Call Completion
IDNA (RFC 3490) Support
Actions on Ethernet cable replug
Auto Dial
Number Guessing
Block Dialing
Deny All Feature
Challenge Response on Phone
Broadsoft Call Control Feature
Call Waiting Indication
Dialtone During Hold
Disconnect on Onhook
Transfer on Onhook
Administrator Mode
Administrator Password
Settings -> SIP -> Lines
In SIP the lines are adjusted and registered. I have already some lines registered so this one will be my fourth and you will start from line one.
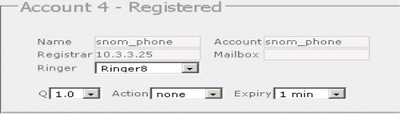
Here I register user snom_phone which is placed on Asterisk 10.3.3.25 (in your case the IP address will be different). I do not have Mailbox for now and choosing ringing tone 8. Timeout when dialing is 1 minute by default. So you now show the phone that there such user at Asterisk.
Settings -> SIP -> Authentication
In this menu you show the phone how to authenticate on Asterisk when trying to register the user.

So now on line 4 your asterisk IP address must be typed in Realm field (my IP is 10.3.3.25), username and password are same as username and secret in sip.conf on asterisk (/etc/asterisk/sip.conf).
Settings -> Network -> Base
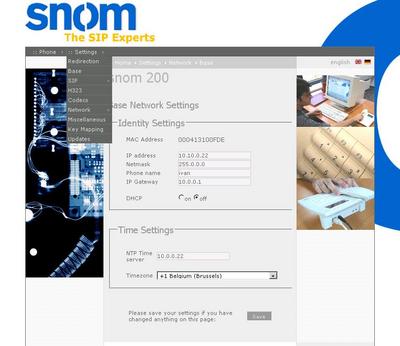
In Identity Settings IP address is the IP of the Snom telephone (in my case it is 10.10.0.22 your IP will be different.). For Network mask 255.0.0.0 is ok. Phone name may be whatever you wish. IP Gateway must be the address of your gateway. DHCP must be off.
In Time Settings you may add some timeserver if you are using any and the time zone in which you are.
Settings -> Network -> Advanced
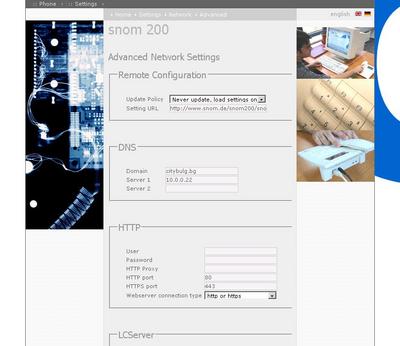
In Remote Configuration I have chosen never to update automatically and just to load settings on booting. You have some more choices here and for DNS just type the IP address of your DNS server. I left all the other settings untouched (HTTP, LCServer, VLAN).
Settings -> Network -> Miscellaneous
Here you can adjust your audio device, auto answer functions and ringing tones.
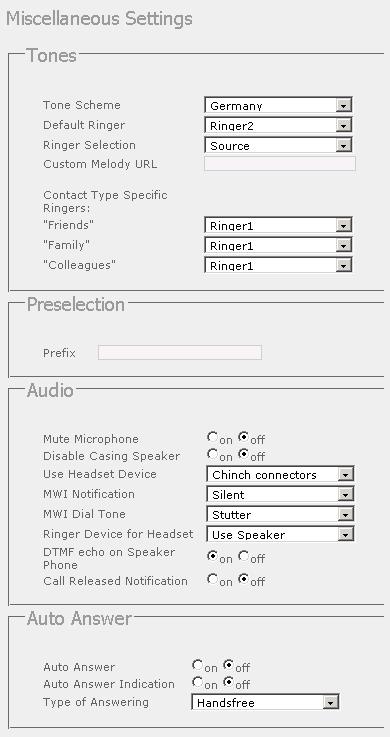
In Tone you set just the ring tones and melodies.
In Audio:
Mute Microphone
Disable Casing Speaker
Use Headset Device
Ringer Device for Headset
DTMF Mode Echo on Speaker Phone
Call Released Notification
In Auto Answer
Auto Answer
Auto Answer Indication
Type of Answering
These are the main features that you have to adjust. Remember to reboot the phone after each change in order to take effect.
For more information about how to make the configurations in the Asterisk's configuration files please read our tutorial about the Configuring IP Phones for use with Asterisk
ADDITIONAL INFORMATION
You can find some more info for the telephone from the local site of the phone when going to Menu/Manual for Snom190 or Menu/Phone/Manual for Snom200. You can also find some more useful information at http://www.snom.com/.
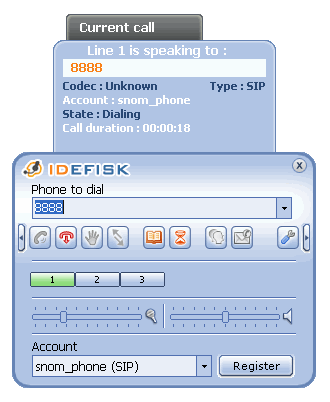
TEST
After registering the user on the Asterisk and the same user on the local site for the telephone we can try calling the Harphone using Softphone. For the test I will use Idefisk 2.0 softphone.
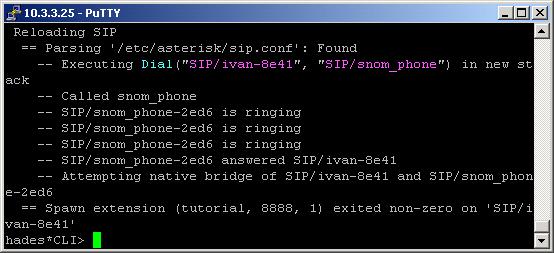
We registered a user snom_phone and extension to dial it 8888, lets try it now.
And here is what the Asterisk CLI shows.

To connect the phone plug one end of an Ethernet cable to the PC input and the other end to your PC LAN card. Plug the free end of your Internet cable to the phones Net input. The other end must be plugged where your Internet is coming from. Plug the adapter in its jack and connect it to the electricity network.
ADJUSTING
When started for first time it will prompt for an IP address. When you choose some non-existing one from your network you can administrate the telephone from the local site (the site is the IP of the phone). For the different model the site will look in a different way but anyway every single setting you can make to the phone can be made also from the site. Here is how the keypad is looking.
If you do not remember your phone IP you can find it in the Main Menu scrolling it with the left right arrows. Let us now look in more details the settings you can do remotely from the phones site.
My phone IP address is 10.10.0.22 so I type it in my browser (remember that this is valid only within your company or local network). We will have a look at some important issues not all of them.
Settings -> Base
All Settings/Base you can adjust the basic settings you want. In Version you can see the Phone type, Phone version, the URLs for Boot loader and Firmware.

Below in Base are all the basic settings you want to change.
Language:
I choose English for software language. You have 12 more basic languages to choose among
Number Display Style:
My chose as you see is Name + Number. You can choose from
Full Contact, Name, Number and Name + Number
Full Contact, Name, Number and Name + Number
Download Embedded Images:
Choice here is between From Phone and From Internet
Call Completion
Possibilities are off and on
IDNA (RFC 3490) Support
Possibilities are off and on
Actions on Ethernet cable replug
Do Nothing and Replug default is Do Nothing
Auto Dial
Possibilities are off after 2, 5, 10 or 15 seconds
Number Guessing
Off/On
Block Dialing
Off/On
Deny All Feature
Off/On
Challenge Response on Phone
Off/On
Broadsoft Call Control Feature
Off/On
Call Waiting Indication
Off/On
Dialtone During Hold
Off/On
Disconnect on Onhook
Off/On
Transfer on Onhook
Off/On
Administrator Mode
Off/On
Administrator Password
Password you would like to user for administration. It is standard password given by the manufacturer. Please do not change it
Settings -> SIP -> Lines
In SIP the lines are adjusted and registered. I have already some lines registered so this one will be my fourth and you will start from line one.
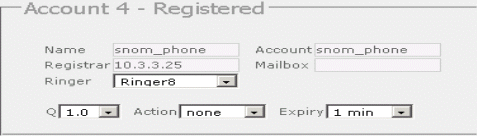
Here I register user snom_phone which is placed on Asterisk 10.3.3.25 (in your case the IP address will be different). I do not have Mailbox for now and choosing ringing tone 8. Timeout when dialing is 1 minute by default. So you now show the phone that there such user at Asterisk.
Settings -> SIP -> Authentication
In this menu you show the phone how to authenticate on Asterisk when trying to register the user.
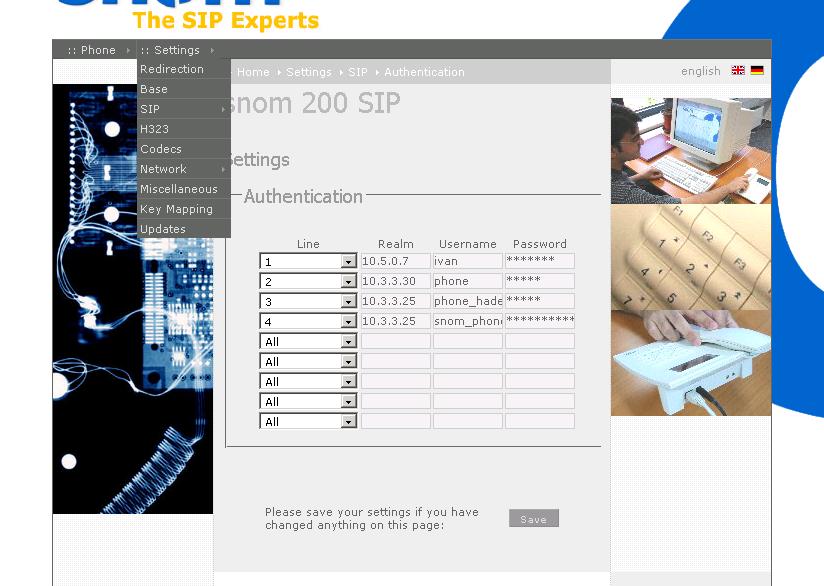
So now on line 4 your asterisk IP address must be typed in Realm field (my IP is 10.3.3.25), username and password are same as username and secret in sip.conf on asterisk (/etc/asterisk/sip.conf).
Settings -> Network -> Base

In Identity Settings IP address is the IP of the Snom telephone (in my case it is 10.10.0.22 your IP will be different.). For Network mask 255.0.0.0 is ok. Phone name may be whatever you wish. IP Gateway must be the address of your gateway. DHCP must be off.
In Time Settings you may add some timeserver if you are using any and the time zone in which you are.
Settings -> Network -> Advanced

In Remote Configuration I have chosen never to update automatically and just to load settings on booting. You have some more choices here and for DNS just type the IP address of your DNS server. I left all the other settings untouched (HTTP, LCServer, VLAN).
Settings -> Network -> Miscellaneous
Here you can adjust your audio device, auto answer functions and ringing tones.
In Tone you set just the ring tones and melodies.
In Audio:
Mute Microphone
On/Off
Disable Casing Speaker
On/Off
Use Headset Device
None, Chinch Connectors or RJ Connectors
Ringer Device for Headset
Use Speaker or Use Headset
DTMF Mode Echo on Speaker Phone
On/Off
Call Released Notification
On/Off
In Auto Answer
Auto Answer
On/Off
Auto Answer Indication
On/Off
Type of Answering
Handsfree, Headset or Handset
These are the main features that you have to adjust. Remember to reboot the phone after each change in order to take effect.
For more information about how to make the configurations in the Asterisk's configuration files please read our tutorial about the Configuring IP Phones for use with Asterisk
ADDITIONAL INFORMATION
You can find some more info for the telephone from the local site of the phone when going to Menu/Manual for Snom190 or Menu/Phone/Manual for Snom200. You can also find some more useful information at http://www.snom.com/.
TEST
After registering the user on the Asterisk and the same user on the local site for the telephone we can try calling the Harphone using Softphone. For the test I will use Idefisk 2.0 softphone.
We registered a user snom_phone and extension to dial it 8888, lets try it now.
And here is what the Asterisk CLI shows.
| Add Comment |
Latest Headlines:
-
T.38 faxing with Zoiper 2.15 is now easier than ever
section: voip software
-
Asterisk 1.4.21 Released
section: Asterisk
-
Asterisk 1.4.20 Released
section: Asterisk
-
Asterisk 1.4.20-rc2 Released
section: Asterisk
-
Asterisk 1.4.20-rc1 Now Available
section: Asterisk
- News Archives (older news)
Latest Tutorials:
-
Sending Fax from Zoiper to Zoiper using T.38
added 08/Dec/2008 18:16
-
VMAuthenticate (dialplan application)
added 01/Mar/2008 15:57
-
Siptronic ST-530
added 06/Nov/2007 17:57
-
Siemens C455 IP hardphone
added 05/Nov/2007 10:24
-
Zoiper
added 22/Oct/2007 17:53
Latest Comments:
-
https://tlajomulco.gob.mx/sites/default/...
tutorial: RemoveQueueMember (dialplan application)
-
OFFICIAL FACEBOOKS@:-
https://www.face...
tutorial: SIP with NAT or Firewalls
-
https://dcks-videahu.readme.io/
https:/...
tutorial: Installation of Asterisk GUI
-
https://zyo.se/one-piece-temporada-2
ht...
tutorial: Read (dialplan application)
-
https://bunny-wp-pullzone-ntwspdfrgr.b-c...
tutorial: SIP with NAT or Firewalls