

3.2.17. Thomson ST2020 SIP hardphone - NEW
1. Introduction

2. Prerequisites
3. Configurations on the Thomson ST2020 IP PHONE
4. Asterisk PBX configuration
5. How to configure your Thomson ST2020 to work with Asterisk
6. Screenshot from the Asterisk CLI

7. Additional information
8. Uploaded Files
9. Reference
Thomson ST2020 IP Phone is a Session Initiation Protocol (SIP) protocol compliant hardphone and it can be used with any SIP compliant PBX, Softswitch or IP Centrex solutions.
It supports Power-over-Ethernet and it has a second Ethernet port for a connection with PC, which reduce the amount of cables.
The phone is directed to the business class users and in this tutorial we are going to show you how to set up your phone to work with the open-source Asterisk PBX, but first let's take a look at the list with the features
Main Features
- 2 lines LCD display
- Connectivity: Integrated 2 port 10/100 Ethernet switch
- Phone services:
- Multiple power options: power over Ethernet 802.3af and external power supply adapter
- VoIP Standard: SIP V2 (RFC 3261)
- Voice compression standards: G.711, G.723.1, G.726, G.729AB
- IP addressing: Static or dynamic IP configuration (integrated DHCP client)
- Quality of Service: ToS DiffServ, 802.1p/Q, VAD, CNG, AGC Packet Loss Compensation, Adaptive Jitter buffering, adjustable packet duration
- Web browser interface for configuration and firmware upgrade (admin & user mode), Auto-provisioning configuration & firmware, LCD MENU configuration
- Connectivity: Integrated 2 port 10/100 Ethernet switch
- Phone services:
* Multiline Appearance, Call Forward, Call Transfer, Call Hold, Redial, Mute
* Message Waiting Indicator
* Speeddial, Handsfree dialing
* Phonebook, Call log
* Caller ID display, Time & Date display
- Audio extension connection: Integrated headset RJ9 port* Message Waiting Indicator
* Speeddial, Handsfree dialing
* Phonebook, Call log
* Caller ID display, Time & Date display
- Multiple power options: power over Ethernet 802.3af and external power supply adapter
- VoIP Standard: SIP V2 (RFC 3261)
- Voice compression standards: G.711, G.723.1, G.726, G.729AB
- IP addressing: Static or dynamic IP configuration (integrated DHCP client)
- Quality of Service: ToS DiffServ, 802.1p/Q, VAD, CNG, AGC Packet Loss Compensation, Adaptive Jitter buffering, adjustable packet duration
- Web browser interface for configuration and firmware upgrade (admin & user mode), Auto-provisioning configuration & firmware, LCD MENU configuration
Key Features
- English language
- SIP v2 compliant
- 2 lines x 16 characters Alphanumeric LCD display
- 2 10/100 Mb/s Auto-sense
- Power over Ethernet
- Speakerphone & Headset
- Handsfree talking (group listening)
- Direct message access key
- Caller ID Display
- SIP v2 compliant
- 2 lines x 16 characters Alphanumeric LCD display
- 2 10/100 Mb/s Auto-sense
- Power over Ethernet
- Speakerphone & Headset
- Handsfree talking (group listening)
- Direct message access key
- Caller ID Display
Phone Sets
- Function Support
* Redial (1 number)
* Speed dial (5 direct memories)
* Message Waiting Indicator
* Mute
* Hold
* Blind Transfer
* Forward (Always, On busy, No answer)
* On-hook dialing
* Group listening
* Address book (18 indirect memories)
* Caller ID Display
* Volume control (speaker, handset, headset & ringer)
* Date & Time Display (idle state)
* Call duration timer
- Key Pad
* 30 keys
* 3 soft key, Volume Up & Down, Menus and Cancel keys
* 5 speeddial (programmable) keys
* 8 fixed function keys (mute, redial, hold, message, transfer, phonebook, multiline, handsfree)
* 3 soft key, Volume Up & Down, Menus and Cancel keys
* 5 speeddial (programmable) keys
* 8 fixed function keys (mute, redial, hold, message, transfer, phonebook, multiline, handsfree)
- LED Indicators
* Message Waiting Indicator
* Handsfree
* Mute
* System
* Handsfree
* Mute
* System
- Interfaces
* 2 RJ-45 auto-sensing 10/100Mbps (one for PC and one for LAN)
Technical Specifications
- VoIP Protocol Support
* SIP RFC3261
- Audio Code
* G.711 u-law/a-law
* G.723.1
* G.729ab
* G.723.1
* G.729ab
- Internet Support
* IP (RFC0791), TCP, (RFC0793), UDP (RFC0768), ARP (RFC0826) protocols
* DHCP client (RFC2131)
* SDP
* TFTP
* HTTP
* DNS
* SNTP
* DHCP client (RFC2131)
* SDP
* TFTP
* HTTP
* DNS
* SNTP
- Ethernet
* IEEE 802.3 10BASE-T Ethernet
* IEEE 802.3u 100BASE-T Ethernet Fast Ethernet
* IEEE 802.3u 100BASE-T Ethernet Fast Ethernet
- Quality of Service
* ToS Diffserv, 802.1p/Q
* VAD, CNG, Packet Loss Concealment
* VAD, CNG, Packet Loss Concealment
- Dial Tone Signal Generation
* DTMF (out-of-band RFC2833)
Configuration
- IP Number Assignment
* DHCP client or fixed
- Configuration Support
* Keypad & LCD
* Web browser management with 2 Levels (User and Administrator)
* TFTP server download, Auto-provisioning support
* Local & remote warm reboot
* Password protection for configuration
* Web browser management with 2 Levels (User and Administrator)
* TFTP server download, Auto-provisioning support
* Local & remote warm reboot
* Password protection for configuration
Physical & Environmental
- Mounting
* Footstand
* Wall Mounting
* Wall Mounting
- Power Input
* DC 48V
* 100V/60Hz to 220V/50Hz full range auto-switching
* Power over Ethernet (802.3af)
* 100V/60Hz to 220V/50Hz full range auto-switching
* Power over Ethernet (802.3af)
- Dimensions - 210 x 180 x 80 mm
- Weight - 700g (main unit)
- Operating Temperature - 0 to +40 C ( 32 to +104 F)
- Storage Temperature - -20 to +70 C (-40 to +158 F)
- Humidity - 5% - 95% non-condensing
2. Prerequisites
1) You will need a working Asterisk PBX with made users and extensions.
2) On the back side of the phone you will find two RJ-45 ports. They are labeled as PC and LAN.
Put the Ethernet cable from your network in the port labeled LAN.
Use another UTP cable to connect your computer with the phone. Put this cable in the RJ-45 jack labeled PC.
3) Plug the handset cord in the RJ-11 port placed on the left side of the phone device (the one marked with a handset) or if you want to use a headset then plug the headset cord in the RJ-11 port marked with a headset.
4) Plug the power cord in the phone.
3. Configurations on the Thomson ST2020 IP PHONE
Thomson ST2020 IP Phone could be configured in two different ways. The first one is through the telephone itself by using the LCD displayed and the softkeys. The second way is to use the through your web browser by using the phone's web interface.
The configuration through the web interface is separated into two levels of access - user and administrator. They are giving different rights and possibilities for changes and configurations, to the user.
First lets see how we can make configurations through the phone device.
The phone has 3 soft buttons, which are used to perform different operations. They are: Vol -, OK and Vol +. In order to make changes in the configuration, you have to press the button labeled with menu. Once you press it you will be able to choose between two possible options - Info and Config.
If you want to see information about the phone's IP address, Status or Version, then you have to choose Info. Press the Vol - softkey and you will see the following three options: IP, Status, Vers. To check the current phone's IP address, press the Vol - softkey. To check the phone's status, press the OK softkey. The status could be either Succeeded or Failed. To check the current firmware version, press the Vol + softkey. Use the button labeled with C, if you want to go back or quit from the menu.
If you choose the Config option, you will be able to change the phone's configuration. Press the Vol + softkey. The phone will turn in Config mode. You have to wait a few seconds until you see the following message: Ready for Config and the phone's IP address. You have to press the Menu button again. You are now at the configuration menu. It is separated in several parts (pages).
On the first page you could choose between Acct (change the authentication's username and password), Phone (Volume and Call Forward) and Next (go to the next page). You could select the desired operation by pressing the corresponding softkey, placed under the options. For the left option (Acct) press the Vol - softkey, for the middle one (Phone), press the OK softkey and for the right option (Next), press the Vol + softkey. These rules are valid for all pages.
On the second page the options are: Speed (configure the speeddial buttons), User (change the username and password for the user level of access) and Next (go to the next page).
On the third page you have Boot (reboots the phone), Admin (gives you access to the Advanced options) and Home (return to the first page).
So let's take a closer look at the options.
The Acct section allows you to change the username and password used for authentication at the Asterisk server. Once you select the Acct menu, you will see the Acct submenu where you could change either the authentication username or the authentication password.
If you want to switch between capital letters, small letters and numbers, you have to use the Vol + softkey. Unfortunately, the current state of the keyboard is not shown anywhere on the LCD display, so you have to check it by pressing some of the keys.
If you type a wrong character, you could erase it by pressing the Vol - softkey. Do not use the C key, because it will return you in the previous menu.
The Phone section allows you to change the outgoing volume of the speaker and the incoming and outgoing volume of the handset (respectively headset). Also, you could change the Type and the URL (phone number) for the call forwarding.
If you want to change the settings for the speeddial buttons or the username and password for the User access level, then you need to go on the second page by pressing Next (use the softkey Vol +).
So, from the second page you could choose between the Speed and the User menus. Through the Speed one you could change the numbers for the five speeddial buttons.
Through the User menu you could change either the username or the password used for the User level of access (used through the web interface).
On the third page you could choose between Boot and Admin. The purpose of the first one is just to reboot the phone device. The system will ask you for confirmation. If you agree - press the softkey, which corresponds for Yes (Vol -) or if you disagree press Vol +, which stands for No.
Now, about the Admin section we will need to take a closer look.
First of all, if you want to make changes in the Administrator section - you will need the Administrator password. By default it is 784518. In order to input digits you will need to change the state of the keypad. Press the Vol + softkey twice. Once you enter the correct password, you will be able to change the following settings: Network, SIP, Media, Advanced, Phone and Reset. These options are again separated in three pages. The Network and the SIP are placed on the first page. The Media and the Advanced options are placed on the second page and on the third one there are the Phone and the Reset options.
Through the Network menu you could enable/disable the DHCP (the phone will take its network configuration from a DHCP server), you could change the IP address (DHCP disabled), the default subnet mask (DHCP disabled), the DNS server and the NTP server.
In the SIP section you could set or change the IP address of the SIP Proxy and the Outbound Proxy. The so called Display Name, which actually is the CallerId, could be changed from this section. The last option here is the User, which into this section actually means: the name that will be displayed on your phone's screen. That's it for the sections and the options on the first page from the administrator section.
Now let's go to the second page. The sections here are: Media and Adv (Advance). The media section allows you to choose the preferable codec and to enable/disable the VAD (Voice Activity Detection). By default the preferable codec is G.711 Alaw. The other options are: G.711 ulaw, G.723 and G.729. By default the VAD is disabled and it should be in this way when you are using the phone with the Asterisk. The Adv section allows you to enable/disable the VLAN (802.1q) and to change the number of the Auto Dials.
The sections on the third page are: Phone and Reset. Through the first one you could change the Time Zone, to change the Daylight settings (+1, -1, No), to change the Tone (could be France, Germany, Spain, USA, UK, Slovenia) and you could set the Voicemail number at which you receive your voicemail messages.
The second section - Reset - allows you to reset the phone device to the factory default settings. Possible options are Yes or No.
Once you are ready with the configuration, you have to reboot the phone. Use the Boot section from the Configuration menu. If all the settings are correct the phone will boot quickly and it will be ready to be used.
Configurations through the Web Interface
As we already mentioned there are two levels of access - User and Administrator. If you would like to log in as User, then use the username user - no password is required and of course your rights will be limited.
As a User you will be allowed to change the username and password only for the User account.
The user rights include the change of the authentication username and password used for authentication with the Asterisk server and the change of the numbers set for quick dial.
Apart from the Administrator account the User could only enable/disable the Call Forwarding function and to change the Call Forward number. You will not be allowed to change the Voicemail number.
The volume levels for the speaker and the handset (headset) could be also adjusted.
The Administrator has full access and the right to change everything. However, to enter as administrator, it is required to put the phone in Config Mode. Also you will need to enter the administrator password. By default it is 784518.
As Administrator you will be allowed to upgrade the firmware, to change the usernames and passwords for the User and Administrator level of access, to restore the default factory settings, to change the network options, to change the options connected with the SIP Server such as codecs, authentication accounts and VAD. You could adjust the Time Zone, Country Tone, Speaker and Handset volume, the VLAN settings and the Speeddial buttons. The Voicemail and Call Forward numbers could also be changed.
4. Asterisk PBX configuration
1) sip.conf
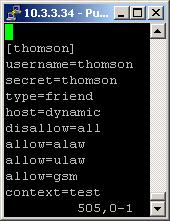
We need to create one user in the sip.conf file. This is because the phone is using the SIP protocol, for a connection with the Asterisk PBX.
So, we have created the user user1. This one will be used with our Thomson ST2020 IP Phone.
Type=friend means that the user could make and receive calls. Host=dynamic means that the IP address of the device is not set statically but dynamically through a DHCP server. Disallow=all - means that the line will not support any codecs. However, below this option we have allow=ulaw, allow=alaw and allow=gsm. This means that the line will support these three codecs - ulaw, alaw and gsm. It is important to write the options exactly in this order. First you have to write the disallow=all option and then the allow options. Otherwise, if you write the disallow option after the allow options, no one of the codecs will be supported by the line. Context=test - this points to the context with the extensions, which the user will be allowed to work with. The context is placed in the configuration file extensions.conf.
Type=friend means that the user could make and receive calls. Host=dynamic means that the IP address of the device is not set statically but dynamically through a DHCP server. Disallow=all - means that the line will not support any codecs. However, below this option we have allow=ulaw, allow=alaw and allow=gsm. This means that the line will support these three codecs - ulaw, alaw and gsm. It is important to write the options exactly in this order. First you have to write the disallow=all option and then the allow options. Otherwise, if you write the disallow option after the allow options, no one of the codecs will be supported by the line. Context=test - this points to the context with the extensions, which the user will be allowed to work with. The context is placed in the configuration file extensions.conf.
2) extensions.conf
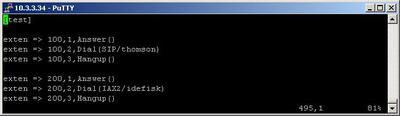
Now, lets take a look at the extensions.conf file.
On the picture above you can see our extensions.conf file.
We will create our extensions in the [test] context of the file. By default there is no such context so you have to create it.
We have two numbers - number 100 will be the number of the Thomson telephone and number 200 will be the number of our idefisk softphone.
For each number we have 3 three configuration lines. The first one contains the Answer application. Its job is to answer the channel.
The second line contains the Dial application. As argument in its brackets we have SIP/thomson or IAX2/idefisk. IAX2 and SIP are the channels, which will be used to connect the specific telephone. thomson and idefisk are the users, defined in the iax.conf file or sip.conf configuration files. This depends on the used protocol. The phones are using these users to register with the Asterisk Server.
The third line contains the Hangup application. It is used to hang up the channel when the conversation is over.
For more information about how to make the configurations in the Asterisk's configuration files please read our tutorial about the Configuring IP Phones for use with Asterisk
5. How to configure your Thomson ST2020 to work with Asterisk
1) Through the telephone device
2) Through the Web Interface


When you start the phone for first time, you will see the message Register Failed Not Implemented. Do not worry this is because the phone is not configured yet. Press the button labeled with menu twice. You will see two menus - Info and Config. You have to choose config. For the purpose press the Vol + key. The phone will go in Config Mode. You have to wait a few seconds. When you see Ready to Config written on the phone's display, you have to press the menu button again. You will enter in the main configuration menu.
The first possible option is the Acct, where we have to set the username and password used for authentication with the Asterisk Server. Press the Vol - key once. You will see another menu with the following options: AuthU and AuthP.
Let's set the username. Press the Vol - key again. You could use the keypad. The initial state of the keypad is for small letters. If you want to write the username with capital letters you have to change this state by pressing the Vol + key once. If you want to type digits press the same key twice. If you make a mistake you could erase characters with the Vol - key. Do not use the button labeled with C because it will return you in the previous menu. When you are ready press the OK button to save the changes.
Use the same system for the authentication password. In order to enter this option press the OK key. Everything else is the same as with the authentication username.
Once you are ready with this you could go ahead with the other options. From the main configuration menu press the Vol + key, which stands for Next twice. You will be sent in the third page of the main configuration menu. The options here are: Boot and Admin. We need the second one. Press the OK key to enter the administrator section.
The first thing here is the password prompt. By default it is 784518. In order to type digits you have to press the Vol + key twice. If you are ready press OK.
We are now at the main administrator menu. Our first job will be to make the network configurations. Press the Vol - to enter the Network menu. By default the phone is configured to take its network setting from a DHCP server. If you want to change this you have to disable the DHCP. Press Vol - again and then by using Vol -and Vol + choose disable.
Now you have to set the phone's IP address, subnet mask and default gateway manually. Press OK to enter the IP option. You have to erase the current IP address which is 0.0.0.0. For the purpose use the Vol - key. Here you do not need to change the state of the key pad - just type the desired IP address. Use the asterisk key (*) for a dot character. If you are ready press OK.
We have to move to the next page from the menu - press Vol +. Now in the same way like the IP address we have to set the subnet mask and the default gateway. When you are ready, go to the third page by pressing Vol +.
Here you have to set the IP addresses of your DNS and the NTP servers. Press Vol - for the DNS one and OK for the NTP. Erase the current addresses with Vol - and set your own ones. Once you are ready you have to continue with the other settings concerning the connection with the Asterisk.
Press C to return to the main administrator menu. You have to configure the IP address of your Asterisk Server, your Caller ID and the Display Name. Go to the SIP section (I am sure that you already know how.). First it is the Proxy setting. This has to be the IP address of your Asterisk Server. The other option is the IP address of the Outbound Server, which in our case is the same as the Asterisk's one. You could type the IP address with digits or with their host names (If you are using DNS). When you are ready go to the next page from the menu, where you could set the Caller ID and the Display Name.
The things here could be a little bit confusing. The name of the option where you could change your Caller ID is Name and the name of the option for the display name is User. In our case we will set the Caller ID to 100 and the display name to thomson. In your case you could use something else. When you are ready press C to return to the main administrator menu and go to the next page.
NOTE: Please, pay attention that the word used for display name should be exactly the same as the one set for authentication username. Otherwise the registration at the Asterisk Server will fail.
Here we have to adjust the Media, which means the preferable codecs and the VAD. By default the codec is set to G.711 Alaw and we will leave it in this way, because this is the codec we are using with our Asterisk. If you are using something else you have to change this by pressing Vol - or Vol +. However you have to know that the ST2020 IP Phone supports only the following codecs: G.711 Ulaw, G.711 Alaw, G.723 and G.729. By default the VAD is disabled and it has to be in this way if you are using the phone with the Asterisk. If it is not then you have to correct this.
Now you are ready with all the settings you have to change in order to get this phone working with the Asterisk software. The last step is to reboot the device. For the purpose you have to return in the main configuration menu by using the C key and then from its third page to choose Boot. The system will ask you for a confirmation. Press Vol - for Yes. If the your configuration is correct, then you will see the word set for display name and the date on the phone's screen.
2) Through the Web Interface
In order to make the configurations, required for the connection with the Asterisk, you have to log in as administrator. However, the first thing you have to do is to put the phone in Config Mode. How to do that?
1) When you see the message: Register Failed Not Implemented, press the button labeled with menu twice.
2) You will see two possible options - Info and Config. Select the second one by pressing the Vol - key.
3) You have to wait a few seconds
4) When the phone is ready you will see the message Ready to Config and the IP address at which the phone could be reached.
5) Open your browser and type this IP address.
6) The system will ask you for username and password. Type administrator for username and 784518 for password. These are the default ones.
7) You are now ready to start making changes.
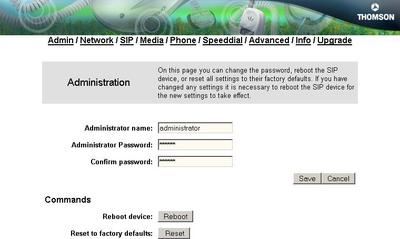
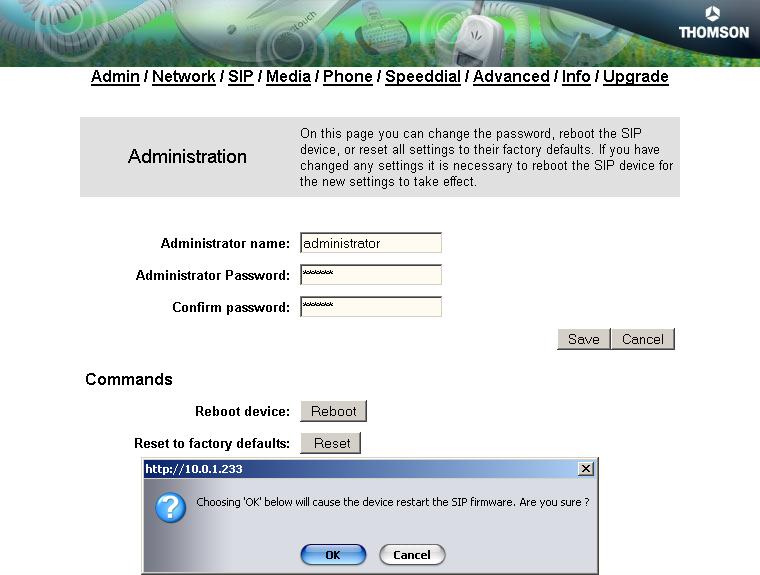
The different options are separated into different menus. When you make a change in a menu, you have to press the Save button. Otherwise the change will not be saved. The first menu is the Admin one. Here, you could change the username and password used by the Administrator account. We highly recommend you to change them. Also you could reboot or reset the device from here.
Next is the Network menu. By default the phone is set to take its network configuration from a DHCP Server. The IP addresses of the DNS and NTP Servers are also set by default, and you have to change them with your own ones. In our example we will set the IP address of our ST2020 manually. Our IP address will be 10.0.1.233 with subnet mask 255.0.0.0 and default gateway 10.0.0.1. In your case these options could be different.
Next is the Network menu. By default the phone is set to take its network configuration from a DHCP Server. The IP addresses of the DNS and NTP Servers are also set by default, and you have to change them with your own ones. In our example we will set the IP address of our ST2020 manually. Our IP address will be 10.0.1.233 with subnet mask 255.0.0.0 and default gateway 10.0.0.1. In your case these options could be different.

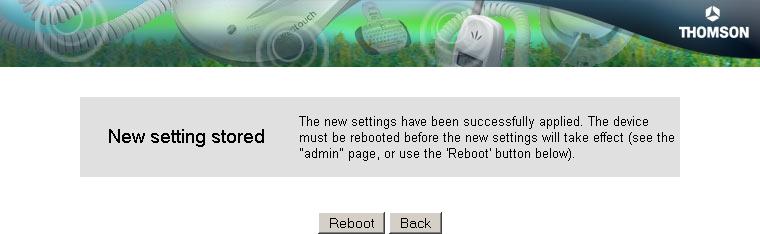
Do not forget to press the Save button! When you press it, you will see the page shown on the screenshot below. If you are ready with all the changes press Reboot. Otherwise press Back to continue with the other options.
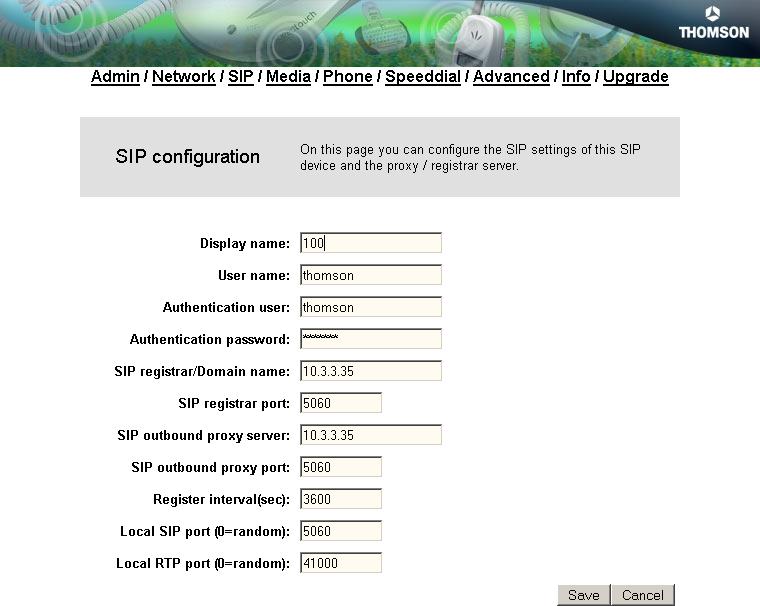
Let's continue with the next menu - SIP. This is the place where you tell to the phone device where and how to connect with the Asterisk Server. First you have to type the username and password used for authentication on the Asterisk They have to be absolutely the same as the ones set in the Asterisk's sip.conf configuration file. Then you have to set the IP addresses of the SIP and Outbound Proxies. In our case they are identical - 10.3.3.34. In your case, you have to type the IP address of your Asterisk Server
Also, there is a field called User name. You have to fill it with the same word used for Authentication user. Otherwise the registration with the Asterisk would failed. In our case this word is thomson. In your case it could be different.
What you fill in the Display Name field, will be used as a Caller ID. So in our case we will set the number at which our Thomson could be reached - 100.
The other options on the page are: SIP registrar port, SIP outbound proxy port, Register interval(sec), Local SIP port (0=random) Local RTP port (0=random). You could leave them with their default values.
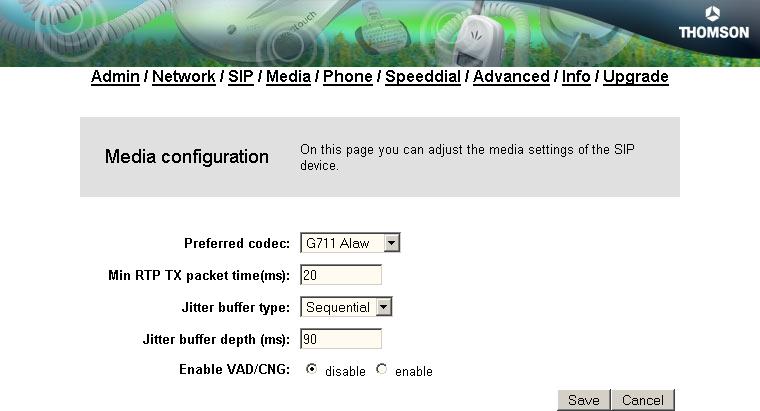
At this point you are ready to use your IP phone with the Asterisk. However, let's take a look at the Media menu. Here you could select a preferable codec and to enable/disable the Voice Activity Detection (VAD) which is important for the normal work of the phone with the Asterisk. The VAD should always be disabled, when you are using the ST2020 with the Asterisk. As for the codecs - you could choose between G.711 alaw/ulaw, G.723 and G.729. In our example we will use the G.711 alaw.
The last step is the rebooting of the device. Go to the Admin menu and press the Reboot button. The system will ask you for confirmation. Press OK.
Now you are ready to use your Thomson ST2020 IP Phone with your Asterisk Server.
In our case we will test it by dialing the number 200 at which our Idefisk softphone is attached
In our case we will test it by dialing the number 200 at which our Idefisk softphone is attached
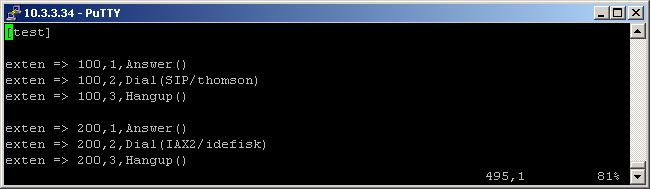
6. Screenshot from the Asterisk CLI

7. Additional information
In order to restore the default factory settings of the phone, please do the following:
The default system settings of the phone will be restored.
In order to update the firmware of the phone, do the following:
The new firmware will be uploaded within a few minutes.
1) Through the Web Interface
Go to the Admin menu (logged in as administrator) and press the Reset button. You will be asked to confirm.
2) Through the Phone Device
Put the phone in Config mode. Go to the third page from the main config menu and choose Admin. Enter the administrator password and then choose the third page from the main administrator menu. Press Reset. You will be ask to confirm.
The default system settings of the phone will be restored.
In order to update the firmware of the phone, do the following:
1) Download the latest firmware from the official web site - The SpeedtouchPartner web site. In order to be able to download, you have to be registered as a partner.
2) Log in as administrator through the web interface.
3) Go to the Upgrade menu.
4) Through the Browse button choose the downloaded firmware file.
5) Press the Upload button.
2) Log in as administrator through the web interface.
3) Go to the Upgrade menu.
4) Through the Browse button choose the downloaded firmware file.
5) Press the Upload button.
The new firmware will be uploaded within a few minutes.
8. Uploaded Files
9. Reference
| Add Comment |
Latest Headlines:
-
T.38 faxing with Zoiper 2.15 is now easier than ever
section: voip software
-
Asterisk 1.4.21 Released
section: Asterisk
-
Asterisk 1.4.20 Released
section: Asterisk
-
Asterisk 1.4.20-rc2 Released
section: Asterisk
-
Asterisk 1.4.20-rc1 Now Available
section: Asterisk
- News Archives (older news)
Latest Tutorials:
-
Sending Fax from Zoiper to Zoiper using T.38
added 08/Dec/2008 18:16
-
VMAuthenticate (dialplan application)
added 01/Mar/2008 15:57
-
Siptronic ST-530
added 06/Nov/2007 17:57
-
Siemens C455 IP hardphone
added 05/Nov/2007 10:24
-
Zoiper
added 22/Oct/2007 17:53
Latest Comments:
-
https://tlajomulco.gob.mx/sites/default/...
tutorial: RemoveQueueMember (dialplan application)
-
https://tlajomulco.gob.mx/sites/default/...
tutorial: RemoveQueueMember (dialplan application)
-
https://tlajomulco.gob.mx/sites/default/...
tutorial: RemoveQueueMember (dialplan application)
-
https://tlajomulco.gob.mx/sites/default/...
tutorial: RemoveQueueMember (dialplan application)
-
ÐÑоÑÑ Ð¿ÑоÑениÑ, ÑÑо Ñ Ð...
tutorial: DrayTek Vigor 2900V - broadband security voip router