

3.2.22. Polycom - SoundPoint 301
Features

Product Highlights:
Polycom SoundPoint IP 301 Specifications
Power
Headset Capability
Handset
Display
Feature Keys
Audio
Network and Provisioning
* NAT refers for `Network Address Translators`
** VPN refers for `Virtual Private Network`
Installation
Notes:
a. The Polycom SoundPoint 301 can be placed both on horizontal and vertical surface.
b. Use the external power supply that is included in the package. Other power supplies may cause damage to the phone, affect the behavior or induce noise.
c. If you are going to use `Power over Ethernet` solution use only inline power cables for IEEE802.3af or Cisco Inline Powering
Here is a quick step by step installation of Polycom SoundPoint 301:
1. Plug the one end of the handset's cable into the phone and the other into the handset itself.
2. Plug the one end of the headset's cable into the phone and the other into the headset itself.
3. Plug your Internet cable into the port with label 'LAN'.
4. Plug your PC cable into the port with label 'PC'. Plug the other end into the Ethernet port of your PC. In doing this you will ensure that both the phone and your PC will be supplied with Internet without need of third device or second Internet line.
5. Power up the phone by plugging the power supply into the phone.
6. Put the stand of the phone in desk-mount and wall-mount position. Mount the hardphone.
Note: Note that points 2 & 4 are optional.
Initialization
When you power up the hardphone the following menu will appear on the LCD display:

If you press the button below the label `START` or you wait long enough, the hardphone will load up its default settings. However we recommend you to run the `SETUP`

The default password is `456`. Enter it with the numpad and press the button which is under OK. If you are using different password, which includes alphabets, you can select lower-case or upper-case letters by pressing the button which is below `1->Aa`. If you press the button below the Cancel label you will return to the previous page.
Setting up dynamic network settings - DHCP
If you are going to use dynamic network settings you will have to set DHCP status to Enable (which is the default state). After you accomplish this, press the `down` navigation button (it is located just up the Menu button). You will see the DHCP Menu:

By entering this submenu you will be able to set the DHCP Timeout, Boot Server Options, BootSrv Type, VLAN Disc, VLAN Disc Opt.
The next page is the IP Gateway. Press the button below the `Edit` label and enter your gateway IP address with the numpad.
With this your network setup will be finished. However there are more menus which you might want to visit. Here is a list of them:
Setting up static network settings
If you are going to use static network settings you will have to set DHCP status to Disable (Enabled is the default state). After you accomplish this, press the `down` navigation button (it is located just up the Menu button). The next menu is about the static IP address of the hardphone. Press the button below the `Edit` label and enter a valid IP address from your network. You can do this with the numpad. When you are ready press the button located below `OK` label. From the next menu you will be able to set the Subnet Mask of the hardphone. You can achieve this in the same way you have set your IP address. The next page is the IP Gateway. Press the button below the `Edit` label and enter your gateway IP address with the numpad.
With this your network setup will be finished. However there are more menus which you might want to visit. Here is a list of them:
Account Configuration
Prerequisitives
Before going further reading this tutorial make sure you have asterisk server and you are familiar with adding users to asterisk. If you are not aware of this issue you can read the tutorial explaining how to add new users to asterisk.
Polycom SoundPoint 301 is working with the SIP (Session Initiation Protocol). You will have to create a SIP user. Open /etc/asterisk/sip.conf and add the user at the bottom at the file.
Then reload Asterisk's sip configuration by executing the command `asterisk -rx "sip reload"`.
At one point we will want to receive calls on our phone, that's why we have to create an extension for this. We will achieve this by adding extension `1001` in our default context in extensions.conf configuration file, located at /etc/asterisk
Account configuration
There are two ways to configure your account. The first way is through the hardphones menus. To achieve this follow this instruction:
In the same way you can configure your second line. When you finish with the configuration youll have to reboot your hardphone in order the changes to be applied.
The second way to configure you SIP settings is through the web interface of the SoundPoint 301. Open your web browser and type the devices IP address in your address bar. In this way you will enter the web interface. Click on the Lines tab.

You will be prompted for username and password. The default username and password are: Polycom and 456. When you enter the page just enter the appropriate data.
When you are ready click on the Submit button. The hardphone will reboot, applying the new settings.
FAQ
Q: What is the default password for SoundPoint 301?
A: The default username is Polycom and the default password is 456
Q: What VoIP protocols SoundPoint 301 supports?
A: Polycoms product supports SIP and MGCP
Q: How to alter the contrast of the display?
A: Go to the main menu. Settings->Basic->Contrast
Q: How to view the current network settings?
A: Go to the main menu. Status->Network->TCP/IP Parameters
Q: How to view the Diagnostics Graphs?
A: Go to the main menu. Status->Diagnostics->Graphs
Q: How to view the current firmware version?
A: Go to the main menu. Status->Platform->Application->Main
Q: How to reboot the hardphone?
A: Go to the main menu. Settings->Advanced->Restart Phone
Q: What documentation is available?
A: You should pay a visit to the Documentation section on the Polycom Web site for a complete list of available documents including data sheets and quick start guides. You should also check with your reseller for any custom documents developed by the Technology Partner.
Q: Does the phone come in any other colors?
A: No. The only color available is gray.
Q: What types of headsets are supported
A: All SoundPoint IP phones are compatible with amplified headsets REV E. and higher. Direct connect headsets are supported. Visit the Polycoms web site for a list of tested headsets or refer to your headset documentation for compatibility information.
Q: How does an administrator manage large quantities of phones?
A: The format and content of the configuration files are such that these files can be customized by administrator tools and used to provision phones upon boot up from an FTP or TFTP boot server. An administrator for a large group of phones can modify the configurations and push the new info to the phones by remotely rebooting the phones. Remote reboot capabilities require the support of the IP-PBX or IP Softswitch. Please contact your reseller for details.
Q: How is the time set on the phones?
A: SoundPoint IP phones uses Simple Network Time Protocol (SNTP) servers to provide accurate time. These servers can be located on the local network or available from various sites on the Internet.
Links
Polycom SoundPoint 301 Datasheet
SoundPoint IP 300 / 301 User Guide - SIP 1.5.x
SoundPoint IP 300 / 301 User Guide - SIP 1.6.x
SoundPoint IP 300 / 301 User Guide - SIP 2.0
SoundPoint IP 301 Quick Start Guide
SoundPoint IP 301 Quick User Guide
SoundPoint IP/SoundStation IP Administrators Guide, Version 2.0.x
sip.conf
extensions.conf
Product Highlights:
2 lines
4 line x 20 character LCD
Very good audio quality
Expanded Flash memory
Dual port 10/100 Ethernet switch
Compatible with NAT* and VPN**
Flexible powering options
Multiple codec support G.711u, G.711A & G.729AB
Standards based
4 line x 20 character LCD
Very good audio quality
Expanded Flash memory
Dual port 10/100 Ethernet switch
Compatible with NAT* and VPN**
Flexible powering options
Multiple codec support G.711u, G.711A & G.729AB
Standards based
Polycom SoundPoint IP 301 Specifications
Power
External wall adapter with power provided directly to the phone
Optional inline power cables for IEEE802.3af or Cisco Inline Powering
Optional inline power cables for IEEE802.3af or Cisco Inline Powering
Headset Capability
Individual modular jack compatible with Plantronics and GN Netcom® business headsets, amplified headsets are recommended
Handset
Hearing aid compatible
Display
4 line x 20 character wide LCD
Customizable animated indicators
Message alert indicator
Customizable animated indicators
Message alert indicator
Feature Keys
10 dedicated feature keys
2 line keys
5 configurable feature keys
Mute key
Headset key
Predefined Hold key
3 context-sensitive soft keys 5 configurable feature keys
Mute key
Headset key
Predefined Hold key
Audio
Individual volume settings for each audio path with visual feedback
Customizable audio sound effects
Hands-free Headset mode
Built-in monitor speaker
Support for G.711 m/A and G.729A (Annex B) codecs
Adaptive jitter buffers and Packet Loss Concealment to improve speech quality
Voice Activity Detection and Comfort noise fill
3 Party Conferencing
Telephony Tone Signaling (RFC2833)
Record and Playback for diagnostic purposes
Network and Provisioning
Dual 10/100 Mbit/s switched Ethernet ports
Manual or dynamic host configuration protocol (DHCP) setup
Time and date synchronization using SNTP
Server provisioned XML-based configuration files
Web provisioning using built-in HTTP server
Support for IEEE802.1p/Q tagging (VLAN), Layer 3 TOS
Network Address Translation (NAT) support
RTCP support (RFC1889)
Event logging
User-selectable hardware diagnostics (Network/CPU/Memory monitor)
* NAT refers for `Network Address Translators`
** VPN refers for `Virtual Private Network`
Installation
Notes:
a. The Polycom SoundPoint 301 can be placed both on horizontal and vertical surface.
c. If you are going to use `Power over Ethernet` solution use only inline power cables for IEEE802.3af or Cisco Inline Powering
Here is a quick step by step installation of Polycom SoundPoint 301:
1. Plug the one end of the handset's cable into the phone and the other into the handset itself.
2. Plug the one end of the headset's cable into the phone and the other into the headset itself.
3. Plug your Internet cable into the port with label 'LAN'.
4. Plug your PC cable into the port with label 'PC'. Plug the other end into the Ethernet port of your PC. In doing this you will ensure that both the phone and your PC will be supplied with Internet without need of third device or second Internet line.
5. Power up the phone by plugging the power supply into the phone.
6. Put the stand of the phone in desk-mount and wall-mount position. Mount the hardphone.
Note: Note that points 2 & 4 are optional.
Initialization
When you power up the hardphone the following menu will appear on the LCD display:

If you press the button below the label `START` or you wait long enough, the hardphone will load up its default settings. However we recommend you to run the `SETUP`
The default password is `456`. Enter it with the numpad and press the button which is under OK. If you are using different password, which includes alphabets, you can select lower-case or upper-case letters by pressing the button which is below `1->Aa`. If you press the button below the Cancel label you will return to the previous page.
Setting up dynamic network settings - DHCP
If you are going to use dynamic network settings you will have to set DHCP status to Enable (which is the default state). After you accomplish this, press the `down` navigation button (it is located just up the Menu button). You will see the DHCP Menu:

By entering this submenu you will be able to set the DHCP Timeout, Boot Server Options, BootSrv Type, VLAN Disc, VLAN Disc Opt.
The next page is the IP Gateway. Press the button below the `Edit` label and enter your gateway IP address with the numpad.
With this your network setup will be finished. However there are more menus which you might want to visit. Here is a list of them:
Server Menu
SNTP Address
GMT Offset
DNS Server
Secondary DNS Server
DNS Domain
CDP
VLAN Id
SNTP Address
GMT Offset
DNS Server
Secondary DNS Server
DNS Domain
CDP
VLAN Id
Setting up static network settings
If you are going to use static network settings you will have to set DHCP status to Disable (Enabled is the default state). After you accomplish this, press the `down` navigation button (it is located just up the Menu button). The next menu is about the static IP address of the hardphone. Press the button below the `Edit` label and enter a valid IP address from your network. You can do this with the numpad. When you are ready press the button located below `OK` label. From the next menu you will be able to set the Subnet Mask of the hardphone. You can achieve this in the same way you have set your IP address. The next page is the IP Gateway. Press the button below the `Edit` label and enter your gateway IP address with the numpad.
With this your network setup will be finished. However there are more menus which you might want to visit. Here is a list of them:
Server Menu
SNTP Address
GMT Offset
DNS Server
Secondary DNS Server
DNS Domain
CDP
VLAN Id
SNTP Address
GMT Offset
DNS Server
Secondary DNS Server
DNS Domain
CDP
VLAN Id
Account Configuration
Prerequisitives
Before going further reading this tutorial make sure you have asterisk server and you are familiar with adding users to asterisk. If you are not aware of this issue you can read the tutorial explaining how to add new users to asterisk.
Polycom SoundPoint 301 is working with the SIP (Session Initiation Protocol). You will have to create a SIP user. Open /etc/asterisk/sip.conf and add the user at the bottom at the file.
[mytest]
username=mytest
secret=mytestsecret
type=friend
host=dynamic
context=default
username=mytest
secret=mytestsecret
type=friend
host=dynamic
context=default
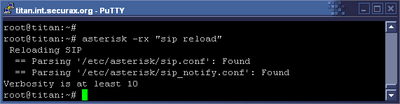
Then reload Asterisk's sip configuration by executing the command `asterisk -rx "sip reload"`.
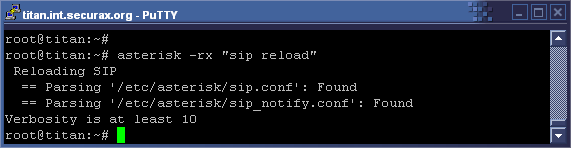
At one point we will want to receive calls on our phone, that's why we have to create an extension for this. We will achieve this by adding extension `1001` in our default context in extensions.conf configuration file, located at /etc/asterisk
[default]
exten => 1001,1,Dial(SIP/mytest,20)
exten => 1001,n,HangUp()
Of course we will have to reload our asterisk extension configuration in order the changes to take effect. We can easily achieve this by typing:exten => 1001,1,Dial(SIP/mytest,20)
exten => 1001,n,HangUp()
`asterisk -rx "extensions reload"` - for Asterisk 1.2.x
`asterisk -rx "dialplan reload"` - for Asterisk 1.4.x
`asterisk -rx "dialplan reload"` - for Asterisk 1.4.x
Account configuration
There are two ways to configure your account. The first way is through the hardphones menus. To achieve this follow this instruction:
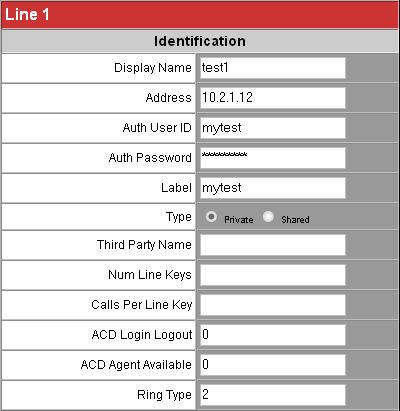
Press the `Menu` button. Navigate to `Settings` and press the button below `Select` label. Select `Advanced` tab and press the `Select` again. Enter you administration password (the default is 456). Select `Admin Settings` and press the `Select` again. Navigate to `SIP Config` and press the `Select` again. Navigate to `Line1` and press the `Select` again. From here you should navigate the different options and set the appropriate settings:
Display -> test1
Address -> 10.2.1.12
Label -> mytest
Type -> Private
Auth User ID -> mytest
Auth Password -> mytestsecret
Address -> 10.2.1.12
Label -> mytest
Type -> Private
Auth User ID -> mytest
Auth Password -> mytestsecret
In the same way you can configure your second line. When you finish with the configuration youll have to reboot your hardphone in order the changes to be applied.
The second way to configure you SIP settings is through the web interface of the SoundPoint 301. Open your web browser and type the devices IP address in your address bar. In this way you will enter the web interface. Click on the Lines tab.

You will be prompted for username and password. The default username and password are: Polycom and 456. When you enter the page just enter the appropriate data.
When you are ready click on the Submit button. The hardphone will reboot, applying the new settings.
FAQ
Q: What is the default password for SoundPoint 301?
A: The default username is Polycom and the default password is 456
Q: What VoIP protocols SoundPoint 301 supports?
A: Polycoms product supports SIP and MGCP
Q: How to alter the contrast of the display?
A: Go to the main menu. Settings->Basic->Contrast
Q: How to view the current network settings?
A: Go to the main menu. Status->Network->TCP/IP Parameters
Q: How to view the Diagnostics Graphs?
A: Go to the main menu. Status->Diagnostics->Graphs
Q: How to view the current firmware version?
A: Go to the main menu. Status->Platform->Application->Main
Q: How to reboot the hardphone?
A: Go to the main menu. Settings->Advanced->Restart Phone
Q: What documentation is available?
A: You should pay a visit to the Documentation section on the Polycom Web site for a complete list of available documents including data sheets and quick start guides. You should also check with your reseller for any custom documents developed by the Technology Partner.
Q: Does the phone come in any other colors?
A: No. The only color available is gray.
Q: What types of headsets are supported
A: All SoundPoint IP phones are compatible with amplified headsets REV E. and higher. Direct connect headsets are supported. Visit the Polycoms web site for a list of tested headsets or refer to your headset documentation for compatibility information.
Q: How does an administrator manage large quantities of phones?
A: The format and content of the configuration files are such that these files can be customized by administrator tools and used to provision phones upon boot up from an FTP or TFTP boot server. An administrator for a large group of phones can modify the configurations and push the new info to the phones by remotely rebooting the phones. Remote reboot capabilities require the support of the IP-PBX or IP Softswitch. Please contact your reseller for details.
Q: How is the time set on the phones?
A: SoundPoint IP phones uses Simple Network Time Protocol (SNTP) servers to provide accurate time. These servers can be located on the local network or available from various sites on the Internet.
Links
Polycom SoundPoint 301 Datasheet
SoundPoint IP 300 / 301 User Guide - SIP 1.5.x
SoundPoint IP 300 / 301 User Guide - SIP 1.6.x
SoundPoint IP 300 / 301 User Guide - SIP 2.0
SoundPoint IP 301 Quick Start Guide
SoundPoint IP 301 Quick User Guide
SoundPoint IP/SoundStation IP Administrators Guide, Version 2.0.x
sip.conf
extensions.conf
| Add Comment |
Latest Headlines:
-
T.38 faxing with Zoiper 2.15 is now easier than ever
section: voip software
-
Asterisk 1.4.21 Released
section: Asterisk
-
Asterisk 1.4.20 Released
section: Asterisk
-
Asterisk 1.4.20-rc2 Released
section: Asterisk
-
Asterisk 1.4.20-rc1 Now Available
section: Asterisk
- News Archives (older news)
Latest Tutorials:
-
Sending Fax from Zoiper to Zoiper using T.38
added 08/Dec/2008 18:16
-
VMAuthenticate (dialplan application)
added 01/Mar/2008 15:57
-
Siptronic ST-530
added 06/Nov/2007 17:57
-
Siemens C455 IP hardphone
added 05/Nov/2007 10:24
-
Zoiper
added 22/Oct/2007 17:53
Latest Comments:
-
https://gist.github.com/anitapsa/a49dd26...
tutorial: SIP with NAT or Firewalls
-
https://fanlist.com/LoveintheMoonlightep...
tutorial: General Installation
-
https://joyme.io/@loveinthecloudstap25
...
tutorial: General Installation
-
https://www.goodreads.com/quotes/1521035...
tutorial: SIP with NAT or Firewalls
-
https://www.goodreads.com/quotes/1521035...
tutorial: SIP with NAT or Firewalls