

3.2.33. Siptronic ST-530
Siptronic ST-530

Overview
Features
Connecting
To connect your ST-530 please look below:

If you look its sides, you can see an outlet for the handset cable and several other ones.
There are two RJ45 outlets one for the internet cable and one to connect your phone to your PC or a LAN switch in case you have more than one PCs.
Plug in your Internet cable in the WAN port
Plug the power cable and plug the power adapter in the wall-plug.
Plug the ethernet cable you found in the package into your PC and the free end is for the LAN port.
To access the Web Configuration pages you need a PC in the same network.
Setup
You need a SIP or IAX account.
Please read this short tutorial to learn how to create one.
Setting up an Asterisk account
NOTE: If you want to setup an IAX2 account, you have to edit the /etc/asterisk/iax.conf file using the same syntax
Save the changes and continue to register an extension for the user "user" ;).
In my file I added :

NOTE: Do not forget to save the changes you just made in extensions.conf .
NOTE: If you want to set up an extension for an IAX2 account, please keep in mind that the Dial extension should look like this:
For example: exten => 731,1,Dial(IAX2/user@user)
As your new user "user" is already configured, please start your Asterisk server:
# asterisk
enter the Asterisk CLI console by typing:
# asterisk -r
and reload the SIP configuration for the changes to take effect by using:
# sip reload
then reload the extensions:
# extensions reload
now you can check what you've done by:
# sip show peers
To execute shell command without exiting Asterisk, type "!", then press the [ENTER] key.
NOTE: ALL characters after ";" are interpreted by Asterisk as a comment !
ADVICE: read our tutorial about "Configuring IP Phones for use with Asterisk" for information how to make the configurations in the Asterisk's configuration files.
Web Configuration Interface
HINT: if it is 192.168.0.11 enter it as http://192.168.0.11

Use the admin account and password and press Logon
Then you will see nothing different but a fat line saying IP Phone
There is a list on the left.

This list is the index of the options screens where you can make changes, modify options & etc.
Some of these could not be accessed via the user account.
Testing
Testing by a softphone

Congratulations ! You can start using it now !.
Setting an additional account.
NOTE: If you want to setup an IAX2 account, you have to edit the /etc/asterisk/iax.conf file using the same syntax
Now save this file and open /etc/extensions.conf to add a new extension for that user.
Setting additional extensions.
NOTE: If you want to set up an extension for an IAX2 account, please keep in mind that the Dial extension should look like this:
For example: exten => 732,1,Dial(IAX2/user2@user2)
NOTE: Please do not forget to enter your Asterisk server' CLI console and reload the SIP, IAX and the EXTENSIONS!
Zoiper Setup
To use your new Zoiper softphone you need an account and you have to set it up.
This you can do following my steps:
Adding SIP account
When you do this you can set an outbound proxy, if necessary, or a voicemail extension, a STUN server, if needed. You can select if Zoiper should register this account upon applications start-up.
When you are ready click on the "Apply" button.
Registering SIP accounts
As you have already set up your hardphone and your softphone, you can make a call from the first to the second one and vice versa :)
Links
Files
This phone supports both SIP and IAX protocols. It is easy to configure and use with an Asterisk server.
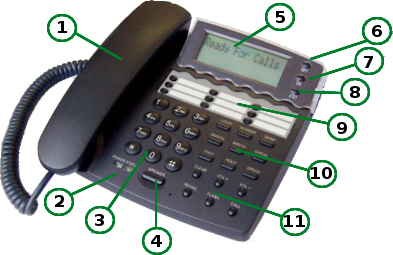
Overview
1. Handset - it is in the package along with its coiled cord
2. Status indicators - they will glow on different events
3. Keypad an ordinary 0-9 keypad with * and # keys
4. Speakerphone toggle On/Off key - allows you to speak without the handset
5. Display
6. Menu / OK key- enter menus
7. Modify key
8. Exit key - exit one level up
9. Fast dial keys
10. Dedicated keys I
11. Dedicated keys II
2. Status indicators - they will glow on different events
3. Keypad an ordinary 0-9 keypad with * and # keys
4. Speakerphone toggle On/Off key - allows you to speak without the handset
5. Display
6. Menu / OK key- enter menus
7. Modify key
8. Exit key - exit one level up
9. Fast dial keys
10. Dedicated keys I
* "Sysinfo" - shows the system information.
* "Up" - scrolls one level up
* "Down" - scrolls one level down
* "Out Call" - shows your outgoing calls
* "In Call" - shows your incoming calls
* "P Book" - shows your phone book
* "FWD" - use this key to forward the current call
* "Hold" - use this key to hold the current call
* "Record"
* "Down" - scrolls one level down
* "Out Call" - shows your outgoing calls
* "In Call" - shows your incoming calls
* "P Book" - shows your phone book
* "FWD" - use this key to forward the current call
* "Hold" - use this key to hold the current call
* "Record"
11. Dedicated keys II
* "Send - often used as "Dial" key
* "Vol +" - increase volume
* "Vol -" - decrease volume
* "Redial" - dials the last dialed number again.
* "Mute"
* "Del"
* "Vol +" - increase volume
* "Vol -" - decrease volume
* "Redial" - dials the last dialed number again.
* "Mute"
* "Del"
Features
* supported servers: 2 x SIP; 1 xIAX
* DHCP client and server
* NAT
* Firewall
* PPPoE for ADSL / cable modem
* Codecs: G.711, G.711a, G.729, G.723.1
* VAD, CNG
* Echo cancellation: G.165 complaint 16ms
* E.164 dial plan
* Call features:
- hotline
- call forward
- call transfer
- 3 way conference calls
- Call ID display
* Telnet / Keypad / Web enabled configuration
* Phonebook 100 entries
* 2xRj45 plugs LAN / WAN
Connecting
To connect your ST-530 please look below:

If you look its sides, you can see an outlet for the handset cable and several other ones.
There are two RJ45 outlets one for the internet cable and one to connect your phone to your PC or a LAN switch in case you have more than one PCs.
Plug in your Internet cable in the WAN port
Plug the power cable and plug the power adapter in the wall-plug.
Plug the ethernet cable you found in the package into your PC and the free end is for the LAN port.
To access the Web Configuration pages you need a PC in the same network.
Setup
You need a SIP or IAX account.
Please read this short tutorial to learn how to create one.
Setting up an Asterisk account
NOTE: If you are an advanced Asterisk user, please skip the following paragraph about setting up an Asterisk account to use with your phone.
First edit the sip.conf file to create the new account.
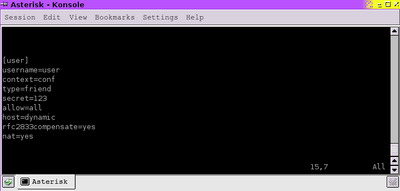
Here is what I added to my sip.conf file:
You have to edit some .conf files. Connect to your Asterisk server and find where the extensions.conf and sip.conf files are located. They are usually located at the /etc/asterisk/ directory.
Use your favorite text editor to make some changes.
Use your favorite text editor to make some changes.
First edit the sip.conf file to create the new account.
Study the example below and follow it:
Here is what I added to my sip.conf file:

[user]: needed to indicate we are registering user "user".
username=user: to determine our user's name is "user".
context=conf: defines the dial context for the user "user". Asterisk divides outgoing numbers in groups called contexts in order to separate/define different needs for different uses. In this example the user "user" is in a context called "conf".
type=friend: Users that can place AND receive calls are described as "friend". If your new user will only receive calls, use "peer" as type. For placing calls only use "user" as type.
secret=123: this is where you set up your user's password. He will use it to login/authenticate on Asterisk. It is presented in plain text, bus as only the server's administrators (you) have access to this file, there is nothing to worry about.
allow=all: means that the line which this user will use supports all audio codecs.
host=dynamic: You can define your users IP as static or dynamic, according to the type of network.
rfc2833compensate=yes: You must have this turned on, or DTMF reception will work improperly.
nat=yes: If you are placing the phone behind a NAT you must enable that.
NOTE: If you want to setup an IAX2 account, you have to edit the /etc/asterisk/iax.conf file using the same syntax
Save the changes and continue to register an extension for the user "user" ;).
Now please open the file extensions.conf file in your favorite editor to make some changes:
In my file I added :
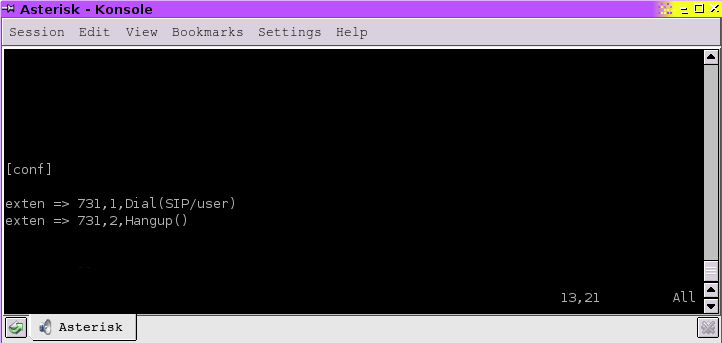
conf: it is the name of the new context.
The first line "exten => 731,1,Dial(SIP/user)" shows that if somebody dials the number 731 his call will be connected with the user "user" through SIP.
The second line "exten => 731,2,Hangup()" says that if the conversation is over then Asterisk has to hang up the line. It is needed to be sure that Asterisk will free it for the next call.
NOTE: Do not forget to save the changes you just made in extensions.conf .
NOTE: If you want to set up an extension for an IAX2 account, please keep in mind that the Dial extension should look like this:
Dial(IAX2/username@username)
For example: exten => 731,1,Dial(IAX2/user@user)
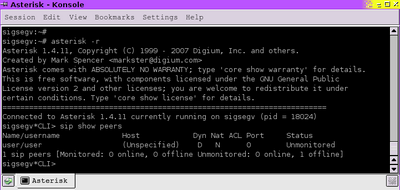
As your new user "user" is already configured, please start your Asterisk server:
# asterisk
enter the Asterisk CLI console by typing:
# asterisk -r
and reload the SIP configuration for the changes to take effect by using:
# sip reload
then reload the extensions:
# extensions reload
now you can check what you've done by:
# sip show peers
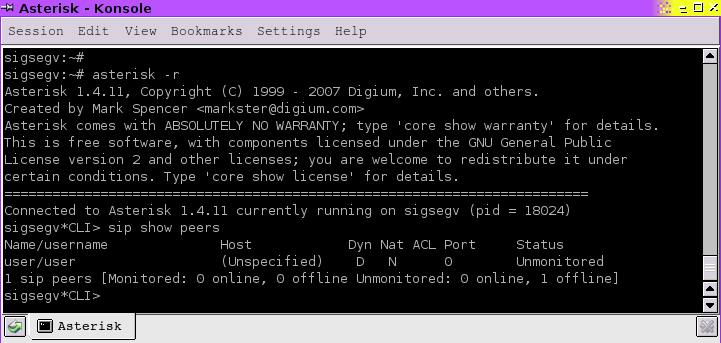
To execute shell command without exiting Asterisk, type "!", then press the [ENTER] key.
NOTE: ALL characters after ";" are interpreted by Asterisk as a comment !
ADVICE: read our tutorial about "Configuring IP Phones for use with Asterisk" for information how to make the configurations in the Asterisk's configuration files.
Web Configuration Interface
When your phone boots, please press the Sysinfo key. to obtain its IP address.
Open a web browser and enter the IP address there.
Open a web browser and enter the IP address there.
HINT: if it is 192.168.0.11 enter it as http://192.168.0.11
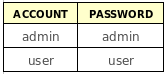
You will see a login screen.
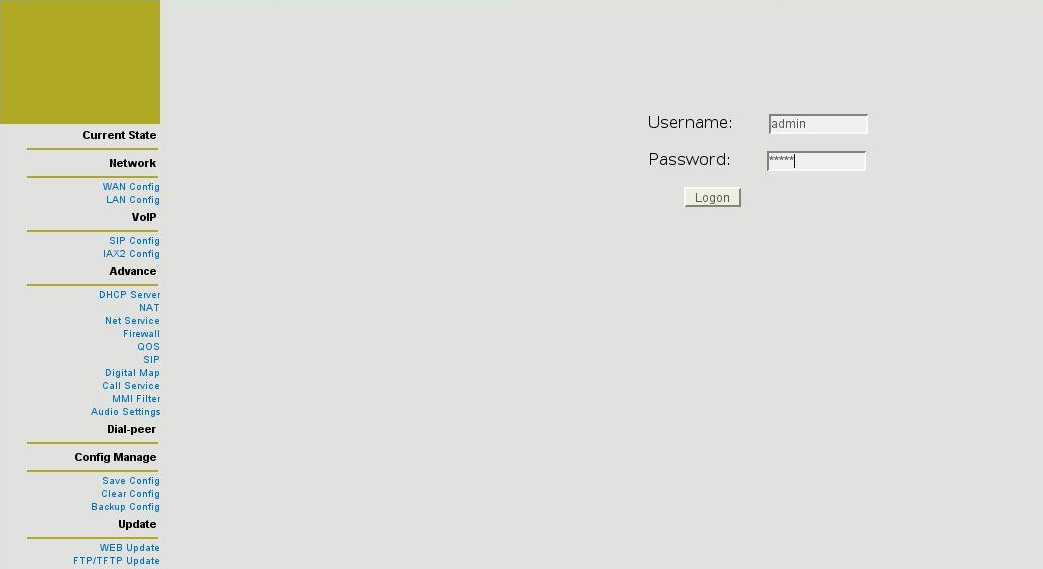
The factory passwords are as follows.
Use the admin account and password and press Logon
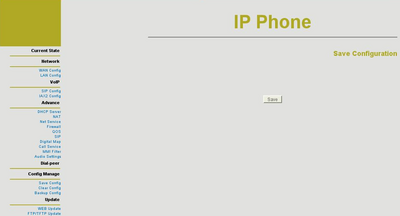
Then you will see nothing different but a fat line saying IP Phone
There is a list on the left.
This list is the index of the options screens where you can make changes, modify options & etc.
Some of these could not be accessed via the user account.
Current state
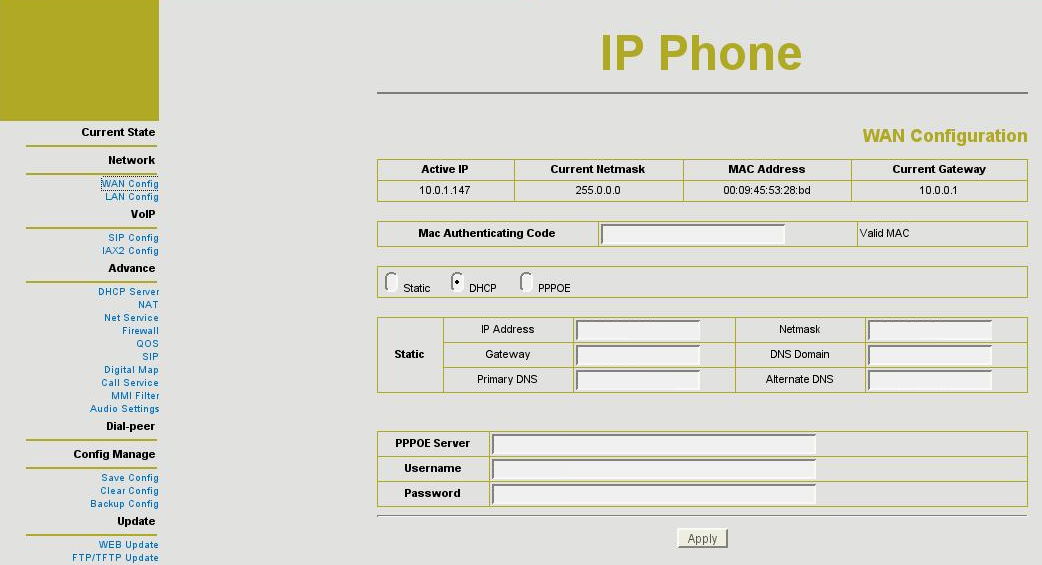
Choose the WAN Config to configure your network settings,

Here you can see what are the current network settings and change as you wish.
You can use static network configuration, a DHCP server or setup a PPPoE connection.
Please fill in some valid information if you are intending to use static network settings or a PPPoE account.
The LAN Config page
SIP Config
ADVANCE
Saving your settings
You can also download your configuration settings as a text file if you press Backup Config .
Clear all of them by choosing Clear Config.
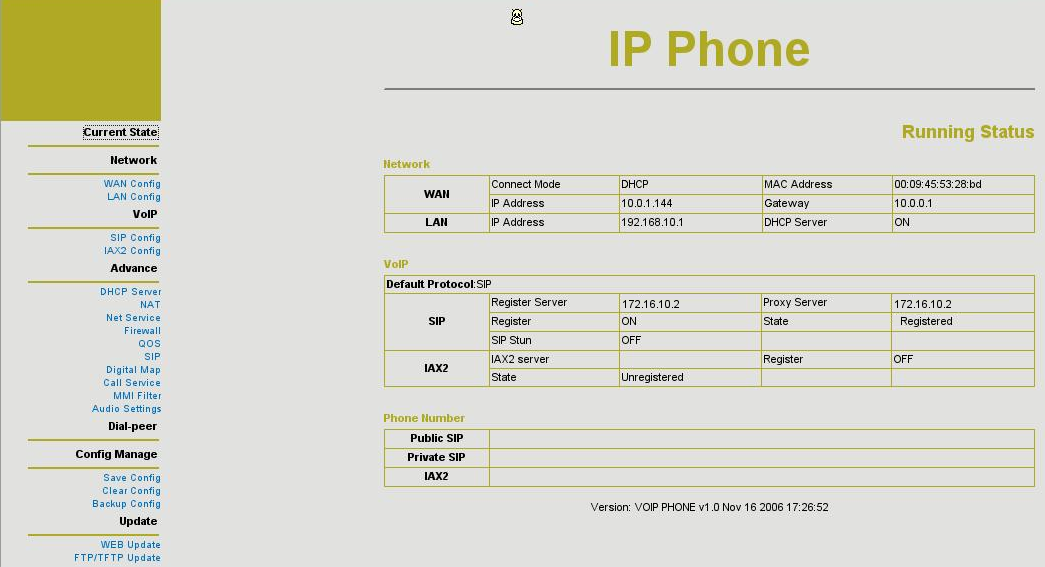
Here you can monitor the current state of your device.
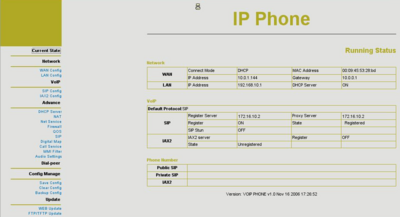
There are three tables - "Network", "VoIP", "Phone Number"
Each of them shows what is the current condition of your ip phone - the IP address, default protocol, if the account is registered or not & etc.
There are three tables - "Network", "VoIP", "Phone Number"
Each of them shows what is the current condition of your ip phone - the IP address, default protocol, if the account is registered or not & etc.
Choose the WAN Config to configure your network settings,
Here you can see what are the current network settings and change as you wish.
You can use static network configuration, a DHCP server or setup a PPPoE connection.
Please fill in some valid information if you are intending to use static network settings or a PPPoE account.
The LAN Config page
It allows you to configure desired network settings for the devices connected AFTER your phone to its LAN port.
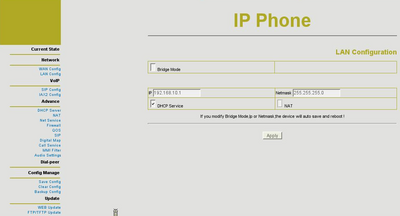
You can use bridged connection or start a DHCP server.
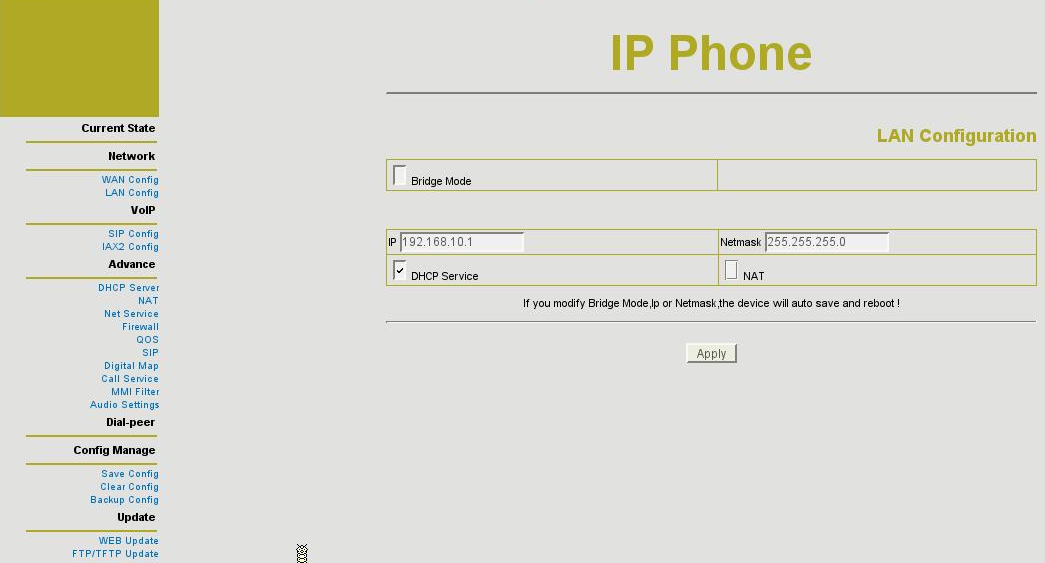
You can use bridged connection or start a DHCP server.
SIP Config
Use that page to setup your SIP account
You will have to setup your SIP account using this page or the Advanced SIP setup pages in order to make calls.
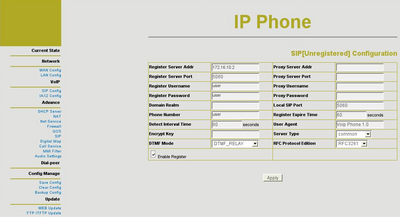
The most important fields:
"Register Server Addr" - enter your Asterisk server's IP address here
"Register Server Port" - enter desired port here, the default is 5060
"Register Username" - enter your authentication name here. This is the name you set up in the sip.conf file of your Asterisk server
"Register Password" - enter your password here, as you've set it up in the sip.conf file of your Asterisk server
"Phone Number" - if you do not have a phone number assigned to your SIP account, you may enter the username here
Fill these fields and go on to the next screen, or skip them and set up an IAX account instead.
If you want to set up an IAX2 account please open the next page IAX2 Config. and fill in the form, which is not different from the previous one.
ADVANCE
You can make more detailed setup from these pages. Not all of them are reachable from the user account.
Saving your settings
Please choose Save Config from the list on the left.
Press the Save button and you will be redirected to the Current state page.

Press the Save button and you will be redirected to the Current state page.
You can also download your configuration settings as a text file if you press Backup Config .
Clear all of them by choosing Clear Config.
Testing
Echo test

Now, if you dial 111 and say something you will hear your own voice.
To do an echo test you need to add few more lines in your extensions.conf file.
Open it with your favorite editor and edit it following the example:
Open it with your favorite editor and edit it following the example:
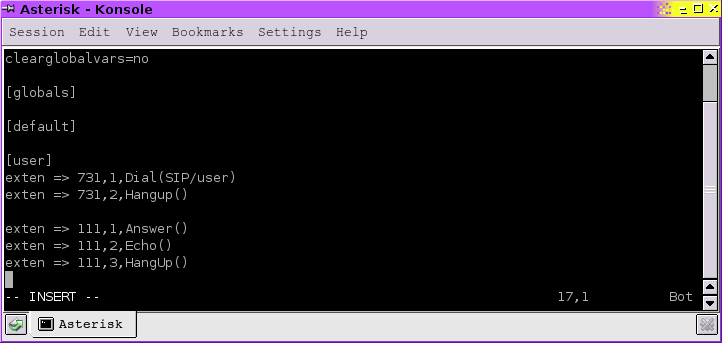
exten => 111,1,Answer(): that means that the call will be answered;
exten => 111,2,Echo(): makes possible for you to hear your own voice;
exten => 111,3,HangUp(): hangs up after you've finished the call.
exten => 111,2,Echo(): makes possible for you to hear your own voice;
exten => 111,3,HangUp(): hangs up after you've finished the call.
Now, if you dial 111 and say something you will hear your own voice.
Testing by a softphone
To make a test call with a softphone you need one.
Download Zoiper and test it for free from the download section on our website!
Download Zoiper and test it for free from the download section on our website!
Installation
.
Zoiper on Linux
If you are using Linux, please follow these steps which will lead you to a working Zoiper phone.
If you are using Linux, please follow these steps which will lead you to a working Zoiper phone.
1. Download the appropriate archive from our website;
2. choose a destination directory and extract it there;
3. open that directory and click the newly extracted file Zoiper with your mouse to run it.
You can also open a terminal in the active X-session, navigate to the target directory by using cd and execute the file by
2. choose a destination directory and extract it there;
3. open that directory and click the newly extracted file Zoiper with your mouse to run it.
You can also open a terminal in the active X-session, navigate to the target directory by using cd and execute the file by
# ./zoiper
.
Zoiper on Windows
If you are using Windows, please follow these steps which will lead you to a working Zoiper phone.
If you are using Windows, please follow these steps which will lead you to a working Zoiper phone.
1. Download the appropriate archive from our website;
2. run the newly downloaded .exe file;
3. you will see Zoiper's installation wizard. You will be expected to read a License Agreement, and maybe - agree it.
4. If you agree it, please click on the appropriate button to proceed to the next screen, to choose a destination directory for your Zoiper. You can see some information about space required by Zoiper and the available free space on your hard drive.
5. The next screen is an opportunity to choose where do you want your Zoiper Start Menu shortcuts.
6. Once again you will deal with shortcuts this time some additional ones for your Desktop and Quick Launch. If you do not want them, just unmark the appropriate checkboxes.
7. When you click the Install button the real installation will begin. You can click the Details button to see some details, but it will finish so fast that you'd hardly have enough time.
8. The next screen is the last one. It will inform you that your Zoiper installation had finished successfully.
Congratulations ! You can start using it now !.
Setting an additional account.
Please connect/open a terminal session to your Asterisk server in order to modify your /etc/asterisk/sip.conf file and add one more user account. It will be needed to use with Zoiper.
You can copy the user account, and modify it a little.
You can copy the user account, and modify it a little.
[user]:change it to [user2] to determine that we are setting an account for user2
username=user: change it too - username=user2 to determine our user's name is now "user2".
context=conf: defines the dial context for the user "user2". You should leave it as it is, as user and "user2" can be in the same context.
type=friend: leave it as it is, as you will need both of your users to place and receive calls when testing.
secret=123: you may use the same password or change it.
allow=all: you do not need to change that.
host=dynamic: you can either enter the IP address of the computer you've just installed Zoiper on or leave this as it is.
rfc2833compensate=yes: You must have this turned on, or DTMF reception will work improperly.
nat=yes: If you are placing the phone behind a NAT you must enable that.
NOTE: If you want to setup an IAX2 account, you have to edit the /etc/asterisk/iax.conf file using the same syntax
Now save this file and open /etc/extensions.conf to add a new extension for that user.
Setting additional extensions.
You added 3 lines for your first account. Now add the new ones below:
As adding user 2 to the existing context, you do not need to specify a new one.
Just add these two lines:
As adding user 2 to the existing context, you do not need to specify a new one.
Just add these two lines:
exten => 732,1,Dial(SIP/user2) shows that if somebody dials the number 732 his call will be connected with the user "user2" through SIP.
exten => 732,2,Hangup(): it is needed to be sure that when the conversation is over then Asterisk has to hang up the line. It is needed to be sure that Asterisk will free it for the next call.
exten => 732,2,Hangup(): it is needed to be sure that when the conversation is over then Asterisk has to hang up the line. It is needed to be sure that Asterisk will free it for the next call.
NOTE: If you want to set up an extension for an IAX2 account, please keep in mind that the Dial extension should look like this:
Dial(IAX2/username@username)
For example: exten => 732,1,Dial(IAX2/user2@user2)
NOTE: Please do not forget to enter your Asterisk server' CLI console and reload the SIP, IAX and the EXTENSIONS!
Zoiper Setup
To use your new Zoiper softphone you need an account and you have to set it up.
This you can do following my steps:
Accessing Options Form
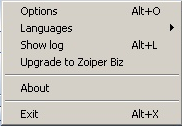

Start your Zoiper and right-click on its interface. Click on "Options" to open the configuration menu.
There is an Options button on the Zoipers interface. You can start configuration form from there too.
Use "Alt+O" if you prefer using keyboard than clicking.
Adding SIP account
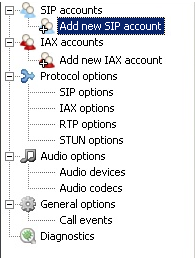
When the form starts you should click on the "Add new SIP account" label in the navigation menu to the left.
A new sub-form will appear. Enter a name the account and click on the "OK" button to create it.
The new entry will appear in the navigation menu to the left.
Click on it to continue the configuration.
On the right side of the navigation menu you can specify some options for the account.
Enter the hostname or the IP address of the Asterisk server (or other VoIP server) that you are going to use.
Enter the account name and secret that you put in the sip.conf file (user2/012). Enter a caller id and name and click on the "Apply" button to activate the changes.
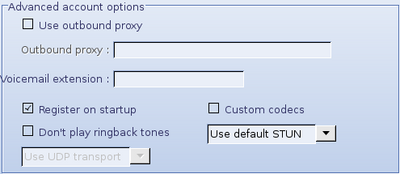
There are additional options that you might want to configure. In order to view the advanced options for the current account you should enable the checkbox with label "Show advanced options" which is located on the bottom left corner.
The new entry will appear in the navigation menu to the left.
Click on it to continue the configuration.
On the right side of the navigation menu you can specify some options for the account.
Enter the hostname or the IP address of the Asterisk server (or other VoIP server) that you are going to use.
Enter the account name and secret that you put in the sip.conf file (user2/012). Enter a caller id and name and click on the "Apply" button to activate the changes.
There are additional options that you might want to configure. In order to view the advanced options for the current account you should enable the checkbox with label "Show advanced options" which is located on the bottom left corner.

When you do this you can set an outbound proxy, if necessary, or a voicemail extension, a STUN server, if needed. You can select if Zoiper should register this account upon applications start-up.
When you are ready click on the "Apply" button.
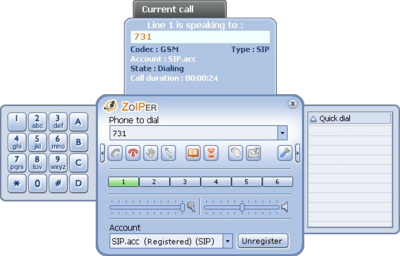
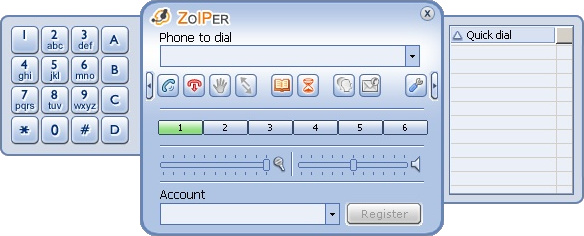
Registering SIP accounts
You should select the proper account from the drop down menu in the bottom of Zoipers interface. When you are ready with this click on the "Register" button.
You can find our Zoiper tutorial here.
As Zoiper supports IAX accounts, you can read the Zoiper tutorial and find out how to set up and use an IAX account.
You can find our Zoiper tutorial here.
As Zoiper supports IAX accounts, you can read the Zoiper tutorial and find out how to set up and use an IAX account.
As you have already set up your hardphone and your softphone, you can make a call from the first to the second one and vice versa :)

Links
Siptronic ST-530 homepage.
Our tutorial about "Configuring IP Phones for use with Asterisk"
Asterisk.org
The official Zoiper site
Zoiper tutorial
Our tutorial about "Configuring IP Phones for use with Asterisk"
Asterisk.org
The official Zoiper site
Zoiper tutorial
Files
| Add Comment |
Latest Headlines:
-
T.38 faxing with Zoiper 2.15 is now easier than ever
section: voip software
-
Asterisk 1.4.21 Released
section: Asterisk
-
Asterisk 1.4.20 Released
section: Asterisk
-
Asterisk 1.4.20-rc2 Released
section: Asterisk
-
Asterisk 1.4.20-rc1 Now Available
section: Asterisk
- News Archives (older news)
Latest Tutorials:
-
Sending Fax from Zoiper to Zoiper using T.38
added 08/Dec/2008 18:16
-
VMAuthenticate (dialplan application)
added 01/Mar/2008 15:57
-
Siptronic ST-530
added 06/Nov/2007 17:57
-
Siemens C455 IP hardphone
added 05/Nov/2007 10:24
-
Zoiper
added 22/Oct/2007 17:53
Latest Comments:
-
https://m.facebook.com/media/set/?set=a....
tutorial: Installation on Slackware
-
https://m.facebook.com/media/set/?set=a....
tutorial: Installation on Slackware
-
https://bento.me/films-voir-le-royaume-d...
tutorial: Request to schedule in the past?!?!
-
https://bento.me/films-voir-civil-war-20...
tutorial: Request to schedule in the past?!?!
-
https://bento.me/voir-navoue-jamais-2024...
tutorial: Request to schedule in the past?!?!