

6.1.2.22. Directory (dialplan application)
1. Directory - this application allows you to browse a list of extensions and to select one of them
NOTE: This application is valid for Asterisk version 1.0.9 and above.
Syntax:
List with the possible options
Purpose and usage
Prerequisites
Asterisk PBX configurations
iax.conf Configurations
voicemail.conf Configurations

extensions.conf Configurations
2. Screenshots of what you can see on the CLI of the Asterisk PBX
3. Additional information
NOTE: This application is valid for Asterisk version 1.0.9 and above.
Syntax:
Directory(vm-context[|dial-context[|options]]) ;the option and the dial-context arguments are optional
List with the possible options
f - if this option is set, then the system will ask you to enter the first three letters from the first name of the user, which is set in voicemail.conf. If this option is not set, then the system will ask you for the first three letters from the last name of the user.
Purpose and usage
You can make a directory of users in voicemail.conf file. Then thanks to the Directory application you can browse through this directory. You can choose to which user to be connected by typing the first three letters from its last or first name(it depends on whether the f option is used or not).
What can you use this application for? It could be very useful, when you want to call somebody, but you know only his/her name and you do not know the number. In this case you could call a special number. A welcome message will be played and then you will be invited to enter the first three letters from the last or the first name of the desired user.
Below, we will show you in details how to configure this application and what will happen when somebody dials it.
Prerequisites
To use this application you need a working Asterisk PBX with registered users in iax.conf, sip.conf or mgcp.conf(It depends on which protocol you would like to use) and made extensions.
To see how the application works we recommend to use our IAX softphone Idefisk. You can download it from here. Please also read our tutorial to learn how to configure it to work with Asterisk PBX.
To see how the application works we recommend to use our IAX softphone Idefisk. You can download it from here. Please also read our tutorial to learn how to configure it to work with Asterisk PBX.
Asterisk PBX configurations
NOTE: This is only an example of what for you can use this application. Of course you can use it and for other things.
iax.conf Configurations
We need three registered users in iax.conf file. This is because we are going to use the IAX2 protocol. If you want to use other protocol such as SIP or MGCP, you have to do the configurations below respectively in sip.conf or mgcp.conf.
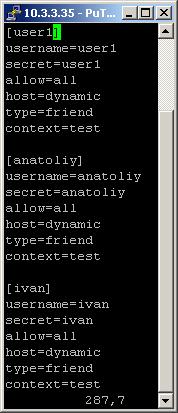
So, we have registered the users user1, anatoliy and ivan.
Type=friend means that this user can make and receive calls. Host=dynamic means that the IP is not static but dynamic through a DHCP server. Allow=all means that the line which this user will use, could support all audio codecs. Context=test - this shows that this user is working with the extensions in this context of the configuration file extensions.conf.
Type=friend means that this user can make and receive calls. Host=dynamic means that the IP is not static but dynamic through a DHCP server. Allow=all means that the line which this user will use, could support all audio codecs. Context=test - this shows that this user is working with the extensions in this context of the configuration file extensions.conf.
voicemail.conf Configurations
In order to use the Directory application, first you have to create the directory with the users. This could be made in the voicemail.conf file. Below we will show you a screenshot from our voicemail.conf file.

In this configuration file, you have to write a context. In our case the name of the context is [testmail]. In the context you have to enter the list of users, which you would like to be used by the Directory application. The way of entering a user is the following:
First you write the users mailbox number. It is followed by the => character. Then you have to write the mailboxs password. It is followed by the name and family name of the user and then his/her e-mail address. You can add and some other options, but we do not have a need from them now. You can learn more about them in our tutorial about the voicemail.conf file.
So we are ready with our directory. Now, lets take a look at the extensions.conf file.
extensions.conf Configurations
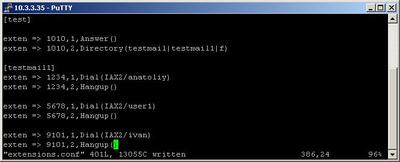
On the picture above you can see our extensions.conf file.
In our example when somebody dials 1010, the call will be answered by the Answer application. The next executed extension will be the one which contains the Directory application. The first argument in its brackets is the name of the context in voicemail.conf file. In our example this is [testmail]. The next argument has to be the name of the context, in the extensions.conf file. The one from which the connection to the users will be made. In our case this is [testmail1]. The last argument is the option f. It will cause the system to require the first three letters from the first name of the user. If this option is not used then the system will ask for the first three letters form the last name of the user.
The extensions.conf context([testmail1]) is very simple. For each user we have two extensions. The first one will use the Dial application to connect the call to the desired user through the IAX2 channel. The second one will hang up the line after the conversation is over.
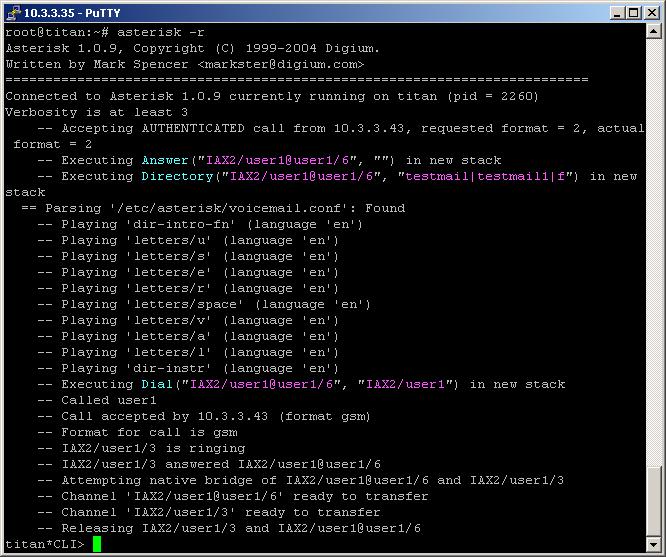
So what will happen actually?
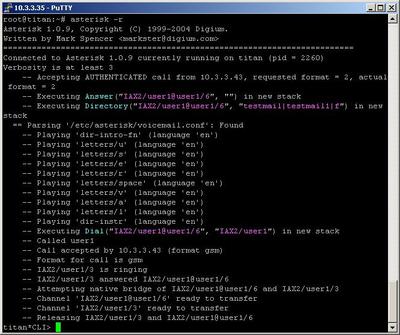
The caller dials number 1010. A welcome message will be played. It will be something like this: Welcome to the directory! Please enter the first three letters of the partys first name using the key pad. Let say that the caller wants to dial the user Anatoliy. The first three letters of his first name are ana. So the keyboard combination is 262. If the user wants to dial the user User, the combination should be 873. If the desired user is Ivan, the combination is 482. It is like the typing of an SMS. The numbers corresponds to definite letters. So, the selected user for example is Anatoliy. The caller will hear the name and the family of the user, spelled letter by letter.
What Asterisk PBX will do next, is to find the <mailbox> number, assigned to Anatoliy in the context [testmail](voicemail.conf) and to find the same number in the context [testmail1](extensions.conf). The number in our case is 1234. The extension in the context [testmail1] for this number will execute the Dial application and it will connect the caller to the user anatoliy through IAX2 channel.
What will happen if there are two or more names, which first three letters are the same?
The system will spell the first name, which matches the three letters and it will ask you whether this is the desired name. If it is the desired name you have to press 1. If it is not, then you have to press the * character. In such case the system will spell the next name, which starts with the desired first three letters.
In our example when somebody dials 1010, the call will be answered by the Answer application. The next executed extension will be the one which contains the Directory application. The first argument in its brackets is the name of the context in voicemail.conf file. In our example this is [testmail]. The next argument has to be the name of the context, in the extensions.conf file. The one from which the connection to the users will be made. In our case this is [testmail1]. The last argument is the option f. It will cause the system to require the first three letters from the first name of the user. If this option is not used then the system will ask for the first three letters form the last name of the user.
The extensions.conf context([testmail1]) is very simple. For each user we have two extensions. The first one will use the Dial application to connect the call to the desired user through the IAX2 channel. The second one will hang up the line after the conversation is over.
So what will happen actually?
The caller dials number 1010. A welcome message will be played. It will be something like this: Welcome to the directory! Please enter the first three letters of the partys first name using the key pad. Let say that the caller wants to dial the user Anatoliy. The first three letters of his first name are ana. So the keyboard combination is 262. If the user wants to dial the user User, the combination should be 873. If the desired user is Ivan, the combination is 482. It is like the typing of an SMS. The numbers corresponds to definite letters. So, the selected user for example is Anatoliy. The caller will hear the name and the family of the user, spelled letter by letter.
What Asterisk PBX will do next, is to find the <mailbox> number, assigned to Anatoliy in the context [testmail](voicemail.conf) and to find the same number in the context [testmail1](extensions.conf). The number in our case is 1234. The extension in the context [testmail1] for this number will execute the Dial application and it will connect the caller to the user anatoliy through IAX2 channel.
What will happen if there are two or more names, which first three letters are the same?
The system will spell the first name, which matches the three letters and it will ask you whether this is the desired name. If it is the desired name you have to press 1. If it is not, then you have to press the * character. In such case the system will spell the next name, which starts with the desired first three letters.
2. Screenshots of what you can see on the CLI of the Asterisk PBX
3. Additional information
For more information about extensions.conf you can check here.
For more information about iax.conf you can check here.
This application is tested with our IAX softphone Idefisk. You can download it from here. For more information about this softphone please read our tutorial.
If you would like to test this application with the SIP channel you can read our tutorials about the SIP Softphones to learn how to configure them to work with Asterisk PBX
| Add Comment |
Latest Headlines:
-
T.38 faxing with Zoiper 2.15 is now easier than ever
section: voip software
-
Asterisk 1.4.21 Released
section: Asterisk
-
Asterisk 1.4.20 Released
section: Asterisk
-
Asterisk 1.4.20-rc2 Released
section: Asterisk
-
Asterisk 1.4.20-rc1 Now Available
section: Asterisk
- News Archives (older news)
Latest Tutorials:
-
Sending Fax from Zoiper to Zoiper using T.38
added 08/Dec/2008 18:16
-
VMAuthenticate (dialplan application)
added 01/Mar/2008 15:57
-
Siptronic ST-530
added 06/Nov/2007 17:57
-
Siemens C455 IP hardphone
added 05/Nov/2007 10:24
-
Zoiper
added 22/Oct/2007 17:53
Latest Comments:
-
https://audibg.com/forum/index.php?/topi...
tutorial: asterisk.conf
-
https://www.boxingscene.com/forums/boxin...
tutorial: asterisk.conf
-
https://ia600803.us.archive.org/21/items...
tutorial: Asterisk Installation
-
https://www.finance.gov.fj/wp-content/up...
tutorial: RemoveQueueMember (dialplan application)
-
https://www.finance.gov.fj/wp-content/up...
tutorial: RemoveQueueMember (dialplan application)