

6.1.2.56. PauseQueueMember (dialplan application)
1. PauseQueueMember - this application allows you to stop, temporary, the answering of calls in the queue, from a specific member.
NOTE: This application is valid for Asterisk version 1.0.9 and above.
Syntax:
List of the possible options
Purpose and usage
Prerequisites
Asterisk PBX configurations
iax.conf and sip.conf Configurations
1) iax.conf
2)sip.conf
queues.conf Configurations


agents.conf Configurations

extensions.conf Configurations

2. Screenshots of what you can see on the CLI of the Asterisk PBX
1) What you can see on the CLI

2) What you can see after the PauseQueueMember application, if you type the CLI command show queue test.
3. Additional information
4. Uploaded files
5. Similar dialplan applications
AddQueueMember
Queue
AgentCallbackLogin
AgentLogin
RemoveQueueMember
AgentMonitorOutgoing
UnpauseQueueMember
NOTE: This application is valid for Asterisk version 1.0.9 and above.
Syntax:
PauseQueueMember(queuename[|member])
List of the possible options
Queuename - this is the name of the context in the queues.conf file, where is the member you would like to be stopped temporary.
member - it could be an interface or an agent.
member - it could be an interface or an agent.
Example:
PauseQueueMember(test|SIP/operator)
or
PauseQueuemember(test|Agent/8888)
or
PauseQueuemember(test|Agent/8888)
Purpose and usage
The purpose of this application is to allow you to stop, temporary, members or agents from the queue. They wont be able to answer the incoming calls in the queue, until the prohibition is cancelled. It can be cancel by using the UnpauseQueueMember application. The entries in the agents.conf and queues.conf files will remain. The members and the agents will be able to answer calls, as soon as, you use the UnpauseQueueMember application.
This application is very similar to the RemoveQueueMember one. The difference is that with the PauseQueueMember you have the alternative to use the UnpauseQueueMember application, when you want to restore the rights of a member. With the RemoveQueueMember application you have to reload or restart your Asterisk in order to return the member in the queue.
Below, we will give you an example.
Prerequisites
To use this application you need a working Asterisk PBX with registered users in iax.conf, sip.conf or mgcp.conf(It depends on which protocol you would like to use) and made extensions. Also, you need to create an context in the queues.conf and another one in the agents.conf file.
To see how the application works we recommend to use our IAX softphone Idefisk. You can download it from here. Please also read our tutorial to learn how to configure it to work with Asterisk PBX.
To see how the application works we recommend to use our IAX softphone Idefisk. You can download it from here. Please also read our tutorial to learn how to configure it to work with Asterisk PBX.
Asterisk PBX configurations
NOTE: This is only an example of one of the uses of this application. Of course you can use it and for other things.
iax.conf and sip.conf Configurations
We need one registered user in the iax.conf file and also another one in the sip.conf file. This is because we are going to use the IAX2 and the SIP channels. If you want to use other protocol such as MGCP, you have to do the configurations below respectively in mgcp.conf.
1) iax.conf
2)sip.conf
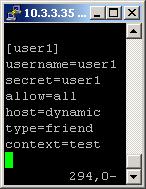
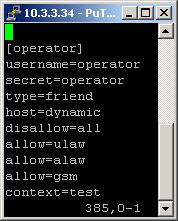
So, we have registered the user user1 in the iax.conf file and the user operator in the sip.conf file.
Type=friend means that this user can make and receive calls. Host=dynamic means that the IP is not static but dynamic through a DHCP server. Allow=all means that the line which this user will use, could support all audio codecs. Context=test - this shows that this user is working with the extensions in this context of the configuration file extensions.conf.
In the sip.conf file you can see the following option: disallow=all. This means that the line will not support any codecs. However, below this option we have allow=ulaw, allow=alaw and allow=gsm. This means that the line will support these three codecs - ulaw, alaw and gsm. It is important to write the options exactly in this order. First you write the disallow=all option and then the allow options. Otherwise, if you write the disallow option after the allow options, no codecs will be supported by the line.
queues.conf Configurations
In this file you have to say which users or agents will participate in your queue. In other words, which users or agents will be responsible for the answer of an incoming call. More about the features of this configuration file, you can learn in our tutorial about the queues.conf file.
There are two possible ways to configure the settings in this file.
The first one, is the so called "static" way. For this configuration you do not need the agents.conf file.
You will say directly, which users to answer the incoming call. In our example, we have created a context with the name [test]. In this context we have written the following: member => SIP/operator. This means that this user(operator) will be responsible for the answering of the incoming calls in the queue test. In the same way you can add even more than one user, which you would like to answer in this queue. However in our case we will have only one user. The advantage of this method, is that you do not have to use the AgentLogin or the AgentCallbackLogin applications in order to log the user in the queue. It will be logged in automatically, when it turns on its phone. The disadvantage is that this user can use, only the phone, on which it is registered. That is why the method is called "static". You can see a screenshot below.

The other way is the so called "dynamic" way. For this configuration you will need the agents.conf file.
In the section agents.conf Configurations we will show you the configurations in it and here we will explain you the configurations in queue.conf file.
Unlike the static method, here we have to write not the name of the user, but the number of the agent, as written in the agents.conf file. In our example we have written the following: member => Agent/8888. This means that we want the agent with number 8888, to answer the incoming calls in the queue test. If you decide to use this method you have to add in your dial plan either the AgentLogin or the AgentCallbackLogin application. This is necessary, because unlike the "static" method, here is not enough just to turn on your phone. The user has to log in itself in the queue, manually. The advantage of this method is that the user could log in from any place and phone, which is connected with the Asterisk PBX.You can see a screenshot below.

agents.conf Configurations
As we have mentioned above, we have to use this configuration file, if we decide to use the "dynamic" method. In this file, we have to create one or more agents. We will use them to answer the incoming calls in our queue.
The way of creating an agent is the following: agent => agentnumber,agentpassword,agentname. In our case we have written the following: agent => 8888,8888,operator. This means that we have registered an agent with number 8888, password 8888 and username operator. The agent is set in the [agents] context. The agent number will be used in the queues.conf file. Please, take a look at section queues.conf Configurations above, to learn how to do this.
The way of creating an agent is the following: agent => agentnumber,agentpassword,agentname. In our case we have written the following: agent => 8888,8888,operator. This means that we have registered an agent with number 8888, password 8888 and username operator. The agent is set in the [agents] context. The agent number will be used in the queues.conf file. Please, take a look at section queues.conf Configurations above, to learn how to do this.

extensions.conf Configurations
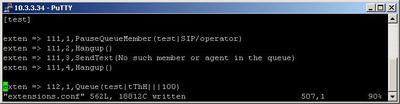
Now lets take a look at the extensions.conf file.

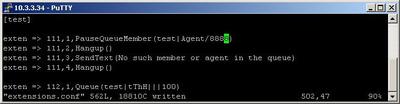
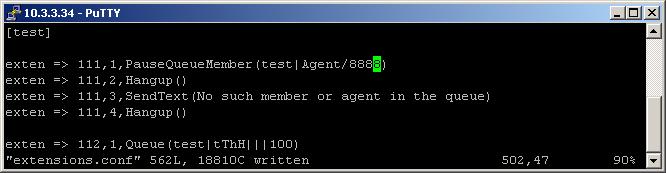
On the picture above you can see our extensions.conf file.
We have one extension with the number 112. It contains the Queue application. Due to it the incoming call will be attached to the queue [test], created in the queues.conf file.
However, in order to be answered the incoming call, we need an logged in agent. For this example we will use the static way of creating an member in the queue. We will write exactly which user we would like to answer the incoming calls in the queue and through which channel. In our case this will be the user operator through the SIP channel. Below you can see a screen shot from the queues.conf file.

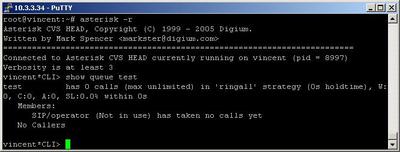
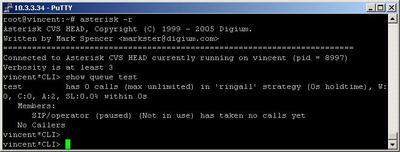
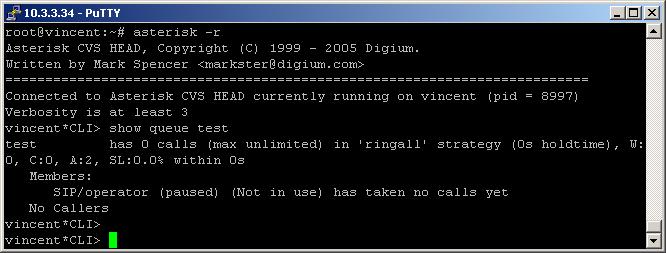
This member will be added in the queue [test], as soon as we turn on the phone where the user operator is registered. We can check which members are in the queue by typing the CLI command: show queue test. Below you can see screen shot.

Now, if you would like to pause this agent, you have to use the PauseQueueMember application. The agent wont be able to answer an incoming calls, until the next reload or restart of the Asterisk system or if you use the UnpauseQueueMember application. Actually the entry for this member will remain in the queues.conf file.
If you want to pause an agent, the procedure is absolutely the same. You have just to change the arguments in the brackets of the PauseQueueMember application. Instead of writing test|SIP/operator, you have to write test|Agent/8888(where 8888 is the agents number).
If you want to pause an agent, the procedure is absolutely the same. You have just to change the arguments in the brackets of the PauseQueueMember application. Instead of writing test|SIP/operator, you have to write test|Agent/8888(where 8888 is the agents number).
This will prevent, the agent 8888, from receiving an incoming calls from the queue [test]. In fact, the entry for this agent will remain into the agents.conf file and in the queues.conf file.
In our example you have to dial the number 111 in order to pause the member or the agent. If there is no such member or agent in the queue and an extension with priority n+101(where n is the current priority) exist, then this will be the next executed extension. In our case this extension contains the SendText application. Thanks to it the following text message will appear on the screen of the caller: No such member or agent in the queue.
Finally, in order to be sure that the Asterisk PBX will hang up the line, after the conversation is over, it is a good idea to make an extension for hanging up the line.
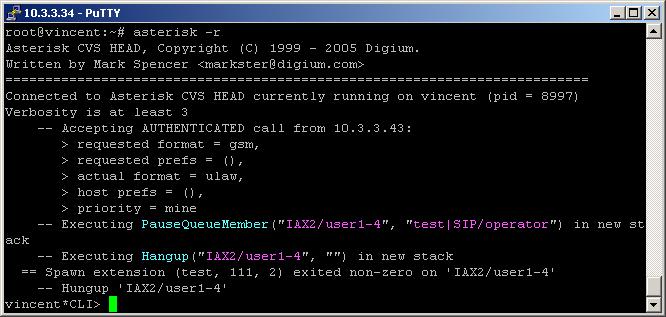
2. Screenshots of what you can see on the CLI of the Asterisk PBX
1) What you can see on the CLI
2) What you can see after the PauseQueueMember application, if you type the CLI command show queue test.
3. Additional information
For more information about extensions.conf you can check here.
For more information about iax.conf you can check here.
This application is tested with our IAX softphone Idefisk. You can download it from here. For more information about this softphone please read our tutorial.
If you would like to test this application with the SIP channel you can read our tutorials about the SIP Softphones to learn how to configure them to work with Asterisk PBX
4. Uploaded files
5. Similar dialplan applications
AddQueueMember
Queue
AgentCallbackLogin
AgentLogin
RemoveQueueMember
AgentMonitorOutgoing
UnpauseQueueMember
| Add Comment |
Latest Headlines:
-
T.38 faxing with Zoiper 2.15 is now easier than ever
section: voip software
-
Asterisk 1.4.21 Released
section: Asterisk
-
Asterisk 1.4.20 Released
section: Asterisk
-
Asterisk 1.4.20-rc2 Released
section: Asterisk
-
Asterisk 1.4.20-rc1 Now Available
section: Asterisk
- News Archives (older news)
Latest Tutorials:
-
Sending Fax from Zoiper to Zoiper using T.38
added 08/Dec/2008 18:16
-
VMAuthenticate (dialplan application)
added 01/Mar/2008 15:57
-
Siptronic ST-530
added 06/Nov/2007 17:57
-
Siemens C455 IP hardphone
added 05/Nov/2007 10:24
-
Zoiper
added 22/Oct/2007 17:53
Latest Comments:
-
Porn categories and best free porn tubes...
tutorial: RemoveQueueMember (dialplan application)
-
https://tlajomulco.gob.mx/sites/default/...
tutorial: RemoveQueueMember (dialplan application)
-
https://tlajomulco.gob.mx/sites/default/...
tutorial: RemoveQueueMember (dialplan application)
-
Hello, check out these updates:<br><br> ...
tutorial: SendImage (dialplan application)
-
https://my-romance-scammer-ep-1-uncut.re...
tutorial: Read (dialplan application)